LightSpeed Technologies 820iR User Manual
Classroom amplification system
Hide thumbs
Also See for 820iR:
- Quick manual (2 pages) ,
- User manual (40 pages) ,
- User manual (42 pages)
Table of Contents
Advertisement
Advertisement
Table of Contents

Related Manuals for LightSpeed Technologies 820iR


Summary of Contents for LightSpeed Technologies 820iR
- Page 1 820iR LightSPEED Classroom Amplification System U s e r M a n u a l...
-
Page 2: Safety Instructions
This Light- 8 2 0 i R U s e r M a n u a l This LightSPEED Power supply Care should This do not use 820iR User Manual | i... -
Page 3: Daily Use Instructions
DAILY USE INSTRUCTIONS TURN ON THE 820iR LES 820iR Classroom Amplification System POWER POSITION THE LIGHTMIC Unplug the LightMic from the charging cable and place it around your neck. Adjust the neck strap so the top of the microphone rests just LT-71 below your collarbone. -
Page 4: Table Of Contents
TABLE OF CONTENTS 820iR CLASSROOM AMPLIFICATION SYSTEM Safety Instructions Daily Use Instructions 820iR Classroom Amplification System System Components System Installation Unpacking Your System Location of the Receiver/Amplifier IR Sensor Placement IR Sensor Installation Suspended Ceiling Mount Wall/Solid Ceiling Mount Speaker Installation... -
Page 5: 820Ir Classroom Amplification System
As the teacher speaks into the LightMic pendant-style transmitter, his or her voice is transmitted to the 820iR and then amplified through the loudspeaker(s). The standard system includes the 820iR infrared receiver/ amplifier, LT-71 LightMic ter, SR-70 infrared sensor and speaker package. -
Page 6: System Components
SYSTEM COMPONENTS LES 820iR Classroom Amplification System POWER 820iR Infrared Receiver/Amplifier LT-71 LT-71 LightMic™ Transmitter Speakers and Speaker Wire Helpful Hint A VOLUME B VOLUME TV/VCR WIRELESS MICROPHONE VOLUME AUDIO INPUT VOLUME SR-70F Infrared Sensor Power Supply Optional HM-70 Handheld Microphone Keep ALL packaging materials. -
Page 7: System Installation
4. Lower the 400 or 700 sliders if a low-pitched ring is present. 5. Reduce volume if feedback is still present. 3 | 820iR Users Manual Location of the Receiver/Amplifier Place the 820iR on a flat surface like a bookcase, countertop or optional Light- SPEED wall shelf (part#AC-800WB). • Select standard wall electrical outlet. -
Page 8: Ir Sensor Installation
820iR. the other end of the 3. Connect sensor cable into one the sensor input on the back of the 820iR. the plastic mounting 1. Screw strip to a place high on the wall or in the middle of the solid ceiling. -
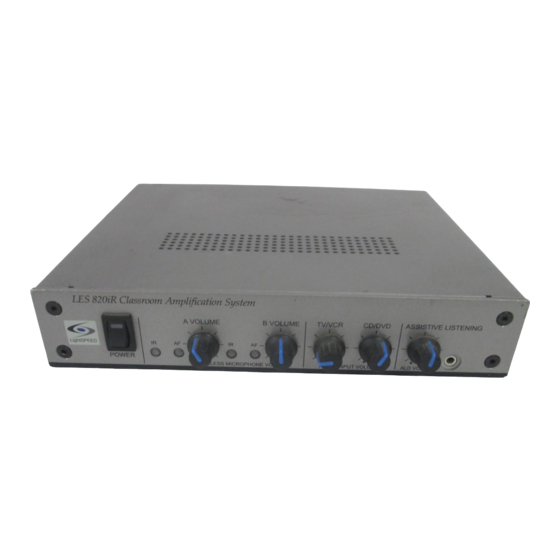
Page 9: Front Panel Controls
LES 820iR Classroom Amplification System POWER 1. POWER Switch/POWER Indicator: This switch is used to turn the 820iR ON (switch up), or OFF (switch down). When the POWER switch is in the ON position, the red POWER light will glow. -
Page 10: Rear Panel Controls
SPEAKER OUTPUTS CHARGERS POWER 1. SPEAKER OUTPUTS (1–4): binding post connectors are used to connect the 820iR to the loudspeakers. Depending on speaker, all outputs may not be used. Plug the 24 V power 2. DC POWER: supply into this jack. -
Page 11: Lightmic Controls And Connections
820iR. Charger Input (CHARGER): the charging cable from the 820iR into this jack for daily charging. The LED on the front will glow red to indicate charging. -
Page 12: Initial Setup
FINALIZING RECEIVER/AMPLIFIER CONNECTIONS 1. Ensure the power switch is in the “OFF” position and all front panel volume controls are turned fully counter-clockwise. LES 820iR Classroom Amplification System A VOLUME POWER WIRELESS MICROPHONE VOLUME 3. Connect the charging cables to yellow charging jacks labeled “CHARGERS.”... -
Page 13: System Operation
SYSTEM OPERATION TURNING THE SYSTEM ON 1. Turn the 820iR switch to the ON position. The red LED on the switch >> will glow. LT-71 3. Turn on the LightMic and set the operating channel to “A.” This microphone will be designated as the “Teacher Mic.”... -
Page 14: Charging The Lightmic
2. Connect one end of the charging cable to the LightMic and the other end to one of the charger jacks on the back of the 820iR. The LED on the front of the LightMic will glow when fully charged. -
Page 15: System Integration Diagram
SYSTEM INTEGRATION DIAGRAM Video Out DVD/VCR Video Out LightSPEED amplifier controls the volume of each source individually (one volume control for each source). 11 | 820iR User Manual Video In IR Sensor Audio Out Audio Out LES 820iR Classroom Amplification System... -
Page 16: Input From External Audio Equipment
SPEAKER OUTPUTS LES 820iR Classroom Amplification System POWER both the 820iR and audio source power on, adjust the 3. With corresponding volume control on the front panel until the desired level is achieved. NOTE! Be careful to not overdrive the volume to the loudspeaker(s), as this can cause potential damage. -
Page 17: Output To Personal Fm Transmitter
4. Adjust output. NOTE! This is to set the maximum allowable signal from the 820iR. the 820iR and ALD turned on, speak into the LightMic and slowly 5. With adjust the corresponding “ALD VOLUME” control until the appropriate audio level is attained in the ALD’s receiver headphones. -
Page 18: Operating The Optional Hm-70 Handheld Mic
8 2 0 i R U s e r M a n u a l OPERATING THE OPTIONAL HM-70 HANDHELD MIC LES 820iR Classroom Amplification System A VOLUME B VOLUME TV/VCR CD/DVD ASSISTIVE LISTENING POWER WIRELESS MICROPHONE VOLUME ALD VOLUME... -
Page 20: Tips On Classroom Amplification
A normal conversational speech level wearing jewelry that may rub or bump against batteries each night. When recharged nightly, operating 8 2 0 i R U s e r M a n u a l 820iR Users Manual | 16... -
Page 21: Troubleshooting Guide
Next to the IR signal light is the AF signal light. This light will flicker (green) as audio is picked up by the microphone indicating activity. that the speaker wires • Confirm are connected correctly to the back of the 820iR (refer to speaker install guide). -
Page 22: System Specifications
Mic Level 3.5 mm Line Level 3.5 mm 1.375” x .75” x 4.625” 3.7 oz Up to 1600 square feet per sensor 50 ft., Plenum-rated Ceiling clip/Wall bracket 4.25” (Diam.) x 2.0” (H) 4.5 oz 820iR User Manual | 18... -
Page 23: Individual Components And Optional Accessories
SPEAKERS Optional Accessories MC-TK250LTM BC-TXLT AC-800WB CA-RCA6 CA-RCA24 CA-MMC3535 CA-MMC2535 19 | 820iR User Manual Description Infrared receiver/amplifier/mixer w/built-in charger LightMic ™ rechargeable microphone/transmitter w/lavaliere cord, batteries and charging cable Handheld microphone/transmitter w/batteries and charging cable Rechargeable AA battery (Nickel Metal Hydride) -
Page 24: User Notes
Record your system serial numbers and purchase information. This is helpful when ordering additional components, accessories, and/or warranty service. Components Serial Number 820iR Microphones Sensors Speakers Purchase Information Your School/Organization District Purchase Date SENSOR INPUT SENSOR SHORT Invoice 820iR User Manual | 20... -
Page 25: User Notes
8 2 0 i R U s e r M a n u a l USER NOTES 21 | 820iR User Manual... - Page 26 L i g h t S P E E D Te c h n o l o g i es , I nc . 1 15 09 S W H e rm a n R d Tu a l a t in , OR 9 7 0 6 2 8 00 .
Need help?
Do you have a question about the 820iR and is the answer not in the manual?
Questions and answers