Table of Contents
Advertisement
Advertisement
Table of Contents

Related Manuals for EasyGate Terrier 200


Summary of Contents for EasyGate Terrier 200
- Page 1 Installation Guide by EasyGate for Terrier Swing Gate System...
- Page 2 Before each order is dispatched a check sheet is completed. Please notify EasyGate immediately if you suspect missing parts. No claims accepted unless notified within 7 days of delivery.
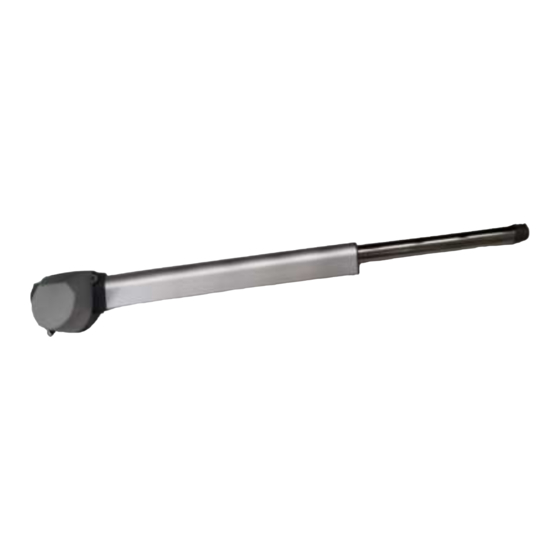
- Page 3 Post bracket pin and wear bush location in tongue plate hole Arm to Gate bracket with pin and crub screw Key to assist opening clutch lever Fully Open ram retracted. Fully Closed ram extended.
- Page 4 Fitting the arm cable: Step 1 – Remove the cover screws. Step 2 – Push up the cover slightly. Step 3 – Some models have a 2 x tab system while others have 3 x screw fasteners. On the back, insert a flat head screw driver in slots, push forward tabs to release hooks Step 5 –...
- Page 5 the arm if you get the symbols wrong. When you test the system and note an arm is going the wrong way, just rotate the arm cable wires that are configured wrong and test again until you get both arms opening on first power up of the board. Wiring Single Gate: Connect arm cable to blocks labelled Mo1+, Mo1- on the control board.
- Page 6 The system is delivered with the AC transformer and the DC battery male connector plugs (white). You will need to plug these in to the matching female connector blocks on the corner of the control board. A clip is fitted to the side of the plug to correctly align with the female plug side catcher.
- Page 7 Double Gate System Learn: This must be completed when first installing the control board so the computer can understand the parameters of the new installation. 1. Check you have SW2 Set DIP switch 8 to ON 2. Press the SYS-learn button which is next to the RF-learn button in the top left corner.
- Page 8 7. After the systems learn has finished, LED no.1 should be revert back to flashing in bursts. You have successfully set up your gate opener kit and is now ready for testing. Dip switch overview: The switches that you will see to the left hand side on the control board are separated into 3 banks and are marked (printed on board) with SW1 SW2 or SW3.
- Page 9 The auto close timer will start when the gates are either fully open or stopped through a cycle. Activating a remote or any other device will override the timer and close the gates immediately. Pedestrian Mode This function will open one side of the gates to a 45 degree angle to allow pedestrians through.
- Page 10 The following functions are all on SW3 (bottom block of switches). Switches: 1 and 2 This function is to select the command button of the remote Option 1 (default setting for double gate) 1 on Button A for double gate operation Button B for single gate operation 2 off Option 2 (setting for single gate)
- Page 11 LED lights LED lights: These lights serve several functions. They are the indicators to see if the system is operating as it should or not. LED 1 System Two flashes followed by 1 second pause = standby mode for learning double gate.
- Page 12 Run the wire from normally closed to FO2 and change SW3 switch 3 to ON. Installing optional wired Probe or vehicle detector to double gates: Note: EasyGate recommend installing safety beams in conjunction with a probe to stop the gates hitting an obstruction such as a vehicle while in a closing cycle.
- Page 13 4. FO + 13.7v Dc positive (+) power for photo beams 5. G Ground/Negative/common (-). 6. D Activation devises on a dual gate operator such as Keypad, exit button, intercom, dial to open. Used with terminal 8. 7. S Activation single gate operator 8.
- Page 14 You have correctly wired the wires from the rams to the control box. Blue light Ensure you have waited the full 10 seconds. stays on Try depowering and repowering the board. permanently If it still keeps glowing please call or email EasyGate. Receiver may need replacement.
- Page 15 Make sure there is nothing obstructing the antenna such as the power cable or motor cables. EasyGate Warranty Terms and Conditions PLEASE READ THE FOLLOWING TERMS AND CONDITIONS OF USE CAREFULLY. Warranty: This is a “Back to Base Warranty”...
- Page 16 EasyGate will not accept any product for which prior authorisation has not been used. EasyGate will pay return shipping costs (equal to Fastway ground rate) to the owner of item(s) repaired under warranty. This warranty does not cover removal or installation of the product in any way or form.
- Page 17 Products which EASYGATE determine to be repairable will be repaired and returned. A set fee which EASYGATE have been predetermined and which may be revised from time to time will be charged for each unit repaired. Products which EASYGATE determines not repairable will be replaced by the nearest equivalent product available at that time.
- Page 18 The expected battery life is a function of the device environment, usage and type. Ambient conditions such as high humidity, high or low temperatures, or large temperature fluctuations may reduce the expected battery life. Low battery condition will cause the system in low power condition and having problem functioning as usual.
Need help?
Do you have a question about the Terrier 200 and is the answer not in the manual?
Questions and answers