Table of Contents
Advertisement
Quick Links
Advertisement
Table of Contents

Subscribe to Our Youtube Channel
Related Manuals for Swift M10L Series


Summary of Contents for Swift M10L Series
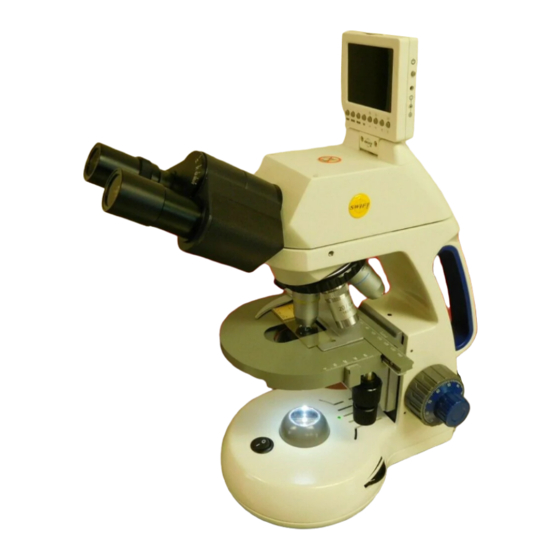
- Page 2 SWIFT M10L SERIES Power Button USB Port Your Swift M10L microscope is an instrument of precision, both optically and mechanically, that is designed to last a lifetime with a Analog Output A/C Adapter minimum amount of maintenance. It is built to the highest and...
-
Page 3: Components Of The Microscope
The standard condenser of down arc motion similar to binoculars. the M10L Series has a Numerical Aperture of 1.25 with filter carrier and iris diaphragm. It is mounted in a sub–stage focusing assembly STAGE –... - Page 4 Be sure the objective “clicks” into position. gathering capabilities. The concept may be compared to the F-stop (If you do not have a Swift M10L with Binocular Head please omit in photographic lenses. Generally speaking, N.A. values of less than step 4-5.)
-
Page 5: Phase Contrast
Battery- NP-40, 3.7V, 550 mAh, LI-ION. Built-in battery lasts up to 2 40XRD and 100XRD objectives. hours on continuous use with full charge Digital Out- Through USB 2.0 to Swift Software at 640 x 480 Screen- Flip up 3’ TFT Screen OIL IMMERSION Optical Head- Binocular with WF10X 20mm Eyepieces or Monocular It is desirable to use immersion oil with the 100XRD objective. - Page 6 OPERATING THE BUILT-IN CAMERA 1. Press the POWER button (9) on the right side of the LCD screen to turn the camera on. A Swift logo will briefly appear on the screen. 2. The camera will start in the default still image capture mode.
-
Page 7: Video Capture Mode
number) icons are also displayed on the LCD screen as a quick To access the camera’s setting menu, press the MENU button(3). reference, but will not appear on a captured image. Inside the menu for each of the three modes, you can manually set certain camera parameters such as the ISO, color, white balance, saturation, and sharpness as well as other camera functions. - Page 8 STILL IMAGE CAPTURE MENU SIZE – Selects the megapixel size of still images. The M10’s built-in camera has a maximum true resolution of 5 megapixels. The pixels of still images taken with the size setting above 5 megapixels will be Setting Default Options...
-
Page 9: Playback Menu
TIME STAMP – The default setting is set to OFF. If desired, a date or PLAYBACK MENU date and time setting can be selected to display information on the LCD screen and captured image. Setting Default Options Delete Next Single Menu VIDEO CAPTURE MENU Select... -
Page 10: Using The Camera With A Computer
SETUP MENU (ALL THREE MODES) SYSTEM RESET – Used to reset all the settings to the factory default setting. Setting Default Options LIGHT FREQUENCY – This setting should be set to 60HZ for users in Format Next Cancel the United States. Menu Execute TV OUTPUT –... - Page 11 The software should To change the USB setting to hard drive mode: automatically detect and install the correct “Swift DV Camera” driver. Click on MENU (3), then click on RIGHT button (7) to access the Setup mode.
-
Page 12: Battery Charging
Then, wipe gently with a soft lens tissue moistened with lens cleaning solution or distilled water, and dry It is important that you only use a Swift replacement LED because it immediately with a clean lens paper. - Page 13 F. PROBLEM – Unable to bring specimen into focus with any components. This servicing should only be done by an authorized objective Swift technician. The Limited Lifetime Warranty will be null and CORRECTION – Eye lens of the eyepiece is partially unscrewed. void if disassembled by any unauthorized repair person.
Need help?
Do you have a question about the M10L Series and is the answer not in the manual?
Questions and answers