Table of Contents
Advertisement
Advertisement
Table of Contents

Related Manuals for COMPRO IP540


Summary of Contents for COMPRO IP540
- Page 1 V2-111102...
- Page 2 The information in this document is subject to change without notice. COMPRO reserves the right to make revisions to this publication without obligation to notify any person or entity of any such changes.
-
Page 3: Table Of Contents
Accessing via Seedonk IM Client (IP540 / 540P only) ....... . - Page 4 IP540(P) / IP570(P) Available Video Modes ........
-
Page 5: Chapter 1: Important Notices
Chapter 1: Important Notices Chapter 1: Important Notices Regulatory Notice This device complies with Part 15 of the FCC Rules. Operation is subject to the following two conditions: (1) This device may not cause harmful interference, and (2) This device must accept any interference received, including interference that may cause undesired operation. -
Page 6: About This Manual
About this Manual This manual is only intended for the users of Compro IP540, IP540P, IP570, and IP570P network camera. The content of this manual is applicable to firmware release 2.0. The camera on the cover of this manual is a Compro IP540, which slightly differs with IP570 in appearance. -
Page 7: Chapter 2: Product Overview
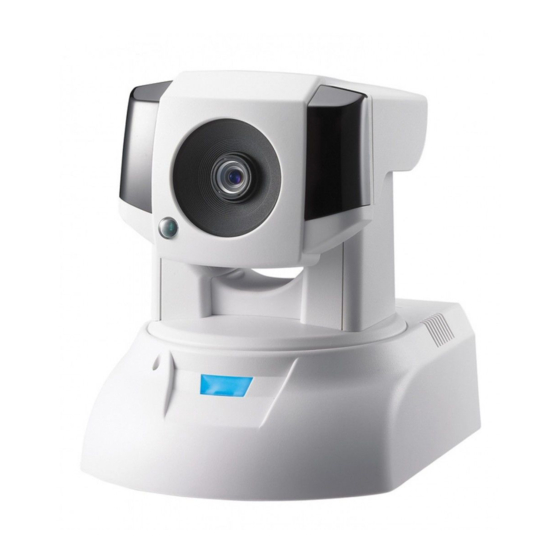
Package Contents IP540(P) Please check the package contents on your hand. If anything is missing, please don’t hesitate to contact your local distributor. Figure 2-1. IP540(P) Parts list IP540(P) Network Camera RJ-45 LAN Cable Power adapter (12V, 2A) & cable... -
Page 8: Ip570(P)
Compro IP540(P) / IP570(P) IP570(P) Figure 2-2. IP570(P) Parts list IP570(P) Network Camera RJ-45 LAN Cable Power adapter (12V, 2A) & cable Quick installation guide Installation CD Wall mount plate Screw for ceiling mount x 5, screw mount x 5, camera pad x4... -
Page 9: Features
Chapter 2: Product Overview Features IP540(P) Full Feature List • 1/3” CMOS progressive scan sensor • Pan, Tilt (Pan of 340 degrees, Tilt of 100 degrees), 2x precision zoom • Day and night functionality with mechanical IR cut filter switching • Built-in IR LED x12 • Supports real-time H.264, MPEG-4 and MJPEG compression (Triple Codec) • Supports dual simultaneous streams • Video frame rate is up to 30 frames per second at 640x480 resolution • Smart motion detection • Two-way audio with built-in MIC (External speaker not included) • Supports UPnP (Universal plug and play) • Supports 10/100 802.3/Ethernet • Optional 802.11b/g/n WLAN upgrade module • Supports local storage (microSD/SDHC) • Easy to install with IP Cam Wizard • Remote Monitoring on 3GPP Mobile • Bundled with a powerful 32-channel IP video management software --- ComproView®... -
Page 10: Ip570(P) Full Feature List
Compro IP540(P) / IP570(P) IP570(P) Full Feature List • 1/4” CMOS progressive scan sensor • Pan, Tilt (pan of 340 degrees, tilt of 100 degrees), 12x optical zoom with auto focus • Day and night functionality with mechanical IR cut filter switching • Built-in IR LED x12 • Supports real-time H.264, MPEG-4 and MJPEG compression (Triple Codec) • Supports dual simultaneous streams • Video frame rate is up to 15 frames per second at 1280 x 1024 resolution • Smart motion detection • Two-way audio with built-in MIC (External speaker not included) • Supports UPnP (Universal plug and play) • Supports10/100 802.3/Ethernet • Optional 802.11b/g/n WLAN upgrade module • Supports local storage (microSD/SDHC) • Easy to Install with IP Cam Wizard • Remote Monitoring from 3GPP Mobile • Bundle with powerful 32-channel IP video management software --- ComproView®... -
Page 11: Application Diagram
NAS products, please refer to the "List of Compatible DVR / NVR / NAS" section in the appendix. Compro does not guarantee other DVR / NVR / NAS products not on the list will work properly with this Compro IP camera. Application Diagram... -
Page 12: Camera Layout
Compro IP540(P) / IP570(P) Camera Layout Figure 2-4. Front and rear view of IP540(P) and 570(P) IR LEDs x 6 (12 in total) Light sensor Lens IR LEDs x 6 (12 in total) Microphone LED status indicator USB wireless adaptor connector... -
Page 13: Led Status Indicator
Chapter 2: Product Overview LED Status Indicator The LED status indicator comprises a blue LED and a red LED. When you turn on the power of IP camera, the camera will start booting procedure. The IR LEDs and LED status indicator will be lit in the following patterns: 1. - Page 14 Compro IP540(P) / IP570(P) 2-8 LED Status Indicator...
-
Page 15: Chapter 3: Installation
Ethernet port on camera: Use the bundled RJ-45 LAN cable to connect the Ethernet port of the IP camera to the Ethernet port of your hub/router. Wireless adaptor (Optional accessory): If you have purchased the Compro USB wireless adaptor for wireless connection, please plug it into the USB port of IP camera for wireless reception. -
Page 16: Connecting Using Poe Function
Compro IP540(P) / IP570(P) Connecting Using PoE Function The illustrations below show how to connect your IP540(P) and IP570(P) camera using PoE function. Figure 3-2. Connecting to a PoE-capable LAN switch Figure 3-3. Connecting to a LAN switch through a midspan... -
Page 17: Wireless Connection
Chapter 3: Installtion Wireless Connection With the Compro wireless adaptor installed, you can also opt for using the wireless connection. Please keep in mind that you can only have one active connection at a given time, either through LAN or wireless network. -
Page 18: Mounting On The Wall Or Ceiling
Compro IP540(P) / IP570(P) Mounting on the Wall or Ceiling S crew the mounting plate into the Secure the IP camera to the ceiling plate. mounting surface. Loosen the screw that fixes the trapezoid- Let the two tips of the fastening bracket shaped fastening bracket. -
Page 19: Installing Camera Software
Chapter 3: Installtion Installing Camera Software The software for your camera includes 3 major parts which help you use the IP camera: 1. iWizard Installer and iWizard utility: For quick and convenient setup of your IP camera software/ hardware in steps. Having installed the iWizard, double-click on the iWizard icon on your desktop and it will start to search the available cameras on your network. -
Page 20: Running The Iwizard Setup Utility
Running the iWizard Setup Utility Before running Compro software, make sure you have the IP Camera beside you. To , insert the installation CD supplied with the camera into your CD-ROM drive, and the iWizard utility will start and guide you during the installation process of the hardware and software for your IP camera. - Page 21 Chapter 3: Installtion 4. Please check the camera name, date and time setting. Figure 3-10. Camera configuration 5. When you come to Seedonk setup, you can choose whether to use Seedonk service and remotely access your camera through Seedonk platform. If you choose [Yes], you may opt for connecting to a different Seedonk server by pressing the [Advanced Settings] button, and entering...
- Page 22 Compro IP540(P) / IP570(P) 7. Select the orientation of your IP camera in Standard Position or Ceiling Mount. You can also change the orientation setting later via the Web client. Figure 3-13. Orientation configuration 8. (If you are not using wireless connection,...
- Page 23 Figure 3-16. iDDNS configuration Note: The iDDNS is a free DDNS (Dynamic Domain Name Service) service from Compro. If you are using floating IP, you need to apply for DDNS service to create a hostname that links to your home or office IP address, which provides easy- to-remember URL for quick access to your camera anytime, anywhere.
- Page 24 Compro IP540(P) / IP570(P) 12. (Sk ip this par t if you didn’t enable Seedonk service.) After successful login to your Seedonk account, you may choose to download and install Seedonk Messenger by clicking on [Download and Install]. Click on [Next] if you wish to do so later manually.
- Page 25 Figure 3-21. Multi-camera setup Note: The iDDNS is a free DDNS (Dynamic Domain Name Service) service from Compro. If you are using floating IP, you need to apply for DDNS service to create a hostname that links to your home or office IP address, which provides easy-to-remember URL for quick access to your camera anytime, anywhere. After successfully creating the iDDNS address name, you can then enter http://xxx (input by yourself ).iddns.
-
Page 26: Running The Iwizard Installer (For Ip570 / 570P)
Running the iWizard Installer (for IP570 / 570P) Before running Compro software, make sure you have the IP Camera beside you. To install the software, insert the installation CD supplied with the camera into your CD-ROM drive, and the iWizard installer will start and guide you during the installation process of the hardware and software for your IP camera. - Page 27 Chapter 3: Installtion 3. The wizard will search for all the available cameras on your local network. You can select your camera from the list on the left side, and it will display live view video and camera information on the right side. (You can double-check the device name and the MAC ID.
- Page 28 Standard Position or Ceiling Mount. You can also change the orientation setting later via the Web client. Figure 3-28. Orientation setting 8. If you already connected the Compro wireless adaptor to your IP camera, please click “Yes” and it will search for available SSID on wireless AP/router, and then select the AP/router you want to use.
- Page 29 Chapter 3: Installtion 9. Select the encryption method and input passphrase, and then select the IP address configuration. (For Wireless connection only.) Figure 3-30. Wireless network setting 10. 1If you want to use iDDNS service, please click [Yes] and input your desired address name.
- Page 30 Compro IP540(P) / IP570(P) 12. 1System will save and reload the new settings onto your camera. Figure 3-33. Saving changes 13. 1The iWizard will run network diagnosis based on your network settings and alert you for inappropriate settings. Figure 3-34. System diagnostics 14.
-
Page 31: Installing Comproview
Chapter 3: Installtion Note: The iDDNS is a free DDNS (Dynamic Domain Name Service) service from Compro. If you are using floating IP, you need to apply for DDNS service to create a hostname that links to your home or office IP address, which provides easy-to-remember URL for quick access to your camera anytime, anywhere. After successfully creating the iDDNS address name, you can then enter http://xxx (input by yourself ).iddns. - Page 32 Compro IP540(P) / IP570(P) 3-18 Installing Camera Software...
-
Page 33: Chapter 4: Accessing The Camera
Chapter 4: Accessing the Camera Viewing Live Video Stream Compro provides a wide range of access method to view the live video streamed from the IP camera that you’ve just installed, which includes: 1. View the live video stream from a single camera on the Internet Explorer (WebVUer) which comes with all Desktop/Laptop/Nettop/Tablet with Windows system. -
Page 34: Accessing Via Pc Web Browser
Compro IP540(P) / IP570(P) Accessing via PC Web Browser User can check the current condition of the monitored area via Internet Explorer which comes with all Windows-based computer system. Please refer to the following steps to watch live view on WebVUer: 1. - Page 35 Chapter 4: Accessing the Camera Figure 4-4. Unblocking application 7. Now you can start using web browser for watching live video and controlling IP camera. Figure 4-5. Live view Note: If your IP camera falls behind a firewall, you will need to enable ports 80 and 554 (default ports used by camera) in your firewall and link them to the internal IP address of the camera.
-
Page 36: Accessing Via Iphone/Smartphone
Compro IP540(P) / IP570(P) Accessing via iPhone/Smartphone As long as your device comes with built-in web browser, you can use the device to view the live video stream via MJPEG mode (video only), which is supported on popular smartphones like iPhone and a wide range of mobile devices such as NB, Mobil Phone, PDA, Nettop, MID, Tablet. -
Page 37: Accessing Via 3Gpp Mobile Phone
DDNS address that you’ve obtained in the installation process). Note: Compro Technology does not guarantee the successful viewing of live video on every 3GPP-compatible cell phone. You may also need to consult with the mobile network service provider about the usage and availability of 3GPP format. -
Page 38: Accessing Via Seedonk Im Client (Ip540 / 540P Only)
The following figure shows a successful login to Seedonk IM platform. You will find your camera under "My Cameras". Double-click on any on-line camera to view its live video. For complete user guide of Seedonk IM, visit "http://web.seedonk.com/support.html". 4-6 Accessing via Seedonk IM Client (IP540 / 540P only) - Page 39 When this happens, simply move your camera to a different location where lighting condition is better or turn on the back light compensation if there are lights shining behind the objects in the scene. Accessing via Seedonk IM Client (IP540 / 540P only)
- Page 40 Compro IP540(P) / IP570(P)
-
Page 41: Chapter 5: Live View
On the first page, you can see the basic control panel at the top and on the left-hand side, and the live video on the right-hand side. Click on the icon to hide or show the control panels. Figure 5-1. Layout of LiveView page for IP540(P) Left control panel – Here provides control over video recording, voice communication, I/O, Pan/Tilt and snapshot. -
Page 42: Page Layout - 570(P)
Compro IP540(P) / IP570(P) Page Layout - 570(P) Figure 5-2. Layout of LiveView page for IP570(P) Left control panel – Here provides control over video recording, voice communication, I/O, Pan/Tilt and snapshot. Video stream selection – You can switch between Stream-1 and Stream-2. (Stream-2 can be enabled and configured in video settings.) -
Page 43: Icons On Live View Page
Compro Use the Compro Home Solution Control button to switch on/off the alert. Home Solu- The Home Solution Control is for use with Compro CM600 Wireless I/O Control tion Control Module and HS-R200 Wireless Remote Control. Left Panel... - Page 44 Compro IP540(P) / IP570(P) Icon Name Description Click the Snapshot button to take a snapshot of live view. A preview Snapshot window will pop up once you hit this button (the size of the preview image is forced as 320 by 240 pixels). Right-click on the preview image and choose ‘Save Image As’...
- Page 45 Chapter 5: Live View Enable Digital Zoom To enable the digital zoom feature: 1. Click on the magnifier icon located on the lower-left corner of real-time video display, and then the digital zoom control window will pop up. 2. Check [Enable Digital Zoom] option and set desired zoom ratio by dragging the adjustment bar. Then set the area to be enlarged by dragging the black square shown on preview window.
-
Page 46: Voice Communication
Compro IP540(P) / IP570(P) Voice Communication Pressing the [Communicate] button allows you to speak into your PC microphone and broadcast through the camera’s speaker or audio line out. To talk through the external speaker connected to the IP camera, place your cursor on the [Communicate] button (the tool tip “Right click to setup” will appear), and right-click on the button and select [Setting] to choose input device and input source. -
Page 47: Chapter 6: Configuration
Chapter 6: Configuration Chapter 6: Configuration Main Setup Page The main setup screen consists of all the basic settings options. To access the main setup page, click on the Setup button seen at the top-right location in the live view screen. Then the setup page as shown in the picture below will be displayed. -
Page 48: Video Settings
1 and 2, refer to the appendix section of this manual Active Bandwidth Management When network congestion occurs, Compro network camera can intelligently force down current user-defined video bit rate and bring it back when healthy bandwidth level becomes available. This avoids video quality deterioration and frame dropping by restricting network camera from sending excessive amount of data while the network is already overloaded. -
Page 49: Video Preference
Chapter 6: Configuration If you have set up the iDDNS service during the installation process of your camera, you can directly enter the web address of your IP camera in a web browser and don’t bother with remembering the IP address. (In this case, replace the “compromk” what you entered in the installation process.) Video Preference Click on the bar to set your video preference (to stress motion smoothness or image quality). -
Page 50: White Balance
Compro IP540(P) / IP570(P) White Balance This controls the white balance of IP camera; available selection: Auto (default), Sunny, Cloudy, Fluorescent Lamp, and Incandescent Lamp. Backlight Compensation This lets you turn on and off backlight compensation and select the strength of the backlight compensation , which when enabled can make the subject appear clearer in the image when the backlight is too bright or the subject is too dark. -
Page 51: Embed Text And Image
Chapter 6: Configuration Normal lighting Without IR LEDs With IR LEDs (Indoor lights on) (Indoor lights off ) (Indoor lights off ) Figure 6-4. Effect of IR LEDs The IR light sensor allows the camera to detect the lighting condition of the environment and to turn on/ off the IR LEDs accordingly; you can configure the IR light operation mode to be [Auto], [Always On], [Always Off ], or [By Schedule]. -
Page 52: Audio Settings
Compro IP540(P) / IP570(P) Audio Settings Here you can choose to enable or disable the audio and also adjust the volume. The Stream-2 audio is only available for adjustment when you turn on the 2nd Stream and check its 3GPP mode option under video settings. -
Page 53: Network Settings
Wireless If you have installed the Compro wireless adaptor on your IP camera, you can set up the wireless connection in this page. To connect wirelessly, please check the [Use Wireless First] box to give priority to wireless connection when LAN network is also connected. And then provide the necessary information on IP address (to obtain IP address via DHCP or use specified static IP address) and access point. -
Page 54: Network Diagnostic
Compro IP540(P) / IP570(P) Figure 6-10. Wireless settings Network Diagnostic Here you can run the diagnostic tool for your current network settings and it will show error messages if any anomaly is detected. For further information on error messages, please refer to the FAQ section in this manual or visit www.comprosecurity.com for more information. -
Page 55: Advanced
If your operating system supports Universal Plug and Play (UPnP™) feature and DHCP is in use on current network, the Compro IP camera will be automatically detected and added to My Network Places on your Windows. If you want to use the IGD (Internet Gateway Device) protocol on your IP camera, please check the [Enable IGD] box to enable it. -
Page 56: Rtp
Compro IP540(P) / IP570(P) If you want to broadcast video using RTP (Real-time Transport Protocol), you can set up the port range, video/ audio address and port number here. PTZ Control Here you can manage your camera’s preset view points (or positions). And configure the patrol mode to let the camera patrol the preset positions. -
Page 57: Patrol Mode
Chapter 6: Configuration Figure 6-12. Add preset points Delete Preset Points If you would like to delete a preset point, please select a preset point from the “Available Preset Points“ list. Before you press [Remove] to delete the selected preset point, you can click [Go To] button to move the camera to the selected position and check the view in the preview window. -
Page 58: Event Setup
Compro IP540(P) / IP570(P) to apply settings. Figure 6-15. Patrol ordering Patrol Speed Here you can configure the PTZ camera patrol speed to be fast, medium, or slow. After you have chosen a speed setting, please press [Save] button. Event Setup... - Page 59 Chapter 6: Configuration FTP Server Here provides the configuration for the FTP server that will receive snapshot taken at the occurrence of triggered events by the camera. Image Server This allows you to set the name of the saved snapshots taken by the camera when an event is triggered. Notify Server Here is for entering the message that notifies ComproView® of an event being triggered. This feature is meant for integration with ComproView®.
-
Page 60: Trigger Setup
Compro IP540(P) / IP570(P) 7. Note: You must have enough credit at Clickatell in order to send SMS message. Trigger Setup You can create, modify, or delete event triggers and set the trigger mechanism to be by Schedule, Motion/ Audio Detection or I/O ports. When creating an event trigger by schedule, you can set up scheduled time and period. -
Page 61: Recording Setup
Having made your settings, press [Save] button to save your settings. To playback the recordings stored on the SD card, go to [Setup], and click on [Recording History] located on the left menu. Note: • This Compro IP camera uses a First In First Out storage method.Once the SD card is full, the oldest file will automatically be overwritten. • If you want to record video clips of detected motion to SD card, you need to set at least a motion detection region before setting up event-based recording in "Recording Setup."... -
Page 62: Date Setup
Compro IP540(P) / IP570(P) Function Key Description Playback Click to download then playback Download Click to download the video clip on your PC Protect/Unprotect Selected clip(s) will never be erased Select All / Deselect / Delete File management Table 6-4. Management of recording history... -
Page 63: Chapter 7: Event Viewer
Chapter 7: Event Viewer Chapter 7: Event Viewer Here displays the history of past events successfully triggered by motion, I/O, schedule, audio detection, tampering, or loitering (types of events depend on camera support). Click on any type of event trigger to view its history. - Page 64 Compro IP540(P) / IP570(P)
-
Page 65: Chapter 8: Maintenance
Figure 8-2. System log Maintenance You can reboot your IP camera, change UI language, export/import user profile, reset to factory default settings, or update camera firmware (please download the latest firmware from Compro’s website first). Figure 8-3. Maintenance page Information... -
Page 66: Profile Management
Firmware Update You can download the latest firmware from Compro’s website (www.comprosecurity.com/en/supports.html). After downloading the firmware, please log in to the setup page of your IP camera and click [Maintenance] on the top menu and then look for firmware update section. Press the [Browse] button and locate the downloaded firmware file and press [Upgrade] button to update camera firmware. -
Page 67: Chapter 9: Troubleshooting
Anytime you need to re-configure your IP camera, you can simply double-click on the iWizard icon (or tap Start > Programs > ComproView® > iWizard) to open the iWizard configuration tool. During the configuration, the iWizard will automatically scan for all of the available Compro IP surveillance products installed on your LAN network (even if they are not on the same subnet). The scanning generally takes around 1 minute to complete, and once the scanning completes, you will see the available IP cameras populating the list. -
Page 68: Reset To The Factory Default Settings
2. After about 5 more seconds, the Status Indicator comes on again. It means that the IP camera has been successfully restored to the factory default settings. 3. Please re-configure the Compro IP camera using the iWizard. Once the camera is reset, it takes 1 minute to reboot. Please wait and start the IP Camera Utility later again to scan for the camera. -
Page 69: Trouble With The Activex Client
Once you launch the Internet Explorer and enter the camera’s IP address in the address field, you'll be asked for the user name and password combination (the default is admin/admin, case sensitive). Note: The ActiveX component developed by Compro currently only runs on Microsoft Internet Explorer 6 or greater. It does not function on other web browsers for the time being. - Page 70 If you’ve gone through all of the above steps but are still unable to obtain video/audio on the browser, please close all the browser windows and delete the "Compro Embedded" folder found under "(OS Drive):\Program Files". (If you're using 64-bit windows, look for "(OS Drive):\Program Files (x86)".) And open your web browser and log in to the IP camera again to reinstall the ActiveX client.
-
Page 71: Trouble With Remote Viewing On Browser
Chapter 9: Troubleshooting Trouble with Remote Viewing on Browser You can view your camera video remotely over the Internet. If you have problem in remote viewing, refer to the section below for preliminary troubleshooting. 192.168.0.1 61.220.20.16 Static IP (LAN) IP Camera NAT (Network Internet Address Translation) - Page 72 Compro IP540(P) / IP570(P) Figure 9-10. Port forwarding Having taken the above steps, you should be able to log in to the IP camera from a remote location by entering the DDNS address or the static IP address in the location field of a web browser (depending on your configuration).
-
Page 73: Ddns Configuration
Figure 9-11. DDNS setup in iWizard The iDDNS is a free DDNS service provided by Compro. If you are using dynamic IP, you may want to apply for DDNS (Dynamic Domain Name Server) service to create a hostname that links to the IP address on your home or office network. -
Page 74: Symptoms, Causes And Solutions
Compro IP540(P) / IP570(P) Symptoms, Causes and Solutions Listed below are some other frequently asked questions and their answers. Symptom Possible Cause/Solution The camera is not powered on. Make sure the camera has been powered on for over 1 minute and its LED status indicator is lit. - Page 75 When this happens, try waiting a few minutes for the new IP information to be updated onto DNS server and then retry connection, or try to decrease the TTL value. If it still doesn't work, refer to other possible causes and solutions, or contact Compro for technical support.
- Page 76 Compro IP540(P) / IP570(P) Symptom Possible Cause/Solution Network connection error. The network connection test verifies if the camera has successfully connected to the LAN network. When the diagnosis result shows a red exclamation mark icon ( ) for network connection, it means the camera fails to connect to LAN network. Check if the LAN cable is securely connected to the Ethernet port of the camera and to your hub/router, or check if the LAN cable is functioning normally.
- Page 77 Chapter 9: Troubleshooting Symptom Possible Cause/Solution Network bandwidth is insufficient. Without sufficient bandwidth, video quality will deteriorate and image errors like pixelation or frame-drop may occur. When you view your camera remotely from the Internet, your camera needs sufficient upload bandwidth to transmit video stream and you need sufficient download bandwidth to download video stream at the remote location.
- Page 78 Compro IP540(P) / IP570(P) Symptom Possible Cause/Solution The network quality is not good. Seeing lots of gray images in live view mode indicates that many data packets which carry video data are dropped during the transmission. This might be caused by network congestion, wireless congestion, or the limited upload/download bandwidth of your network.
-
Page 79: Contacting Compro Technical Support
The speed class of SD card does not meet the requirement. You might experience minor issue in video recording when your SD card does not meet the writing speed requirement. Compro recommends using class 4 or above SD card for video recording. - Page 80 Compro IP540(P) / IP570(P) 9-14 Contacting Compro Technical Support...
-
Page 81: Chapter 10: Technical Specifications
Chapter 10: Technical Specifications Chapter 10: Technical Specifications Technical Specifications Category IP540 / IP540P IP570 / IP570P Image Sensor 1/3" CMOS Megapixel sensor 1/4" CMOS Megapixel sensor • Focal Length: 4.0 mm • Focal Length: 3.8(W)~45.6(T) mm Lens • Max Aperture Ratio: F1.5 • Max Aperture Ratio: 1.65(W)~F360(T) • Fixed iris • Auto Iris Pan range -170°... - Page 82 Compro IP540(P) / IP570(P) Category IP540 / IP540P IP570 / IP570P • Multiple channel management • iDDNS service for dynamic IP and desktop shortcut creation Software ComproView® • Recording search and playback • Scheduled and event-driven management • Smart Detection • Monitor the current condition of the monitored area via Internet Explorer Internet Explorer • Capture a still image and save it in JPG format on PC (ActiveX) • Alarm and event management: FTP, I/O alarm, server notification and email Browser • PC, Laptop, Nettop, MID, or Tablet with IE/ActiveX support. Supported Devices • Mobile phone, iPhone/iPod, PDA support in MJPEG mode. MJPEG Mode...
-
Page 83: Chapter 11: Appendix
Chapter 11: Appendix Chapter 11: Appendix Examples of Port Forwarding Setup on Routers The following are some examples of router configurations with reagrd to port forwarding / port mapping / virtual server on some popular router products. You can also log on to portforward.com for more port forwarding setup examples on other router products. - Page 84 Compro IP540(P) / IP570(P) ASUS RT-N12 Virtual Server Setup D-Link DIR-655 Virtual Serve Setup 11-2 Examples of Port Forwarding Setup on Routers...
- Page 85 Chapter 11: Appendix TP-LINK wr1043n Virtual Server Setup Examples of Port Forwarding Setup on Routers 11-3...
-
Page 86: Ip540(P) / Ip570(P) Available Video Modes
Below table shows the 3rd-party DVR / NVR / NAS products (running RTSP, Real Time Streaming Protocol) that are supported by Compro Network Cameras and their corresponding firmware version. Compro does not guarantee other DVR / NVR / NAS products not listed in the table will work properly with Compro IP cameras. Solution Partner... -
Page 87: List Of Figures And Tables
Figure 2-4. Front and rear view of IP540(P) and 570(P) ....... - Page 88 Compro IP540(P) / IP570(P) Figure 6-2. Video Settings ........... . . 6-2 Figure 6-3.
- Page 89 Chapter 11: Appendix 11-7...
- Page 90 . c o m p r o s e c u r i t y . c o m Compro Technology Head Office 3F, No.12, Alley 6, Lane 45, Pao Shin Road, Hsintien District, New Taipei City 231, Taiwan...
Need help?
Do you have a question about the IP540 and is the answer not in the manual?
Questions and answers