Table of Contents
Advertisement
Advertisement
Table of Contents

Related Manuals for Nuvico DT-E400


Summary of Contents for Nuvico DT-E400
-
Page 2: Table Of Contents
Setup Guide of HDoCS™ Digital Video Recorder NUVICO TABLE OF CONTENTS DVR Pre-Installation ............................3 DVR Installation .............................. 3 Hard Disk Installation ............................. 3 Front Panels ..............................5 Rear Panels ............................... 6 Peripheral Connections ........................... 6 RS-485 and Controller Connection ......................6 Specifications .............................. -
Page 3: Hard Disk Installation
Setup Guide of HDoCS™ Digital Video Recorder NUVICO Regulatory information FCC information This equipment has been tested and found to comply with the limits for a digital device, pursuant compliance: to part 15 of the FCC Rules. These limits are designed to provide reasonable protection against harmful interference when the equipment is operated in a commercial environment. -
Page 4: Dvr Pre-Installation
Setup Guide of HDoCS™ Digital Video Recorder NUVICO Thank you for purchasing our product. If there is any question or request, please do not hesitate to contact dealer. This manual is applicable to the models listed in the following table. -
Page 5: Front Panels
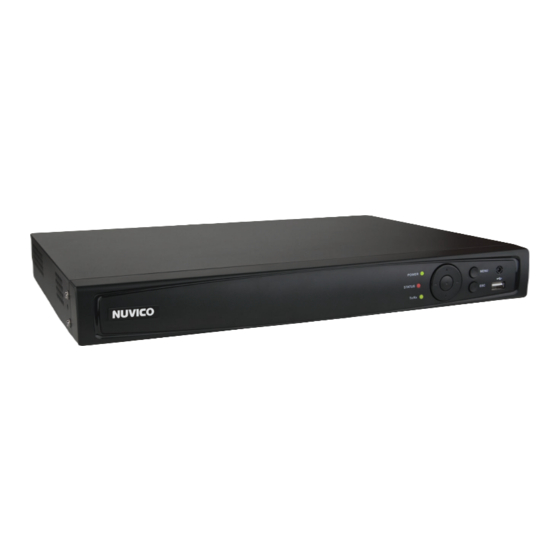
Setup Guide of HDoCS™ Digital Video Recorder NUVICO Front Panels Figure 1. 1 Front Panel of 8-ch DVR Table 1. 1 Description of Front Panel Name Function Description Power indicator turns yellow when the power switch on the real POWER panel is turned on. -
Page 6: Rear Panels
Setup Guide of HDoCS™ Digital Video Recorder NUVICO Rear Panels 8-ch DVR Item Description VIDEO IN BNC interface for TVI and analog video input. AUDIO IN RCA connector AUDIO OUT RCA connector DB15 connector for VGA output. Display local video output and menu. -
Page 7: Specifications
Setup Guide of HDoCS™ Digital Video Recorder NUVICO To connect PTZ to the DVR: 1. Disconnect pluggable block from the RS-485 terminal block. 2. Press and hold the orange part of the pluggable block; insert signal cables into slots and release the orange part. -
Page 8: Hdd Storage Calculation Chart
Setup Guide of HDoCS™ Digital Video Recorder NUVICO Dual-stream Support Stream type Video, Video & Audio Synchronous playback 4-ch 8-ch 16-ch Playback resolution 1080P / 720P / VGA / WD1 / 4CIF / CIF / QVGA / QCIF Remote connections... -
Page 9: Accessing By Web Browser
Setup Guide of HDoCS™ Digital Video Recorder NUVICO 1536K 675M 1792K 787M 2048K 900M 4096K 1800M 8192K 3600M 16384K 7200M Please note that supplied values for storage space used are just for reference. Storage space used is estimated by formulas and may have some deviation from actual value. -
Page 10: Live View
Setup Guide of HDoCS™ Digital Video Recorder NUVICO Live View The live view interface appears by default when you log in the device. Interface Introduction Name Description Displays the list of channels and the playing and recording status of each Channel List channel. -
Page 11: Recording
Setup Guide of HDoCS™ Digital Video Recorder NUVICO Start/Stop all live view Next page Capture pictures in the live view Open/Close audio mode Start/Stop all recording Start/Stop two-way Audio Enable/Disable digital zoom Adjust volume Recording Before you start Make sure the device is connected with HDD or network disk, and the HDD or network disk has been initialized for the first time to use. -
Page 12: Playback
Setup Guide of HDoCS™ Digital Video Recorder NUVICO Playback Interface Introduction Name Description Channel List Displays the list of channels and the playing status of each channel. Playback Window Displays the image of channel. Play Control Bar: Play control operations are supported. -
Page 13: Log
Setup Guide of HDoCS™ Digital Video Recorder NUVICO Play/Pause Stop Slow down Speed up Play by single frame Capture Stop all playback Download Video clip Open/Close audio Full Screen Reverse play 6. You can drag the progress bar with the mouse to locate the exact playback point. You can also input the time... -
Page 14: Menu Operation
Setup Guide of HDoCS™ Digital Video Recorder NUVICO Menu Operation Menu Structure The menu structure of the HDoCS™ DVR is shown below: Menu Playback Export Manual Record Camera Maintenance Shutdown Configuration System Info Normal Record General Schedule General Logout Event... -
Page 15: Live View
Setup Guide of HDoCS™ Digital Video Recorder NUVICO 2. Select the Shutdown button. 3. Click the Yes button. 4. Turn off the power switch on the rear panel when the note appears. After the device starting up, the wizard will guide you through the basic settings, including edting password, date and time settings, network settings, HDD initializing, and recording. -
Page 16: Record Settings
Setup Guide of HDoCS™ Digital Video Recorder NUVICO Record Settings Before you start: Make sure that the HDD has already been installed. If not, please install a HDD and initialize it. You may refer to the user manual for detailed information. -
Page 17: Playback
Setup Guide of HDoCS™ Digital Video Recorder NUVICO OPTION 2: 1. Enter the Playback menu and select Playback from the menu. 2. Playback management. The toolbar in the bottom part of Playback interface can be used to control playing process. -
Page 18: Backup
Setup Guide of HDoCS™ Digital Video Recorder NUVICO Backup Recorded files can be backed up to various devices, such as USB flash drives, USB HDDs or USB DVD writers. To export recorded files: 1. Enter Video Export interface. Choose the channel(s) you want to back up and click the Quick Export button. - Page 19 Setup Guide of HDoCS™ Digital Video Recorder NUVICO...
- Page 20 The NUVICO logo is the registered trademark of NUVICO. © Copyright 2014, NUVICO. All rights reserved. Version 11.14...
Need help?
Do you have a question about the DT-E400 and is the answer not in the manual?
Questions and answers