3M mp8749 User Manual
Hide thumbs
Also See for mp8749:
- Operator's manual (43 pages) ,
- Technical manual (12 pages) ,
- Basic technical manual (12 pages)
Table of Contents
Advertisement
Quick Links
Liquid Crystal Projector
USER'S MANUAL
USER'S MANUAL
Thank you for purchasing this liquid crystal projector.
WARNING • Please read the accompanying manual "SAFETY
INSTRUCTIONS" and this "USER'S MANUAL" thoroughly to ensure correct
usage through understanding. After reading, store this instruction manual in a
safe place for future reference.
NOTE
• The information in this manual is subject to change without notice.
• The manufacturer assumes no responsibility for any errors that may appear in this manual
• The reproduction, transmission or use of this document or contents is not permitted without
express written authority.
TRADEMARK ACKNOWLEDGMENT : PS/2, VGA and XGA are registered trademarks of
International Business Machines Corporation. Apple, Mac and ADB are registered trademarks of
Apple Computer, Inc. VESA and SVGA are trademarks of the Video Electronics Standard
Association. Windows is a registered trademark of Microsoft Corporation. Carefully observe the
trademarks and registered trademarks of all companies, even when not mentioned.
CONTENTS
CONTENTS
FEATURES .......................................2
BEFORE USE ...................................2
Contents of Package ..............................2
Part Names.............................................3
Loading the Batteries..............................5
Fixing the Handle....................................5
INSTALLATION ................................6
Angle Adjustment ...................................6
Cabling ...................................................7
Power Connection ..................................8
Example of System Setup ......................8
Plug & Play .............................................8
OPERATIONS ...................................9
Power ON ..................................................9
Power OFF ..............................................9
Basic Operation ....................................10
Setup Menu ..........................................12
Input Menu............................................13
Image Menu..........................................14
Options Menu .......................................15
No Signal Menu ....................................16
MAINTENANCE ..............................17
Lamp.....................................................17
Air Filter ................................................19
Other Maintenance ...............................19
Page
TROUBLESHOOTING ....................20
OSD Message ......................................20
Indicators Message ..............................21
Symptom ..............................................22
SPECIFICATIONS...........................23
ACCESSORIES...............................24
.......................................................................................
TABLES
Table 1. Installation Reference.................6
Table 2. Cabling .......................................7
Table 3. Basic Operations ......................10
Table 4. Setup Menu ..............................12
Table 5. Input Menu................................13
Table 6. Image Menu..............................14
Table 7. Options Menu ...........................15
Table 8. No Signal Menu ........................16
Table 9. OSD Message ..........................20
Table 10. Indicator Message ..................21
Table 11. Symptom ................................22
Table 12. Specifications .........................23
.......................................................................................
For "TECHNICAL" and "REGULATORY
NOTICE", see the end of this manual.
Page
ENGLISH-1
Advertisement
Table of Contents

Subscribe to Our Youtube Channel
Related Manuals for 3M mp8749


Summary of Contents for 3M mp8749
-
Page 1: Table Of Contents
Liquid Crystal Projector USER'S MANUAL USER'S MANUAL Thank you for purchasing this liquid crystal projector. WARNING • Please read the accompanying manual “SAFETY INSTRUCTIONS” and this “USER'S MANUAL” thoroughly to ensure correct usage through understanding. After reading, store this instruction manual in a safe place for future reference. -
Page 2: Features
Multimedia Projector Mouse cable Video/Audio Cable Component Operator's Guide MP8749 Projecteur multimedia - Guide de L' opérateur MP8749 Multimedia-Projektor - Benutzerhandbuch MP8749 Proyector de Multimedia - Guía del usuario MP8749 Proiettore Multimediale - Guida dell' operatore MP8749 Multimedia Projector - Gebruiksaanwijzing... -
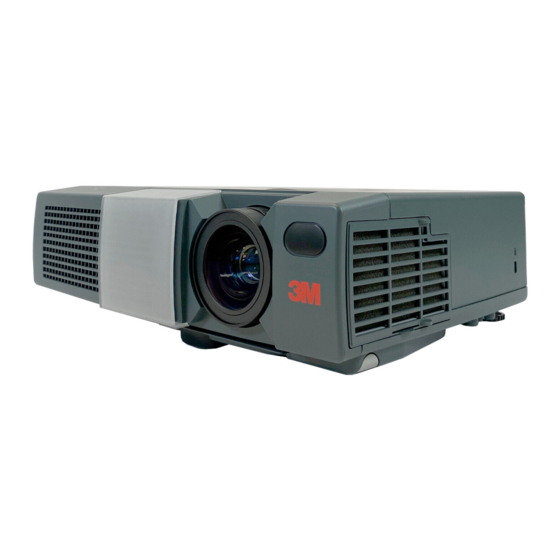
Page 3: Part Names
Part Names Speaker Zoom Knob Focus Ring Handle Hook Remote Control Sensor Power Switch Lens AC Inlet Slide Lens Door (to the Power Cord) Foot Adjuster Ventilation Openings (Intake) FRONT/LEFT VIEW OF THE PROJECTOR Control Panel (Refer to P.9 "OPERATIONS") INPUT Button STANDBY/ON Button LAMP Indicator... -
Page 4: Remote Control Transmitter
Part Names (continued) BLANK Button STANDBY/ON Button LASER Button VIDEO Button RGB Button Disk Pad MOUSE / RIGHT Button Used to operate the Used to click the right mouse shift function and mouse button. left click function. KEYSTONE Button AUTO Button RESET Button MENU Button Used to click the right... -
Page 5: Loading The Batteries
Loading the Batteries Install the AA batteries into the remote control transmitter. 1. Remove the battery cover. Push the knob while lifting up the battery cover. 2. Load the batteries. Make sure the plus and minus poles are correctly oriented. 3. -
Page 6: Installation
INSTALLATION INSTALLATION Installation of the Projector and Screen Refer to the drawing and table below for determining of the screen size and projection distance. The projection distances shown in the table below are for full size (1024 x 768 dots). a: Distance from the projector to the screen. -
Page 7: Cabling
Cabling Refer to the table below for connecting each terminal of the projector to each device. Table 2. Cabling Function Terminal Cable RGB IN 1 Accessory RGB cable or optional RGB RGB input RGB IN 2 cable with D-sub 15-pin shrink jack and inch thread screws RGB output RGB OUT... -
Page 8: Power Connection
Power Connection Use the correct one of the enclosed power cords depending on the power outlet to be used. Connect the AC inlet of the projector to the power outlet firmly by the power cord. CAUTION • Be carful in handling the power Power cord according to instructions of the outlet... -
Page 9: Operations
OPERATIONS OPERATIONS STANDBY/ BLANK STANDBY/ON LASER STANDBY/ON Button ON Button VIDEO POWER Indicator Zoom Knob AUTO MENU KEYSTONE Focus Ring MENU SELECT POSITION RESET FREEZE MAGNIFY MUTE Power Switch VOLUME Slide Lens Door Power ON 1. Check that the power cord is connected correctly. 2. -
Page 10: Basic Operation
Basic Operation The basic operations shown in Table 3 is performed from the supplied remote control transmitter or the projector control panel. Items indicated by (*) may be used from the control panel. Table 3 . Basic Operation Item Description Select Input Signal ( : Press the INPUT button. - Page 11 Items indicated by (*) may be used from the control panel. Table 3. Basic Operation (continued) Item Description VOLUME Volume Adjustment : Press the VOLUME button. Set/Clear Mute Mode : Press the MUTE button. No sound is heard in the MUTE MUTE mode.
-
Page 12: Setup Menu
Setup Menu The following adjustments and settings are possible when SETUP is selected at the top of the menu. Part of the Setup menu differs between RGB input and video input. Select an item with the buttons, and start operation. Use the Single menu to reduce menu size (see Table 3, MENU SELECT). SETUP INPUT IMAGE... -
Page 13: Input Menu
Input Menu SETUP INPUT IMAGE OPT. The following functions are available when INPUT is selected on the EXECUTE AUTO menu. Select an item with the buttons, and start or stop CANCEL VIDEO operation with the buttons. The function indicated (**) are HDTV effective on video input mode only, not on RGB input mode. -
Page 14: Image Menu
Image Menu SETUP INPUT IMAGE OPT. The following adjustments and settings are available when IMAGE is BLANK MIRROR selected on the menu. Select an item with the buttons, and START UP GAMMA COLOR TEMP start or stop operation with the buttons. -
Page 15: Options Menu
Options Menu SETUP INPUT IMAGE OPT. The following adjustments and settings are available when OPT. is VOLUME MENU COLOR selected on the menu. Select an item with the buttons, and LANGUAGE AUTO OFF start or stop operation with the buttons. SYNC ON G WHISPER Table 7. -
Page 16: No Signal Menu
No Signal Menu VOLUME The same adjustments and settings are available as with the Image and BLANK MIRROR Options menus when the MENU button is pressed during display of the START UP MENU COLOR “NO INPUT IS DETECTED ON ***” or “SYNC IS OUT OF RANGE LANGUAGE AUTO OFF ON ***”... -
Page 17: Maintenance
MAINTENANCE MAINTENANCE Lamp HIGH VOLTAGE HIGH TEMPERATURE HIGH PRESSURE Contact your dealer before replacing the lamp. For the optional lamp, see the item “Optional Parts” of the Table 12. Before replacing the lamp, switch power OFF, remove the power cord from the power outlet, and wait approximately 45 minutes until the lamp has cooled. -
Page 18: Replacing The Lamp
Replacing the Lamp 1. Switch the projector OFF, remove the power cord from the power outlet, and wait at least 45 minutes for the unit to cool. 2. Prepare a new lamp. 3. Check that the projector has cooled sufficiently, and gently turn it upside down. -
Page 19: Air Filter
Air Filter Cleaning the air Filter The air filter should be cleaned as described below at intervals of approximately 300 hours. 1. Switch the projector power supply OFF, and remove the power cord from the power outlet. 2. Clean the air filter with a vacuum cleaner. Replacing the Air Filter Replace the air filter if contamination cannot be removed, or if it is damaged. -
Page 20: Troubleshooting
For product infomation, product assistance, service infomation, or to order accessories, please call: In U.S. or Canada : 1-800-328-1371 In other locations, contact your local 3M sales office. OSD Message The messages as described below may appear on the screen at power ON. Take the appropriate measures when such messages appears. -
Page 21: Indicators Message
Indicators Message The POWER indicator, LAMP indicator, and TEMP indicator are lit and blank as follows. Take the appropriate measures. Table 10. Indicators Message POWER LAMP TEMP Contents indicator indicator indicator Lights Turns off Turns off The Standby mode has been set. orange Blinks Turns off Turns off... -
Page 22: Symptom
Symptom Before requesting repair, check in accordance with the following chart. If the situation cannot be corrected, then contact your dealer. Table 11. Symptom Symptom Possible cause Remedy Page The main power switch is not Turn on the main power switch. turned on. -
Page 23: Specifications
SPECIFICATIONS SPECIFICATIONS Table 12. Specifications Item Specification Product name Liquid crystal projector Panel size 2.3 cm (0.9 type) Liquid crystal Drive system TFT active matrix panel Pixels 786,432 pixels (1024 horizontal x 768 vertical) Lens Zoom lens F=1.7 ~ 2.1 f=27.3 ~ 32.8 mm Lamp 200 W UHB Speaker... -
Page 24: Accessories
Mac adapter ......... . 78-8118-3308-2 How to Order Please order these parts through your dealer, or contact 3M Customer Service at the following number : In U.S.
Need help?
Do you have a question about the mp8749 and is the answer not in the manual?
Questions and answers