Table of Contents
Advertisement
Quick Links
C C I I N N E E M M A A S S T T A A G G E E I I I I
MANUAL
Thank you for purchasing Soundstage loudspeakers. At Soundstage we strive to create loudspeakers
engineered to deliver the best value in loudspeaker technology, for stereo or home-theatre applications.
Soundstage loudspeakers are designed for ease of installation and will provide you with excellent sound
quality for years to come. Reading this manual will assist you in getting acquainted with your Soundstage
loudspeakers. Soundstage provides a 5 year parts and labour warranty on all drivers, 1 year on speak-
er and subwoofer amplifiers. To obtain servicing please contact your Soundstage representative. The orig-
inal bill of sale is required for warranty service.
Advertisement
Table of Contents

Subscribe to Our Youtube Channel
Related Manuals for Soundstage CINEMA STAGE II


Summary of Contents for Soundstage CINEMA STAGE II
- Page 1 Soundstage loudspeakers are designed for ease of installation and will provide you with excellent sound quality for years to come. Reading this manual will assist you in getting acquainted with your Soundstage loudspeakers. Soundstage provides a 5 year parts and labour warranty on all drivers, 1 year on speak- er and subwoofer amplifiers.
- Page 2 • near pools,bathtubs and wet basements. In the event of a malfunction, do not attempt to service the product yourself. Please contact your Soundstage dealer. • Before making connections to your receiver/processor, please make sure the subwoofer is unplugged from the wall and that your audio/video receiver or surround processor is in the off position.
- Page 3 Speaker Mounting Affix the bracket to the wall with screws via a wall stud or use butterfly anchors to secure the wallboard. Once the bracket is firmly secured, slide the speaker over the bracket. Wall Mount Option Subwoofer Placement Low frequency sound is generally non-directional. This allows for great flexibility when placing the subwoofer, as it is difficult for the ear to discern where the low frequency sound originates.
- Page 4 L/R satellites to the "Speaker out" will automatically limit the low frequency sent to the small speakers with the high- pass filter built into the Soundstage subwoofer. This is helpful to small speakers, in that they will then not be required to repro- duce frequencies that may be beyond their operating range.
- Page 5 A) On/Off Switch: Your subwoofer has an On/Off switch. Once connected to your receiver and plugged into the wall outlet, the Soundstage sub- woofer will need to be turned on and can be left in the “auto” position so that once it senses a signal coming from your receiver, it will automatically turn on and will turn off into Standby mode after it does not sense a signal for 5 minutes.
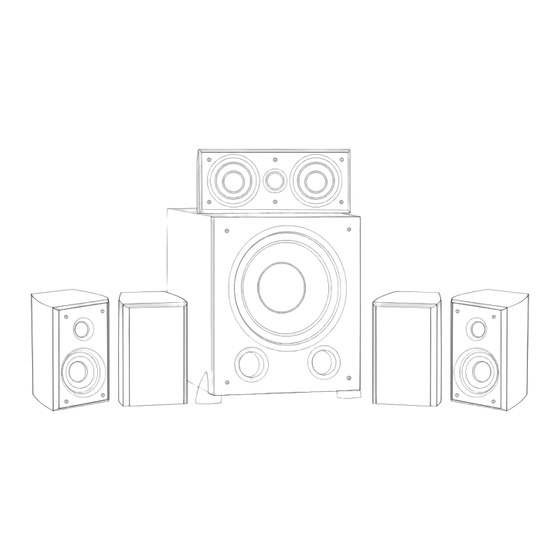
- Page 6 C C I I N N E E M M A A S S T T A A G G E E I I I I SATELLITE LOUDSPEAKERS CENTER CHANNEL LOUDSPEAKER SUBWOOFER Tweeter: 1" Soft Dome Tweeter: 1" Soft Dome Woofer: 10"...
Need help?
Do you have a question about the CINEMA STAGE II and is the answer not in the manual?
Questions and answers