
Related Manuals for Cool lights CL-LED600

Summary of Contents for Cool lights CL-LED600
- Page 1 CL-LED600 600 LED Lighting Panel Operations Manual Cool Lights USA www.CoolLights.biz Manual V1.0. Cool Lights CL-LED600 is © Copyright 2009 CoolVideoLights.Com All Rights Reserved.
-
Page 2: Table Of Contents
Table of Contents INTRODUCTION .....................................3 ASSEMBLY AND OPERATING PROCESS..........................3 LED 600 P ..........................3 EMOVE THE ANEL FROM THE BOX ...................... 4 TTACH THE POWER SUPPLY TO PANEL INPUT Mounting power supply on the light stand..........................4 Plug the AC to DC power supply into the wall socket ......................5 Turn on the panel..................................5 ....................................6 ARNDOORS... -
Page 3: Introduction
Introduction This is the operations manual for the Cool Lights USA CL-LED600 LED Panel. The exact models available are the CL-LED60056F (5600K flood panel), the CL-LED60056S (5600K spot panel) and the CL-LED60032S (3200K spot panel). Your LED 600 panel puts out a comparable hard light to a tungsten 650w fresnel based on light meter readings. -
Page 4: Attach The Ac To Dc Power Supply To Panel Dc Input
This is the main DC power input from whatever external power supply you may use to power the LEDs— including of course the Cool Lights AC to DC power supply that came with the panel. Simply attach the 4 pin XLR from the power supply into the mating connector on the back until it locks into place. -
Page 5: Plug The Ac To Dc Power Supply Into The Wall Socket
supply on the floor at the base of the light stand as well, but it is recommended to use the carabiner to hang on the light stand for optimum heat dispersion from the power supply into the air. Figure 4 shows the carabiner attached to the top riser thumbscrew of the light stand. Plug the AC to DC power supply into the wall socket . -
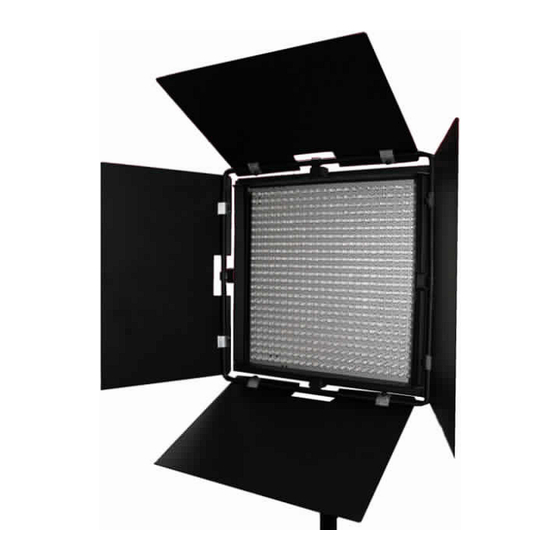
Page 6: Barndoors
Barndoors . The CL-LED600 LED Panel includes as standard a barndoor unit which fits into the accessory holder on the front of the panel. The barndoors come attached to the panel out of the box. They are locked in place with two safety locks on the top of the panel as pictured in Figure 6. -
Page 7: Ab Mount Battery Plate Installation
the battery plate for some reason) but they will not immediately be used any more in this process so put them aside. 3). Attach the battery adapter mounting plate to the back of the panel where the 4 screws for the battery plate access door were before as shown in Figure 7. - Page 8 4). Attach the battery adapter connector to the panel battery connector. It is keyed so it cannot be put on wrong. However, verify that red wire goes across to red wire and black wire to black. 5). Attach the battery adapter back to its mounting plate with 4 medium length screws (form the included packet of screws) into the recessed holes that were removed in step 1.
-
Page 9: Troubleshooting
Troubleshooting When troubleshooting any problem, always start with the simplest possibilities and work forward to the more complex ones as you exhaust each scenario. Start with the power plug and make sure it is not only securely plugged into the wall but also into the power supply’ s IEC adapter. -
Page 10: Operating Specifications
All readings in Lux taken with light meter. Conclusion This completes setup and testing of the Cool Lights CL-LED600 600 LED Panel. With proper care, you should get many years of service out of its sturdy aluminum construction. Thanks for...
Need help?
Do you have a question about the CL-LED600 and is the answer not in the manual?
Questions and answers