Advertisement
Table of Contents
- 1 Table of Contents
- 2 Package Contents
- 3 Trailer Components
- 4 Assembling Your Trailer
- 5 Attaching the Wheels
- 6 Attaching the Tow Arm
- 7 Attaching the Trailer to a Bike
- 8 Attaching the Jogger Fork Tubes
- 9 Attaching the Jogger Wheel
- 10 Attaching the Safety Flag
- 11 Using the Cover and Windscreen
- 12 Using the Brake
- Download this manual
Advertisement
Table of Contents

Related Manuals for Everyday Traveler


Summary of Contents for Everyday Traveler
- Page 1 Owner’s Instructions and Safety Manual Traveler Bike Trailer...
-
Page 2: Table Of Contents
Contents Trailer Components Assembling Your Trailer Attaching the Tow Arm Attaching the Trailer to a Bike Configuring the Trailer into a Jogger Attaching the Jogger Fork Tubes Attaching the Jogger Wheel Attaching the Safety Flag Using the Cover and Windscreen Using the Brake Securing Children and Cargo Disassembly, Folding and Storage... -
Page 3: Package Contents
Package Contents: Trailer body, 2 rear wheels, tow bar with hitch connector, jogger wheel (select models only), 2 jogger fork arms (select models only), 2 fork arm screw mounts (select models only), flag, manual Required Tools: 10mm wrench (for attaching to non quick release bicycles only) -
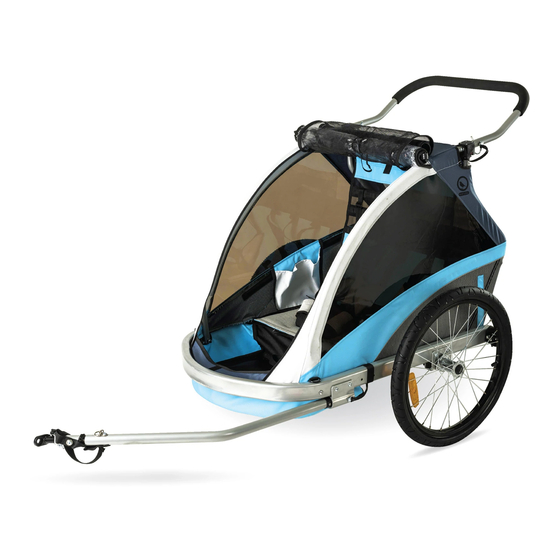
Page 4: Trailer Components
Trailer Mode Jogger Mode (select models only) Trailer Components 5. Push bar/folding assembly 1. All weather/mesh access panel 6. Push button release wheels 2. Tow bar and hitch connector 7. Tow bar/jogger fork receiver 3. Jogger fork arm (not included with all models) 8. - Page 5 Tow Bar and Hitch Connector Components 1. Hitch connector 2. Safety strap 3. Lock pin 4. Tow bar...
-
Page 6: Assembling Your Trailer
Assembling your Trailer 1. Remove the trailer parts from the box. Set the main trailer body flat on the ground with the black side down. 2. To open the frame, lift the rear cabin tubing up, then the front tubing. Pull the rear cabin tubing up to allow the black clip on the front cabin tubing to lock into the hardware on the rear cabin tubing. -
Page 7: Attaching The Wheels
Using Lock Pin & Spring Clip Fasteners To use the lock pin and spring clip fasteners, insert the pin at attachment point until it pushes through the opposite hole. Rotate the spring clip up and over until it snaps into place over the pin head. To unlock, reverse order. Attaching the Wheels 1. -
Page 8: Attaching The Tow Arm
Attaching the Tow Arm (for use as a trailer) 1. The hitch arm is held in place by a spring pin and a quick release pin. Depress the spring pin and slide the tow arm into the receiver on the left side of the trailer as shown. 2. -
Page 9: Attaching The Trailer To A Bike
Attaching the Trailer to a Bike Your trailer is designed to attach easily to just about any full-size bicycle. Once installed the hitch con- nector can be left on the bicycle and the trailer released using the spring clip. The hitch fitting must be attached to the left rear axle of the bike. Do not attach to any cycle where it cannot attach to the axle. - Page 10 Attaching the Trailer to a Bike 1. Remove the quick release or nut from the left side of the bikes rear axle. Install the hitch connector between the quick release or nut and the bike frame. Tighten the quick release or nut according to the manufacturers recommendation.
- Page 11 Removing the Trailer from the Bike 1. Remove the safety strap by releasing the clip on the D-ring. Remove the quick-release lock pin to release the flex connector and trailer. The hitch connector can remain on the bike when the trailer is removed.
- Page 12 Configuring your Trailer into a Jogger (select models only) Your trailer can accept an optional jogger kit. Tow Bar and Hitch Connector Components 1. 2 fork tubes 2. 2 fixing screws 3. Quick release 16 inch wheel...
-
Page 13: Attaching The Jogger Fork Tubes
Attaching the Jogger Fork Tubes (select models only) 1. To install the jogger kit, first remove the tow arm by releasing the lock pin and then press the spring pin and pull out the arm. 2. Take one jogger fork tube and insert into the corresponding receiver on the trailer body and insert the lock pin and close the spring clip. -
Page 14: Attaching The Jogger Wheel
Attaching the Jogger Wheel (select models only) 1. Open the quick release axle skewer on the wheel to allow the axle to fit inside the plastic fork tips. Align the flats on the axle with the flats on the fork tips, and slide into the slots. Close the quick-release lever, making sure it is tight. -
Page 15: Attaching The Safety Flag
Attaching the Safety Flag 1. Assemble the flag and insert the end into the small sleeve on the left side of the trailer body. WARNING! This flag is meant for use only with the trailer and greatly increases your visibility to others. -
Page 16: Using The Cover And Windscreen
Using the Cover and Windscreen 1. The clear vinyl windscreen and the protective mesh barrier zip open for loading. In inclement weather, the clear windscreen protects your passengers from the elements. Weather permitting, you can roll up the clear window and affix with the elastic straps provided. The mesh allows ventilation, but prevents debris from entering the trailer. -
Page 17: Using The Brake
Using the Brake Your trailer is equipped with a strap parking brake for added safety. When loading or unloading or parking your trailer, engage the parking brake to prevent the trailer from moving. 1. Release the buckle from the strap affixed to the rear of the trailer frame. Loop the free end of the strap through the spokes of the wheel, and clip the latch to the D-ring as shown. - Page 18 Securing Your Child Place a single child in the center and use the center strap in the middle. For two children use the outer center straps and shoulder straps. 1. Un-clip the straps and place your child in the seat. Adjust the upper buckles to fit snugly above your child’s shoulders.
- Page 19 Cargo Storage The trailer has a rear storage area. This is not intended for items weighing more than 10lbs (4.5kg). WARNING! Distribute items carefully and evenly. Items may cause the trailer to become unstable. Failure to comply with this warning could result in serious injury to you or your child Folding Your Trailer To fold your trailer, simply locate the release latches on the vertical frame tubes.
- Page 20 General Maintenance From time to time, check your trailer for loose hardware, worn parts, torn material or stitching. Repair or replace parts as needed. Over or under inflation of tires may cause handling issues for the trailer. Replace tires only with street tread tires. We suggest you periodically clean all parts, wipe dry and then let air dry, especially if exposed to salt water, salt spray, beach sand etc.
- Page 21 WARNINGS! Please read the warnings carefully. Failure to follow these warnings and assembly instructions could result in serious injury or death. • Passengers and riders must always wear properly fitted CPSC approved cycling helmets. • Maximum weight capacity for one child is 50lb (23kg), and for two children is 100lb (45kg). Exceeding capacity may cause the trailer to become unstable.
- Page 22 Pre-Ride Safety Check Before every ride the following safety check should be performed. • Check to ensure hitch connector is tight. • Check to ensure hitch safety strap is secure. • BUCKLE UP! Check seat harness and secure all baggage. •...
- Page 23 Do not use your trailer until you have become accustomed to how it affects your bicycle handling. SUFFOCATION WARNING: Plastic bags can be dangerous. To avoid danger of suffocation, keep plastic bags away from babies and children. For more on Everyday lifestyle, please visit us at www.everydaybicycles.com...
Need help?
Do you have a question about the Traveler and is the answer not in the manual?
Questions and answers