Table of Contents
Advertisement
ASSEMBLY INSTRUCTIONS
ATTENTION: THIS PRODUCT IS NOT FOR COMMERCIAL USE
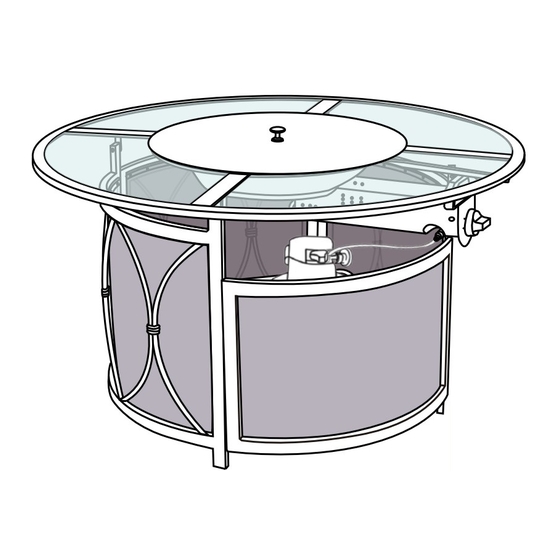
RIVIERA 43 INCH ROUND GAS FIREPIT WITH PAINTED GLASS TOP
Warning: If the information in this manual is not followed exactly, a fire or explosion may
!
result causing property damage, personal injury, or loss of life.
• Do not store or use gasoline or other flammable vapors and liquids in the vicinity
of this or any other appliance.
• An LP-cylinder not connected for use shall not be stored in the vicinity of this or
any other appliance.
DANGER: If you smell gas:
!
1. Shut off gas to the appliance .
2. Extinguish any open flame.
3. If odor continues, keep away from the appliance and immediately call your gas
supplier or fire department.
• Installation and service must be performed by a qualified installer, service agent,
or gas supplier.
Warning:
Improper installation, adjustment, alteration, service, or maintenance can cause
!
injury or property damage. Read the installation, operating, and maintenance
instructions thoroughly before installing or servicing this equipment.
DANGER
!
Use the correct bolts as indicated. Do not tighten any of the bolts until the table is completely assembled.
Do not sit or stand on this table.
Keep children away during assembly. This item contains small parts that can be swallowed by children.
Do not use indoors or inside of any enclosure.
Retain these assembly instructions for future reference.
Installer - Leave these instructions with the owner.
Quote the following FQC NO. when contacting the service center.
INTENDED FOR RESIDENTIAL USE ONLY.
TGS43GF
CARBON MONOXIDE HAZARD
This appliance can produce carbon monoxide which has
no odor.
Using it in an enclosed space can kill you.
Never use this appliance in an enclosed space such as a
camper, tent, car, or home.
SERVICE CENTER TOLL FREE NO.
TEL: 1-877-539-7436
FAX: 1-877-539-7439
PAGE 1 OF 9
WARNING: For Outdoor Use Only
!
COURTYARD CREATIONS INC.
Advertisement
Table of Contents

Related Manuals for Courtyard Creations TGS43GF

Summary of Contents for Courtyard Creations TGS43GF
- Page 1 Retain these assembly instructions for future reference. Installer - Leave these instructions with the owner. Quote the following FQC NO. when contacting the service center. SERVICE CENTER TOLL FREE NO. TEL: 1-877-539-7436 FAX: 1-877-539-7439 COURTYARD CREATIONS INC. PAGE 1 OF 9...
- Page 2 This appliance has been tested to and complies WARNING with ANSIZ21.97 and CSA 2.41-2014. The installation must conform to local codes or in If the appliance is not in use, the gas must be turned the absence of local codes to the National Fuel off at the supply cylinder.
-
Page 3: Parts List
PARTS LIST PART 27XA4913 MATERIAL CODE PART Q’TY COVER 17XY9701------- TGS43GF-CS04-8 FUEL SUPPLY HOSE REAR FRAME TGS43GF-CS04-7 17C33A0722001Y4 BOLT M6*14 RIGHT FRAME 17C33A0716001Y4 TGS43GF-CS04-I BOLT M6*45 LEFT FRAME TGS43GF-CS08-5 17FA05040301-Y4 WASHER d6.5*D13*1.0 CROSS BRACE 17D02A030301-Y6 TGS43GF-CS10-5 NUT M6 FRONT DOOR... - Page 4 FIGURE 2 FIGURE 3 The tab #13 BOLT M6*14 #13 BOLT M6*14 Step 2: Step 3: Place both ends of the cross brace (#4) on top of the Fasten the tank support assembly (#7) to the front door bottom tabs on the right and left frames (#2 and #3). (#5) by using bolts (#13) and washers (#15).
- Page 5 FIGURE 6 FIGURE 7 Igniter Valve #14 BOLT M6*45 Step 6: Step 7: Place the table top (#6) on to the frame assembly. Open the front door (#5), place the tank into the tank Fasten them together by using bolts (#14), washers support assembly (#7) and through the tank fastener (#15), and plastic nuts (#17).
- Page 6 FIGURE 9 FIGURE 10 Burner system Fire shield Note: When closing the door, make sure that the distance between the Hose hose and the burner Note: system is more than 2 Note: The lava rocks cannot be The fire shield on the inches.
- Page 7 Read the following switch usage instructions for lighting and to extinguish: Switch Usage Instructions Main Flame PILOT Step 1: Lighting : Step 2: Adjusting : To ignite, push the “T” shaped switch in and When lit, let the “T” shaped switch pop up, rotate counterclockwise.
- Page 8 TYPES OF GAS LIQUID PROPANE CARE AND MAITENANCE: 1. Do not use aerosol polish or any other flammable Maximum Inlet Pressure 250 psig material to clean the burner while it is in use. Minimum Inlet Pressure 25 psig 2. Inspect and clean the burner regularly. Use a wire Manifold Pressure 11 inches W.C.
- Page 9 INSTRUCTIONS FOR REMOVING THE TANK FIGURE A FIGURE B Counterclockwise Note: Step B: Close the valve tightly before removing the tank. To remove the fuel supply hose from the tank, rotate counterclockwise. See Figure B. Step A: Loosen the fuel supply hose from the igniter valve.
Need help?
Do you have a question about the TGS43GF and is the answer not in the manual?
Questions and answers
What year was this model made and sold