Advertisement
Available languages
Available languages
Quick Links
Advertisement

Related Manuals for BIOS 132HC Pre-Programmed


Summary of Contents for BIOS 132HC Pre-Programmed
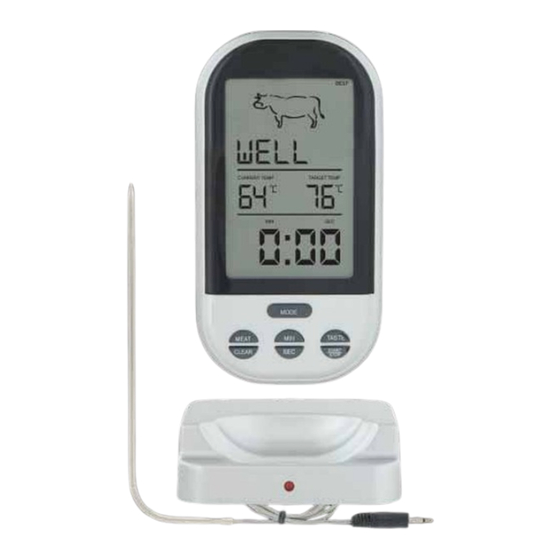
- Page 2 132HC INSTRUCTIONS WIRELESS PRE-PROGRAMMED THERMOMETER MONITOR MONITOR Backlight Meat Indicator Taste Indicator Current Measured Target Reset Temperature Temperature Power ON/OFF Timer Switch Mode Battery Meat Compartment Clear Min/Sec Taste Start/Stop FRONT BACK Battery Compartment Power ON/OFF Switch PROBE WIRELESS TRANSMITTER Thank you for purchasing the Wireless Pre-Programmed Thermometer.
- Page 3 Features: • Pre-programmed cooking temperature for different meats and tastes • Select taste setting: rare to well done • Displays preset and actual cooking temperatures • Alarms when target temperature is reached • Temperature range: 32°F to 482°F (0°C to 250°C) • Stainless steel probe with 1 m (39”) heat resistant wire • °C/°F switchable • Backlight • 99:59 (min:sec) count down and up timer...
- Page 4 B. Installing the Battery in the Transmitter 1. Remove the battery compartment cover on the bottom of the transmitter. 2. Insert 2 AAA batteries as indicated and replace the battery cover 3. Switch the power switch on the bottom of the transmitter to ON. 4. Once the transmitter is turned on a red LED light will flash on the transmitter 3 times and the current temperature will be displayed on the monitor.
- Page 5 • To stop the alarm temporarily, press the MODE button. • To stop the alarm completely, remove the probe from the meat. F. Thermometer Placement Insert the tip of the probe into the thickest part of the meat. The probe should be placed on the side of the meat. This allows for the meat to be turned during cooking. Avoid touching bone, fat or gristle.
- Page 6 • If the meat temperature does not appear on the screen after the probe has been inserted into the meat, check to make sure the plug from the probe is securely inserted into the side of the transmitter. • DO NOT place the monitor in direct sunlight, or let it come in direct contact with moisture or hot surfaces.
- Page 7 One Year Warranty If this product proves to be defective in material or workmanship within one year of purchase, please return it to the address below. It will be repaired or replaced without charge upon receipt of the unit prepaid with $5.00 to cover handling, packaging and return postage.
- Page 8 132HC MODE D’EMPLOI THERMOMÈTRE PRÉPROGRAMMÉ SANS FIL MONITEUR MONITEUR Rétroéclairage Indicateur de viande Indicateur du mode de cuisson Température Température Réinitialisation mesurée actuelle ciblée Commutateur Sous tension/ Minuterie Hors tension Mode Compartiment Viande des piles Annulation Cuisson Minute/Seconde Marche/Arrêt VUE DE FACE VUE ARRIÈRE Compartiment des piles...
- Page 9 Caractéristiques : • Températures de cuisson préprogrammées pour différentes viandes et cuissons • Sélection du réglage de la cuisson : saignant à bien cuit • Affichage des températures préprogrammées et actuelles • Signal sonore se déclenche lorsque la température ciblée est atteinte • Gamme de température : 32 °F à 482 °F (0 °C à 250 °C) • Sonde en acier inoxydable avec fil résistant à la chaleur de 1 m (39 po) • °C/°F commutable • Rétroéclairage • Compte et décompte de 99:59 (min:s) de la minuterie...
-
Page 10: Sous Tension
B. Mise en place des piles et du transmetteur 1. Retirez le couvercle du compartiment des piles situé à la partie inférieure du transmetteur. 2. Insérez 2 piles AAA en respectant les polarités indiquées et replacez le couvercle du compartiment. 3. - Page 11 NOTE : Lorsque la température choisie est atteinte, le moniteur se mettra à émettre des bips et “Température actuelle [Current Temp.] “clignotera. • Pour fermer l’alarme temporairement, appuyez sur la touche MODE. • Pour fermer l’alarme définitivement, retirez la sonde de la viande. F. Mise en place du thermomètre Insérez la pointe de la sonde dans la partie la plus épaisse de la viande. La sonde doit être placée sur le côté...
- Page 12 Précautions • Porter toujours un gant résistant à la chaleur pour toucher la sonde en acier inoxydable ou le fil résistant à la chaleur, ou juste après la cuisson. • Laver à la main à grande eau la sonde en acier inoxydable entre les utilisations (la sonde n’est pas à l’épreuve du lave-vaisselle). • Garder la sonde en acier inoxydable et le fil résistant à la chaleur loin de la portée des enfants. • Si la température de la viande ne s’affiche pas à l’écran après que la sonde ait été insérée dans la viande, vérifier si la fiche provenant de la sonde est insérée solidement dans la prise sur le côté du transmetteur. • NE PAS PLACER le moniteur dans la lumière solaire directe, ou le mettre en contact direct avec l’humidité...
- Page 13 Cependant, il n’y a pas de garantie que l’interférence ne se produira pas lors d’une installation particulière. Si cet instrument cause vraiment de l’interférence nuisible lors de la réception à partir d’une radio ou d’une télévision, qui peut être déterminé en allumant ou fermant cet équipement, nous encourageons l’utilisateur d’essayer de corriger cette interférence par une ou plusieurs mesures : • Réorienter ou relocaliser l’antenne qui reçoit.
Need help?
Do you have a question about the 132HC Pre-Programmed and is the answer not in the manual?
Questions and answers
hi , my device shows over 300 deg even when probe free in the air. New batteries and reset not doing anything. What to do?
If your BIOS 132HC Pre-Programmed Thermometer shows over 300°F even when the probe is free in the air, follow these steps:
1. Check the Probe Connection – Ensure the probe is securely plugged into the transmitter. Wipe the probe’s plug before inserting it to prevent incorrect readings.
2. Inspect for Moisture – If the probe or its plug has moisture, dry it completely before use. Moisture can cause incorrect temperature readings.
3. Avoid Damage – If the probe has been exposed to open flames or submerged in water, it may be damaged and need replacement.
4. Power Cycle the Device – Turn the thermometer off and on again to reset it.
5. Replace Batteries – Low battery power can cause incorrect readings; replace the AAA batteries in both the monitor and transmitter.
6. Ensure Proper Use – The probe is designed for measuring meat temperature, not oven temperature. Using it incorrectly may cause faulty readings.
If the issue persists after these steps, the probe may be faulty and require replacement.
This answer is automatically generated