Table of Contents
Advertisement
Advertisement
Table of Contents

Related Manuals for Longshine LCS-GFS9326


Summary of Contents for Longshine LCS-GFS9326
- Page 1 Longshine Technologie Europe GmbH www.longshine.de...
-
Page 2: Table Of Contents
Table of Content Unpacking Information ..............1 1. Introduction to 24+2G Gigabit Ethernet Web Smart Switch ...2 1.1 General Description ......................2 1.2 Key Features ........................3 1.3 The Front Panel ......................3 1.4 The Rear Panel....................... 5 2. Installing 24+2G Gigabit Ethernet Web Smart Switch .........................6 2.1 Desktop Installation ...................... -
Page 3: Unpacking Information
Unpacking Information Thank you for purchasing the 24+2G Gigabit Ethernet Web Smart Switch. Before you start, please check all the contents of this package. The product package should include the following: 1. One 24+2G Gigabit Ethernet Web Smart Switch 2. One power cord 3. -
Page 4: Introduction To 24+2G Gigabit Ethernet Web Smart Switch
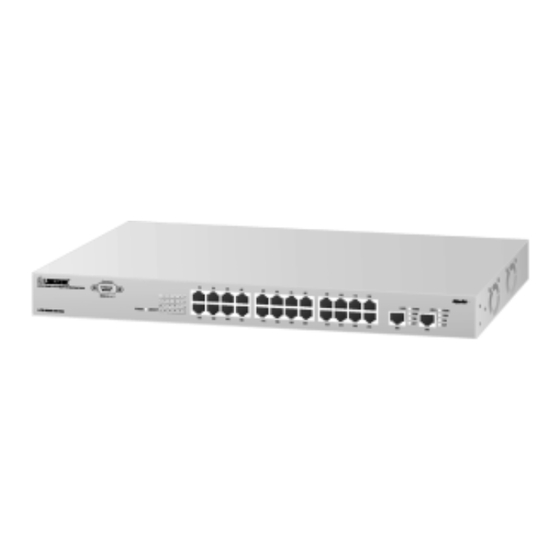
1. Introduction to 24+2G Gigabit Ethernet Web Smart Switch 1.1 General Description The device is a 24+2G 10/100Mbps Ethernet Web Smart Switch. The device is a powerful, high-performance Gigabit Ethernet switch, which provides smart and efficient management functions and support 26 ports connection with 24 ports of 10/100Mbps and 2 ports 10/100/1000Mbps with Full/Half duplex capability. -
Page 5: Key Features
1.2 Key Features 24 fixed 10/100Mbps Fast Ethernet ports for easy network connecting application. Support 2 fixed 10/100/1000Mbps Gigabit ports Provide Auto-discovery Function for easy Network management. Provide 8K MAC address entries and 26 groups VLAN table Support Port aggregation. Supports 3 types of QoS priority for port base, 802.1p &... - Page 6 Wiring for 10/100/1000Mbps (Copper) Following are the summaries of cabling required: Media Speed Wiring 10Mbps Category 3,4,5 UTP/STP 100Mbps Category 5 UTP/STP 10/100/1000Mbps copper 1000Mbps Category 5,5e UTP/STP LED Definition The rich diagnostic LEDs on the front panel can provide the operating status of individual port and whole system.
-
Page 7: The Rear Panel
1.4 The Rear Panel The rear panel of the switch is shown as below... -
Page 8: Installing 24+2G Gigabit Ethernet Web Smart Switch
2. Installing 24+2G Gigabit Ethernet Web Smart Switch This switch can be placed directly on your desktop, or mounted in a rack. Users can immediately use most of the features simply by attaching the cables and turning the power on. 2.1 Desktop Installation For desktop installation, the switch needs to put on a clean, flat desk or table close to a power outlet. -
Page 9: Installing Network Cables
Repeat the two previous steps for the other side of the unit. Insert the unit into the 19" rack and secure with suitable screws (not provided). Reconnect all cables. 2.3 Installing Network Cables Station Connections Reference to the wiring statement of the previous section; connect each station to the switch with correct type of cables. -
Page 10: Management Guide
3. Management guide This section instructs you how to enter and set up the configurations, which can be accessed by RS-232 serial port (out-of-band) on the rear panel or by Telnet session / Internet Browser over the network (in-band). Factory Default value: ¡... - Page 11 In-Band Connections (Web Browser / Telnet) To manage the switch through in-band access, you should configure the management station with an IP address and subnet mask compatible with your switch. 1. Running your Web Browser and enter the IP address “192.168.1.1” as the URL in the “address”...
-
Page 12: Home Page
3.2 Home Page On the Home page, you can select the configuration by clicking the menu tabs located on the upside of the UI. It includes, System Ports VLANS Aggregation Discovery To restore the default Values of switch, Click the “Default” Button. If you want to reboot the switch, click the “Reboot”... -
Page 13: System
3.2.1 System To set up the system configurations such as login value, system name and IP address. Items Functions Mac Address The Mac Address of the switch S/W Version To check up the Software Version, see this. H/W Version The Hardware version System name Name of the Switch IP Address... -
Page 14: Ports
3.2.2 Ports On the page, you can view the Port status, set up the Speed mode and enable the FDX flow control. Items Functions Admin Enable or Disable the Admin function Bandwidth To control the bandwidth, you can select the speed limitation you need in the drop list. -
Page 15: Vlans
3.2.3 VLANS VLANS Configuration is for dividing the LAN into subnet groups for better network management. (26 VLAN groups total) Mode: 1. Disable: Turn off the VLAN function by selecting the mode. 2. Port BASE: Group the port you select by entering the group number (Ex.1) in VLAN textbox and selecting the port numbers (Ex.1, 2,3,4) you want. -
Page 16: Aggregation/Trunking Configuration
3.2.4 Aggregation/Trunking Configuration To set up the Port trunk groups, select “Enable” of the group you need. Don’t forget to click the “Apply” to save the setting. Supports 7 trunk groups for network application. -
Page 17: Qos
3.2.5 Qos There are three modes of Quality of Service to choose, TOS, Tag Base, and Port base. To Disable the QOS, click Disable and Click apply to save. To use the TOS, select TOS and click Apply to save. To enable the Tag Base, select Tag base and click Apply to save. -
Page 18: Discovery
3.2.6 Discovery When you install several 24+2G Gigabit Ethernet web-smart switches, the discovery management tool helps you to search and access those switches on the LAN easily. Therefore you can access any switch on your LAN without memorizing those IP addresses. You can only find switches with the IP Address compatible with the one you access. -
Page 19: Default
3.2.7 Default To restore to default values, 1. Click the default button on the Home page 2. Click “Apply” to activate. Don’t power off the switch while it’s working. 3.2.8 Reboot To reboot the switch, 1. Click the Reboot button on the Home page 2. -
Page 20: Product Specifications
4. Product Specifications Standard IEEE802.3 10BASE-T IEEE802.3u 100BASE-TX IEEE802.3x full-duplex operation and flow control IEEE802.1p Traffic prioritization Interface 24 * 10/100Mbps auto MDI/MDI-X RJ-45 switching ports 2*10/100/1000Mbps auto MDI/MDI-X RJ-45 switching ports 1 * RS-232 Console port Cable Connections RJ-45 (10BASE-T): Category 3,4,5 UTP/STP RJ-45 (100BASE-TX): Category 5 UTP/STP Network Data Rate 10/100/1000Mbps Auto-negotiation... - Page 21 FCC Certifications This Equipment has been tested and found to comply with the limits for a Class A digital device, pursuant to part 15 of the FCC Rules. These limits are designed to provide reasonable protection against harmful interference when the equipment is operated in a commercial environment.
- Page 22 DECLARATION OF CONFORMITY CE = European Community Conformity Mark We, Manufacturer/Importer Longshine Technologie (Europe) GmbH An der Strusbek 9 22926 Ahrensburg Germany Declare That The Product LCS-GFS9326 24-Port Web based Switch 24x10/100Mbps 2x10/100/1000Mbps, Rackmount Is In Conformity With: Standards Results...
Need help?
Do you have a question about the LCS-GFS9326 and is the answer not in the manual?
Questions and answers