Table of Contents
Advertisement
ENGLISH
Please visit www.archos.com/manuals to download the latest version for this manual.
Dear Customer,
thank you for choosing this Archos
using it and that it will give you entire satisfaction for many years to come.
Please do register your product on our website (www.archos.com/register)
to ensure that you get access to our help line and to be informed of free
software updates for your product.
Wishing you the best Multimedia experience,
The Archos
™
All the information contained in this manual was correct at the time of publication.
However, as our engineers are always updating and improving our products, your
device's software may have a slightly different appearance or modified functionality
than presented in this manual.
ENGLISH USER MANUAL
Team
product. We hope that you will enjoy
™
Version 2.1
Advertisement
Table of Contents

Related Manuals for Archos Version 2.1


Summary of Contents for Archos Version 2.1
- Page 1 ENGLISH ENGLISH USER MANUAL Please visit www.archos.com/manuals to download the latest version for this manual. Dear Customer, thank you for choosing this Archos using it and that it will give you entire satisfaction for many years to come. Please do register your product on our website (www.archos.com/register) to ensure that you get access to our help line and to be informed of free software updates for your product.
-
Page 2: Table Of Contents
1.3 VIDEo SETTINGS ............11 1.4 PUTTING VIDEoS oNTo YoUR ARCHoS 1.5 RECoRDING VIDEo . -
Page 3: Introduction
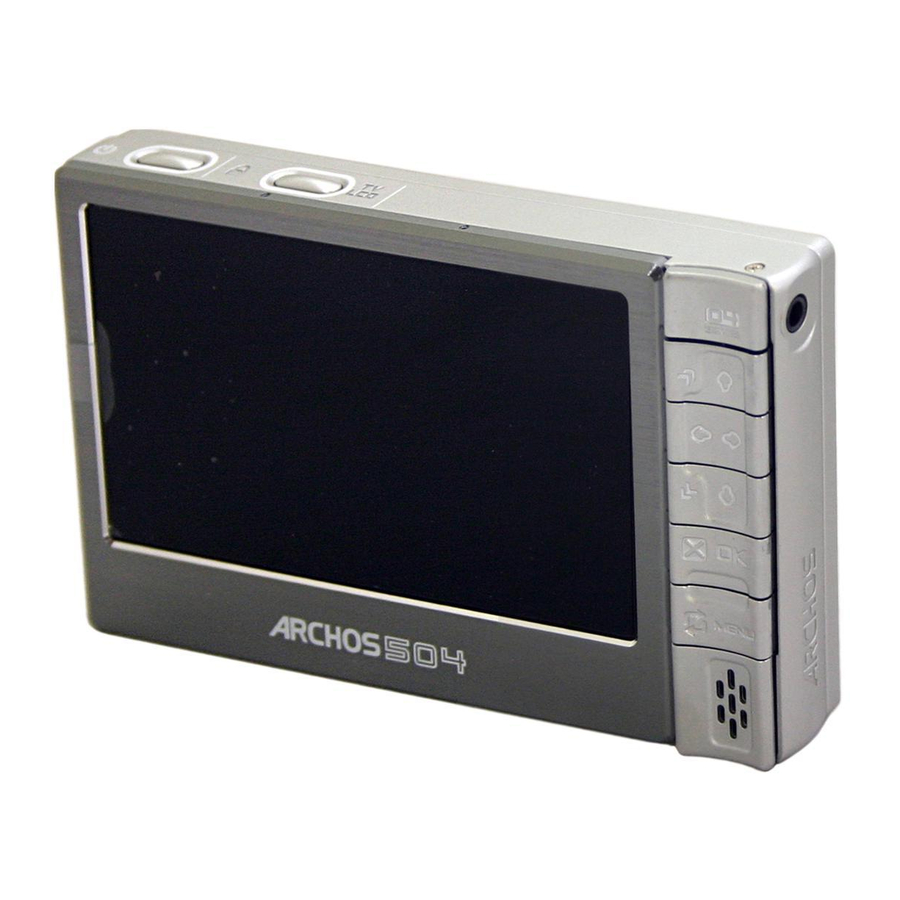
Top of the Device: Press and hold to switch on/off. Press once to switch the display of the image between TV and built-in LCD screen. Press and hold to lock the buttons of your ARCHoS Main Navigation buttons: Menu... -
Page 4: Led Indicators
504/604 MANUAL bUILT-IN MICRoPHoNE AND LoUDSPEAkER The built-in microphone is on the left side of the device. See: Using the AudioCorder . The built-in loudspeaker is on the right side, below the buttons. LED INDICAToRS oN/off indicator battery charge indicator - light on: the battery is charging. -
Page 5: Interface Language
• The interface of your ARCHoS German. • More languages are available from www.archos.com. See Updating the firmware for instructions on installing these language packs. To change the system’s language: from the Home Screen, press Highlight the language icon and press OK. -
Page 6: Other Character Sets
The ARCHoS has a removable battery. You can purchase extra batteries from www. ™ archos.com. To replace the battery of the ARCHoS V2.1 device for the first time, charge the battery for two ™ device charges via your computer’s USb port: ™... -
Page 7: Product Care
504/604 MANUAL To replace the battery of the ARCHoS Caution: If the battery is incorrectly replaced or short-circuited, this could result in damage to the product and/or serious injuries to the user. Replace only with an original Archos battery. ™... -
Page 8: Playing Video
When browsing in video mode, only video files are shown. THE VIDEo LIST • the Video List (default view) only shows the video files in the Video folder of the ARCHoS ’s hard drive ™ (it does not show videos located in subfolders). - Page 9 504/604 MANUAL • both views display a motion thumbnail of the highlighted video as well as various information about the video file. If you have saved a video frame as a thumbnail (see: Video Playback Menu • Items), the thumbnail will no longer play the highlighted video file, but show that image instead.
-
Page 10: Video Playback
VIDEo PLAYbACk bUTToN CoNTRoLS During video playback, the buttons of your ARCHoS accelerated fast forward fast rewind accelerated fast rewind VIDEo PLAYbACk MENU ITEMS Info displays a message box with all the available information about the current video file. -
Page 11: Video Settings
504/604 MANUAL format allows to change the way the image is displayed. Auto: adjusts the video size to best adapt to the built-in screen or TV. full Screen: displays the entire picture on the screen. Maximized: enlarges the picture to fill the screen. original: displays the picture in its original format. -
Page 12: Putting Videos Onto Your Archos Device
LCD brightness adjusts the level of brightness of the built-in screen 1.4 PuTTIng VIdeOs OnTO yOur arChOs There are two main methods to transfer your own videos onto the ARCHoS • Synchronize your videos with Windows Media This method requires your ARCHoS ®... -
Page 13: Recording Video
504/604 MANUAL 1.5 reCOrdIng VIdeO • Your ARCHoS device can record video, via its VideoCorder function. ™ • You will need the optional DVR Station or DVR Travel Adapter to record video. See: optional functionalities to learn more about this feature. -
Page 14: Playing Music
• When new music is added to the Music folder of the ARCHoS ARCLibrary will need to be updated. by default, this is done automatical- ly, but you can choose to do it manu- ally via the ‘Update ARCLibrary’... - Page 15 504/604 MANUAL ARCLIbRARY* AND MUSIC bRoWSER MENU ITEMS Info displays a message box with all the available information about the highlight- ed music file. Press to close the info screen. Delete allows you to delete the highlighted music file. A confirmation screen will pop Rename allows you to change the name of the highlighted music file using the virtual keyboard.
-
Page 16: Playing Music
MUSIC PLAYbACk bUTToN CoNTRoLS During music playback, the buttons of your ARCHoS accelerated fast forward press once: back to the beginning of the song, or previous song (in the first 10 seconds of a track) -
Page 17: Music Settings
504/604 MANUAL MUSIC STATUS ICoNS Status bar icons tell you if your ARCHoS playing paused MUSIC PLAYbACk MENU ITEMS Info displays a message box with all the available information about the current music file. Press to close the info screen. -
Page 18: Sound Settings
Scan play mode. 2.4 sOund seTTIngs This screen allows you to adjust the sound settings of your ARCHoS personal taste. Use / to highlight a different parameter, then use / to select a different setting. -
Page 19: Equalizer Screen
• Reset highlight and press OK to reset sound parameters to the default values. EQUALIzER SCREEN Your ARCHoS device features a 5-band equalizer. ™ • Use / to highlight a different frequency range (bass, Mid. bass, Mid. range, Mid. -
Page 20: Playlists
2.5 PlaylIsTs • A playlist is a list of audio tracks that the music player will automatically play one after the other. • on your ARCHoS as you want. • In the Archos Browser, playlists are the files with the ™... - Page 21 504/604 MANUAL • You can also add the content of an entire folder, artist, album, etc. if you highlight it and press or OK. Another way to add songs to a playlist is by using the Add to playlist or Insert in playlist menu items: Add to playlist will add the highlighted track, folder, artist or album at the end of the playlist.
-
Page 22: Editing A Playlist
Attention: if you save the playlist while playing a song, the song playback will be stopped. 2.6 PuTTIng MusIC OnTO yOur arChOs There are two main methods to transfer your own music onto the ARCHoS • Synchronize your music with Windows Media This method requires your ARCHoS ®... -
Page 23: Recording Audio
504/604 MANUAL • Copy and Paste your music files from your computer into the Music folder of your (see Computer Connection for details on how to connect your ARCHoS ARCHoS ™ device to your computer). You can easily create audio content with your computer by using Windows Media Player 10 to convert your own CDs to MP3 or WMA format. -
Page 24: Using The Audiocorder
In the Home Screen, highlight the AudioCorder icon and press OK to display the pre-recording screen. • All audio recordings made by your ARCHoS Recordings folder. If you wish to keep them in a different location, you can use the Move function of the Archos browser). -
Page 25: Built-In Microphone Recording Procedure
You can also start recording to a new file directly by choosing the Save file and start a new recording menu item while you are recording. 3.3 lIne-leVel reCOrdIngs Your ARCHoS device can also record from external line-level audio sources, with ™... -
Page 26: Viewing Photos
THE PHoTo WALL • the Photo Wall (default view) shows thumbnails of your photos. It only shows the picture files in the current folder of the ARCHoS ’s hard drive (it does not ™ show pictures located in subfolders). •... - Page 27 THE PHoTo bRoWSER • the Photo browser allows you to navigate the Photo folder of your device’s hard drive. It is based on the Archos browser. • To use it, highlight ‘browse Hard Drive’ in the PhotoLibrary view and press OK.
-
Page 28: Viewing Photos
4.2 VIewIng PhOTOs Highlight a picture file, press OK to view it. The menu overlay will disappear automatically after a few seconds. PHoTo VIEWER bUTToN CoNTRoLS When viewing photos, the buttons of your ARCHoS zoom in previous photo zoom out close photo viewer When zooming, / / / are used to scroll. -
Page 29: Photo Settings
504/604 MANUAL Set as wallpaper defines the current picture as your ARCHOS Start slideshow starts a slideshow from the current image. Settings will display the photo settings screen (see next chapter). Sound will display the sound settings screen (see: Sound Settings ). Press this screen. -
Page 30: Playing A Slideshow
When you come back to it, simply press OK to resume the slideshow. 4.6 TransferrIng PhOTOs TO yOur arChOs There are several methods for you to transfer your own photos to the Pictures folder of the ARCHoS ™... -
Page 31: Using The Browser
5. usIng The brOwser The Archos File Browser gives you the possibility to navigate the file sys- ™ tem of your ARCHoS In the Home Screen, highlight the browser icon and press OK to enter the file browser. You will see two panels: •... - Page 32 504/604 MANUAL bRoWSER MENU ITEMS Info displays a message box with all the available information about the highlight- ed file. Press to close the info screen. Create folder creates a folder in the current location. You will have to enter the folder’s name with the virtual keyboard (see: Using the Virtual keyboard ).
-
Page 33: Copying And Moving Files And Folders
504/604 MANUAL CoPYING AND MoVING fILES AND foLDERS • In the left panel, highlight the file or folder that you want to copy or move. • Press to focus on the right panel. • Navigate to the location where you wish to copy or move the file or folder that you highlighted in the left panel. -
Page 34: Keyboard Function Keys
Once you are satisfied with the new name for the file, folder or playlist, you can save it by using the Validate current name menu item. 5.3 usIng The Pdf reader • Your ARCHoS device features a PDf reader with hyperlink support. ™ •... - Page 35 504/604 MANUAL foLLoWING HYPERLINkS • Some PDf documents have hyperlinks (for instance, a table of contents, links to an external website, etc.). • Links are surrounded by a blue outline, a highlighted link (active link) is sur- rounded by a red outline. •...
-
Page 36: Computer Connection
504/604 MANUAL 6. COMPuTer COnneCTIOn 6.1 ‘wIndOws MedIa deVICe’ Or ‘PC hard drIVe’ There are two connection modes for your ARCHoS puter. When your ARCHoS screen will pop up on the ARCHoS be used for this connection (see Connection Steps). - Page 37 • The ARCHoS device will appear in ‘My Computer’. ™ • You can now put your own files onto the ARCHOS synchronize your music, videos or photos to the ARCHoS Media Player 10. ® copy your media files directly via Windows Music , Video or Pictures folder.
-
Page 38: Disconnection
• A message will pop up, telling you that it is now safe to disconnect the device*. You can now safely unplug the USb cable from your ARCHoS puter. * If you get a message saying that the device cannot be removed, close any com-... - Page 39 ARCHoS wards the trashcan, which will turn into a big eject symbol. • Drop the icon onto this eject symbol: the ARCHoS hard drive will disappear from the desktop. • You can now safely unplug the USb cable from your ARCHoS device and/or computer.
-
Page 40: Setup Screen
Setup Screen. 7.1 language seTTIngs • Language Choose between English, french or German. Visit www.archos.com to check the availability of other languages that you can download and install. • far East font lets you use other character sets. See: other Character Sets . -
Page 41: Display Settings
TV/LCD button on the device). • External Display Choose between Composite / S-Video / Component / RGb. This setting deter- mines what type of display your ARCHoS LCD SETTINGS • LCD brightness adjusts the level of brightness of the built-in screen. -
Page 42: Clock Settings
504/604 MANUAL • Picture name allows you to select a picture to use as a background image. You can choose between all default backgrounds and images that you have pre- viously set as wallpapers. You can also set a picture as wallpaper from the photo and video modes. In order for your wallpapers to be displayed correctly when displaying on a TV, their resolution should ideally be 1024x576 pixels. -
Page 43: Power Settings
These settings will help you save battery power, thus allowing a longer battery autonomy. You can adjust settings for both battery operation and DC-Power operation (when the ARCHoS is connected to a powered DVR Station or to a wall outlet via the ™... -
Page 44: Tv Control
This button is grayed out when the ARCLibrary setting is set to off . • Preferred USb lets you choose your preferred USb connection mode, which will be highlighted by default each time you connect your ARCHoS nection mode determines how your device interacts with your computer: V2.1 ™... -
Page 45: Updating The Firmware
To INSTALL THE LATEST fIRMWARE: 1. Download the AoS file (Archos operating System) • on the downloads page for your product on www.archos.com, click on the link to download the firmware update (Archos V2.1 will use the Media Transfer Protocol ™... - Page 46 My Computer and paste the AOS file (right-click > Paste ) inside the Data folder. if you are in PC Hard Drive mode (see: System Settings ), simply drag and drop the AOS file onto the icon of your ARCHOS • If there is already an AOS file, Windows existing file: click on Yes .
-
Page 47: Optional Functionalities
• The ARCHoS DVR Station stays connected to your home entertainment system ™ and allows you to quickly connect your ARCHoS TV, record from your satellite or cable box, etc. • The ARCHoS DVR Travel Adapter allows you to record from an external video ™... - Page 48 / to select a different setting. Scheduling Parameters • Auto Stop Rec options: oN/off. If set to oN, the ARCHoS stop recording after the duration set in the Duration parameter. If set to off, the recording will continue until you press drive fills up. •...
- Page 49 Auto/Composite/S-Video/black&White. You can choose which video input you want the ARCHoS Normally, with a good video signal, you can set it to Auto and your ARCHoS will scan the DVR station inputs to see which one is receiving video.
-
Page 50: Copy Protection
The scheduler automatically reorganizes the recording events chronologically, • In order for a scheduled recording to start, you must leave the ARCHoS on the main menu screen or leave it in stand-by mode. If you are listening to mu- sic, watching a video or looking at photos with the device, it will not interrupt you to make the scheduled recording. - Page 51 From your browser menu click on File > Save As… to save the file. Do not change the file Name, but do change the Save as Type to ‘Web page, HTML only’. Now save the file to the ‘System’ folder on your ARCHOS When you disconnect your ARCHoS...
- Page 52 (see Updating the firmware). • If you change your Yahoo! adding new ones, only the new programs will be added to the ARCHoS uler when you save the html file to the ARCHOS scheduled items, you must do this in the ARCHoS •...
- Page 53 Test channel select: When you press the Test channel select button (highlight test channel select and press OK), the ARCHoS through the DVR Station’s infrared emitter and change the channel on your tuner (VCR, cable box, or satellite receiver).
-
Page 54: Recording Audio (External Source)
504/604 MANUAL Test oN/off: When you click on the Test on/off button, the ARCHoS will send a signal to the infrared emitter and turn your device on or off. Press this test button again and your device should change from on to off or off to on. -
Page 55: Usb Host Connection
8.5 usb hOsT COnneCTIOn • With the optional Docking Adapter or DVR Station, you can connect compatible USB devices to the ARCHOS, in order to transfer files or pictures. • These devices can be Mass Storage Class (MSC) devices, such as digital cameras, card readers or external hard drives, or digital cameras using the Picture Transfer Protocol (PTP). -
Page 56: Technical Specifications
USb 2.0 Host : Mass Storage class (MSC) and Picture Transfer Protocol (PTP) (with optional adapter). CoNNECTIoNS: • 3.5 mm stereo headphone mini-jack and TV output (AV cable sold separately). • Archos docking station connectors to connect optional adapters and station. ™ PoWER SoURCE: • Internal: removable Lithium-Ion Polymer battery. -
Page 57: Computer System Requirements
Microsoft WMV MP@ML up to DVD resolution. Subject to availability. See www.archos.com. H.264 up to DVD resolution. AAC sound. Subject to availability. See www.archos.com. MPEG-2 MP@ML up to 10 Mbps (up to DVD resolution). AC3 stereo sound. on average; based on 3.5 mins/song & 64 kbits/s WMA (for better quality 128 kbit/s or more recommended), on 500 kbits/s MPEG-4 audio/video encoding and 1h30/movie (for near DVD Quality 1500 kbits/s encoding or more recommended), on JPEG, VGA. -
Page 58: Lcd Pixel Policy
3 defective pixels (regardless if these pixels have one or more defec- tive dots). This means that during the period of guarantee for your country or juris- diction, if the screen on your product has four or more defective pixels, ARCHoS ™... -
Page 59: Technical Support Information
MANUAL TeChnICal suPPOrT InfOrMaTIOn Need Help? You can find the information you need: • on our Website: see the frequently asked questions section on www.archos.com/faq • by asking our technical support team: visit www.archos.com/support for e-mail support. • U.S. & Canada: Call 877-300-8879 (toll free).
Need help?
Do you have a question about the Version 2.1 and is the answer not in the manual?
Questions and answers
Display is not coming when power on.
The display may not be coming on when powering on the Archos Version 2.1 for several reasons:
1. Battery Issue – The device may not have enough charge. Try charging it and check the battery status in the top right corner of the screen.
2. Connection Issue – If using an external display, ensure the TV Video Display Indicator LCD light is on, indicating an active connection.
3. Software or Hardware Malfunction – If the device’s software has been updated or modified, it may affect functionality. Try resetting the device.
4. Device Is Off or Not Responding – Ensure the power button is functioning properly and attempt a restart.
If none of these steps resolve the issue, further troubleshooting may be needed.
This answer is automatically generated