Table of Contents
Advertisement
Quick Links
Download this manual
See also:
User Manual
Advertisement
Table of Contents

Related Manuals for Geemarc CLA9


Summary of Contents for Geemarc CLA9
- Page 1 CLA9/CLA9T AMPLIFIED HEARING ASSISTANT AMPLIFICATEUR PORTATIF AMPLIFICATOR PORTATIL English Français...
-
Page 3: Table Of Contents
- Unpacking the CLA9/CLA9T Description General Description Installation Setting Up - Earpiece Using the CLA9/CLA9T - Turning the CLA9/CLA9T On and Off - Tone and Balance Setting - CLA9T only - Tone & balance setting Troubleshooting Safety Information Regulatory Compliance... -
Page 4: Introduction
“T” setting. It is important that you read the instructions below in order to use your Geemarc CLA9 or CLA9T to its full potential. Keep this user guide in a safe place for future reference. -
Page 5: Unpacking The Cla9/Cla9T
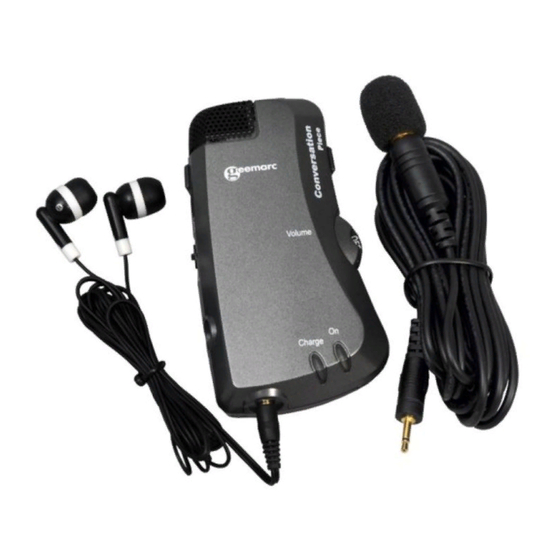
Introduction Unpacking the CLA9 and CLA9T When unpacking the CLA9/CLA9T, you should find the following in the box: - CLA9 or CLA9T Conversation Piece - Earphone with rubber ear cushions - 2.4V (4/5AAA) Rechargeable Battery - Travel charger - Black velvet carrying case for CLA9/CLA9T Conversation Piece - A microphone with "holder"... -
Page 6: Description
Description General Description Microphone port Internal microphone CLA9/CLA9T Conversation piece On/Off Volume control Mode Switch (MIC or T) wheel CLA9T only Charging port Earpiece port Charge and On LED Belt clip Battery Compartment Cover... - Page 7 Description Space for Battery-pack or batteries Tone & Balance Setting Plug for the battery pack...
-
Page 8: Installation
) instead of the one supplied . Plug the battery charger in to the main supply and plug the other end of the lead into the charging port on the left hand side of the CLA9/ CLA9T Conversation Piece. Switch the main supply on. -
Page 9: Using The Cla9/Cla9T
"built in T coil". An external microphone is supplied and can be connected in the socket "Mic" ( option for the CLA9), then set the switch to "Mic" position, in this case the "built in T coil" is disabled. -
Page 10: Troubleshooting
The CLA9/CLA9T Is not charging - Make sure that the power supply cord is plugged in correctly i.e. into a working wall socket and into the CLA9/CLA9T Conversation Piece. - Make sure that the battery is inserted correctly and is of the... -
Page 11: Safety Information
Safety Information General Do not open the unit. Contact the helpline for all repairs. Cleaning Clean the CLA9/CLA9T with a soft cloth. Never use polishes or cleaning agents - they could damage the finish or the electronic pieces inside. Environmental Do not expose to direct sunlight. -
Page 12: Regulatory Compliance
Regulatory Compliance Warning: Changes or modifications to this unit not expressly approved by the party responsible for compliance could void user's authority to operate the equipment. NOTE: This equipment has been tested and found to comply with the limits for a Class B digital device, pursuant to Part 15 of the FCC Rules. -
Page 13: Guarantee
Simply send the CLA9/CLA9T (postpaid) and a copy of your sales slip as proof of purchase to: Sonic Alert Inc., 1050 E. Maple Road, Troy MI 48083 IMPORTANT : YOUR RECEIPT IS PART OF YOUR WARRANTY AND MUST BE RETAINED AND PRODUCED IN THE EVENT OF A WARRANTY CLAIM.
Need help?
Do you have a question about the CLA9 and is the answer not in the manual?
Questions and answers