Advertisement
Quick Links
QUICK USER GUIDE
!!! Please refer to our website: www.geemarc.com for an up to date user guide,
as there may be important updates and changes you need to be aware of !!!
INTRODUCTION
This 2.4GHz DIGITAL WIRELESS INDUCTION NECK-LOOP SYSTEM uses the
latest digital wireless technology. This enables the sound from your selected audio
device directly into your hearing aids. Simply connect the transmitter to the desired
audio source: TV, sound system, etc.
FEATURES
•
2.4GHz digital hopping system technology
•
Inductive neck-loop transmits directly to hearing aid
•
Docking charge mechanism
•
Battery saving auto RF transmission off (when no audio signal)
•
In personal listener mode CL7060 mutes audio input.
•
Speed charging mechanism
•
Spare battery for continuous use.
•
Left/right balance and tone control
•
Optical audio in
COMPONENT PART LIST
DESCRIPTION
Function Identification: Neck Loop Receiver
FRONT
(A1) Neck-Loop
Receiver with
audio output jack
(A2) Transmitter
(A3) Polymer Lithium
Rechargeable
Battery x 2 pieces
(A4) AC/DC Adapter
(A5) RCA Adapter
Cable
(A6) Audio Cable (3.5
mm stereo plug at
both ends)
(A7) TOSLINK Optical
Cable
REAR
1
(B1) Break-free Plug
(B2) Volume Adjustment
(B3) Power on indicator
(B4) Microphone button for room monitoring
(B5) On/Off switch
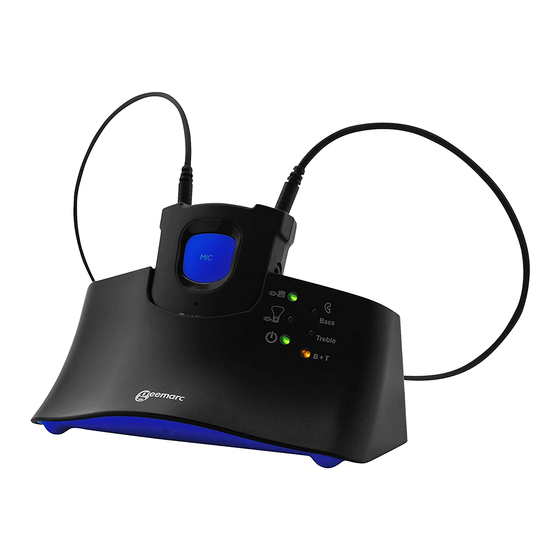
Function Identification: Charging Cradle
FRONT
REAR
(C1) Charging Cradle
(C2) Spare Charging Slot
(C3) LED Charging Indicator for Spare Battery
(C4) LED Charging Indicator for Main Battery
(attached to neck loop receiver)
(C5) LED Power/Signal Indicator
(C6) Tone Clarity Button
Please note that only one input (either audio input or optical input) should be
connected.
INSTALLATION
Transmitter
(D1) Connect the power adapter to the DC IN input socket located on the transmitter
rear panel.
(D2) Connect the power adapter provided to an electrical outlet. Make sure the
Power LED on the Transmitter is ON.
(D3) Connect the transmitter to your audio source.
(D4) RCA Adapter Cable, Audio Cable, TOSLINK cable and are provided for different
types of connection to your Audio Source (e.g. TV set, sound system, etc).
(D5) When using the TOSLINK cable ensure that the clear plastic protective covers
are removed from both ends.
Please note that only one input (either audio input or optical input) should be
connected. Where possible the best audio result will be obtained by using the
TOSLINK cable.
Adaptor+UK plug
Europe
plug
SETTING UP THE NECK LOOP RECEIVER
Installation and charging the battery
Fig. A
(B6) Microphone
(B7) Volume balance (left/right)
(B8) 3.5 mm Audio output jack
(B9) Battery
(C7) LED Indicator of Tone Clarity
(C8) DC In
(C9) Mono/Stereo Select
(C10) Optical input for TOSLINK
cable
(C11) 3.5mm Audio In
3.5mm headphone
socket
RCA socket
Optical Jack
The power adaptor with detachable plugs
suitable for UK and Europe.
The green power indicator LED will blink
when you connect the power adapter to
the electrical outlet, When the audio
signal is detected from the audio source,
the green LED Indicator will be on.
Fig. B
Fig. C
2
Advertisement

Related Manuals for Geemarc CL7060


Summary of Contents for Geemarc CL7060
- Page 1 (C8) DC In (C3) LED Charging Indicator for Spare Battery (C9) Mono/Stereo Select !!! Please refer to our website: www.geemarc.com for an up to date user guide, (C4) LED Charging Indicator for Main Battery (C10) Optical input for TOSLINK as there may be important updates and changes you need to be aware of !!!
-
Page 2: Technical Specifications
CE Directives by the status of the three LED's. Geemarc Telecom SA hereby declares that this product is in compliance with the The above table shows the settings. Check which setting works best for you. essential requirements and other relevant provisions of the Radio and Telecommunications Terminal Equipment Directive 2014/53/UE.
Need help?
Do you have a question about the CL7060 and is the answer not in the manual?
Questions and answers