Advertisement
Quick Links
Advertisement

Related Manuals for EFI GTS


Summary of Contents for EFI GTS
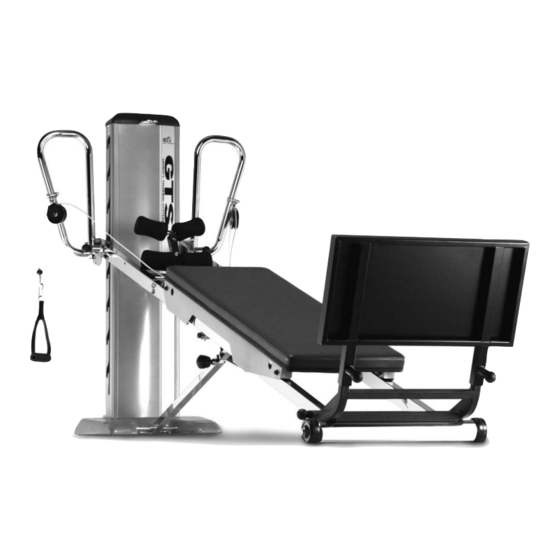
- Page 1 ® OWNER’S GUIDE...
- Page 2 Also included is a description of your warranty information. If during the course of using the GTS you have any questions about the product or you require parts or service, please write, email or call us at the address or phone number listed below.
- Page 3 NOTE: Letters in (parentheses) refer to the PARTS IDENTIFIER on page 1 and/or the PARTS ASSEMBLY on page 2 Use as needed for clarification. INSET 3 (on back of Tower; see INSET 1) PARTS IDENTIFIER - GTS-03 When parts are referenced throughout this guide, (on top of Tower; see INSET 1) corresponding letters from this PARTS IDENTIFIER page are also listed.
- Page 4 NOTE: Letters in (parentheses) refer to the PARTS IDENTIFIER on page 1 and/or the PARTS ASSEMBLY on page 2. Use as needed for clarification. PARTS ASSEMBLY - GTS Your GTS arrives with some assembly required. BOX CONTENTS Tower, Rail &...
- Page 5 NOTE: Letters in (parentheses) refer to the PARTS IDENTIFIER on page 1 and/or the PARTS ASSEMBLY on page 2 Use as needed for clarification. SET UP - GTS Remove your GTS from the box. Stand the GTS upright. Never turn your GTS on its side because it will cause the gas spring to engage. Assemble and use the GTS on level ground.
- Page 6 Tighten Support Strut Knob by turning clockwise. IMPORTANT SAFETY REQUIREMENT: Support Strut Knob MUST engaged and tightened while GTS is unfolded or in use. CAUTION: To avoid damage to your GTS, the Support Strut Knob must be loosened and disengaged when folding.
- Page 7 SAFETY TIP: Ensure that the Support Strut Knob (M) is engaged and tight. Your GTS arrives with shipping sleeves on the ends of the Tower Crossbar (Z). The shipping sleeves serve one purpose: to protect the Tower Crossbar during shipping.
- Page 8 Set the shipping sleeve aside. You may discard the shipping sleeves or retain them in the event you need to ship your GTS in the future. Now that the shipping sleeves have been removed, you are ready to...
- Page 9 LAT Bar aligns closest to the Tower (A). Black Knob NOTE: Six holes face the back of the GTS. The black knob is nearest the Glideboard (G). Retrieve the large Bronze Washer. Slide it onto the LAT Bar Cylinder.
- Page 10 NOTE: Letters in (parentheses) refer to the PARTS IDENTIFIER on page 1 and/or the PARTS ASSEMBLY on page 2. Use as needed for clarification. INSTALL LAT BARS (CONTINUED) Chrome Washer POSITION THE LAT BARS - PHASE 2 (CONTINUED) Retrieve the Chrome Washer. Slide it onto the end of the Tower Crossbar (Z) that extends beyond the LAT Bar Cylinder.
- Page 11 ® OWNER’S GUIDE NOTE: Letters in (parentheses) refer to the PARTS IDENTIFIER on page 1 and/or the PARTS ASSEMBLY on page 2 Use as needed for clarification. Place the Socket Head Screw on the end of the Wrench. With one hand, feed the Socket Head Screw partially Socket through the elongated slot.
- Page 12 NOTE: Letters in (parentheses) refer to the PARTS IDENTIFIER on page 1 and/or the PARTS ASSEMBLY on page 2. Use as needed for clarification. GTS OPERATION INSTRUCTIONS ADJUST LAT BAR To adjust the LAT Bars (Y), pull the retractable knob on the LAT Bar to disengage the LAT Bar from the Upper Rail (N) and rotate LAT Bars to the desired position.
- Page 13 Be sure the Tower Crossbar is fully secured in the Tower Level Hook on both sides before use. Always perform a visual and manual check before getting on the GTS. When you are lowering the resistance level, lift the Curved Crossbar (O2) or Rails to disengage the Tower Crossbar from the Tower Level Hook.
- Page 14 NOTE: Letters in (parentheses) refer to the PARTS IDENTIFIER on page 1 and/or the PARTS ASSEMBLY on page 2. Use as needed for clarification. FOLDING FOOT HOLDER Your GTS arrives with the Folding Foot Holder attached. Remove the packing material.
- Page 15 ® OWNER’S GUIDE NOTE: Letters in (parentheses) refer to the PARTS IDENTIFIER on page 1 and/or the PARTS ASSEMBLY on page 2 Use as needed for clarification. INSTALL FOLDING PLATFORM Face the Tower (A) and align the bottom of the Folding Platform with the large outside holes on the Lower Rails (K) just above the Lower Rail Base (J).
- Page 16 NOTE: Letters in (parentheses) refer to the PARTS IDENTIFIER on page 1 and/or the PARTS ASSEMBLY on page 2. Use as needed for clarification. FOLDING AND STORAGE The GTS is easily folded for storage. Whenever you move or store the GTS, fold the Telescoping Squat Stand (H) and Folding Platform (I) toward the Glideboard (G).
- Page 17 A-frame. 68.-69. Continue pulling the Rails toward the Tower until the Lower Rail Base (J) rests on the Tower Base (Q) and the GTS stands upright. You can use your foot to push the Rail Base onto the Tower Base.
- Page 18 Participants using GTS should wear athletic shoes and comfortable lightweight clothing. Long hair should be tied back to avoid contact with the center pulley, center hinge or rollers. Before use, check to ensure that all GTS parts are in place and working properly and the Support Strut Knob (M) is engaged.
- Page 19 WARNING Always control the Glideboard while mounting or dismounting your GTS. Do not exceed 650 pounds (295 kg) of total weight-bearing on GTS, including body weight, weight bar and added weights. Maximum user body weight is 350 pounds (159 kg).
- Page 20 Monthly • Inspect Dynamic Arm Pulley System (W) • Remove all Glideboards for visual inspection of Your GTS will offer your health and fitness or wellness for wear or damage. If plastic outer cable rollers/wheels. Clean any debris accumulated on...
- Page 21 (force) in can assist in planning a program for the individual’s operation. Do not use your GTS if it is not completely pounds or kilograms required to move the glideboard. age and physical condition. Certain exercise programs assembled or has been damaged in any manner.
- Page 22 NOTE: Letters in (parentheses) refer to the PARTS IDENTIFIER on page 1 and/or the PARTS ASSEMBLY on page 2. Use as needed for clarification. RESISTANCE CHARTS...
- Page 23 _______________________________________________________________________________ against delivery agents for damage during shipping. _______________________________________________________________________________ If the GTS appears to have sustained damage in shipping, or if the GTS appears to have shifted in _______________________________________________________________________________ delivery but no damage is evident, retain the _______________________________________________________________________________ shipping boxes until the GTS has been fully...
- Page 24 San Diego, CA 92126 efisportsmedicine.com ©2003/2007, efi Corp / J31176 / 99474. All rights reserved. Manufactured in Taiwan and sold under USA Design Patent No. 6,921,355. Also covered by one or more of the following patents: D493,853; D405,132; 4,004,801; 5,169,363; 5,967,955; 7,270,682; 4,004,801; 5,169,363...
- Page 25 EFI, which are accompanied by this written warranty. EFI, at its option, will repair, replace or refund the purchase price of any product that does not conform to this warranty. Repairs or replacement will be made at no charge to the customer for parts or labor, provided that the customer shall be responsible for any transportation and shipping costs.
- Page 26 WHETHER RESULTING FROM THE USE, MISUSE OR INABILITY TO USE THE PRODUCT OR FROM DEFECTS IN THE PRODUCT. EFI retains the exclusive right to repair or replace the product or offer a full refund of the purchase price at its sole discretion. SUCH REMEDY SHALL BE YOUR SOLE AND EXCLUSIVE REMEDY FOR ANY BREACH OF WARRANTY.
Need help?
Do you have a question about the GTS and is the answer not in the manual?
Questions and answers