
Related Manuals for Samsung RUGBY 4


Summary of Contents for Samsung RUGBY 4
-
Page 1: User Manual
R U G G E D I Z E D M O B I L E P H O N E User Manual Please read this manual before operating your device, and keep it for future reference. -
Page 2: Legal Notices
RESPECT TO THE PRODUCT, INCLUDING BUT All Intellectual Property, as defined below, owned NOT LIMITED TO THE MERCHANTABILITY OF THE by or which is otherwise the property of Samsung PRODUCT OR ITS FITNESS FOR ANY PARTICULAR or its respective suppliers relating to the SAMSUNG PURPOSE OR USE;... - Page 3 IC Notice ©2014 Samsung Electronics Samsung is a registered trademark of Samsung This Class B digital apparatus complies with Electronics Co., Ltd. Canadian ICES-003. This device complies with Industry Canada licence exempt RSS standard(s). Operation is subject to the The actual available capacity of the internal memory...
-
Page 4: Table Of Contents
Table of Contents Getting Started Call ..................62 ............. 1 Backup Manager Front View ............66 ................2 Security Closed and Side Views ................67 ..........4 PC Connections Assemble Your Device ............69 ..........5 Network Set Up Your Device ................70 ............8 Memory ................72 Know Your Device... -
Page 5: Getting Started
Getting Started Learn about your mobile device hardware, assembly procedures, and how to get started using your new device. -
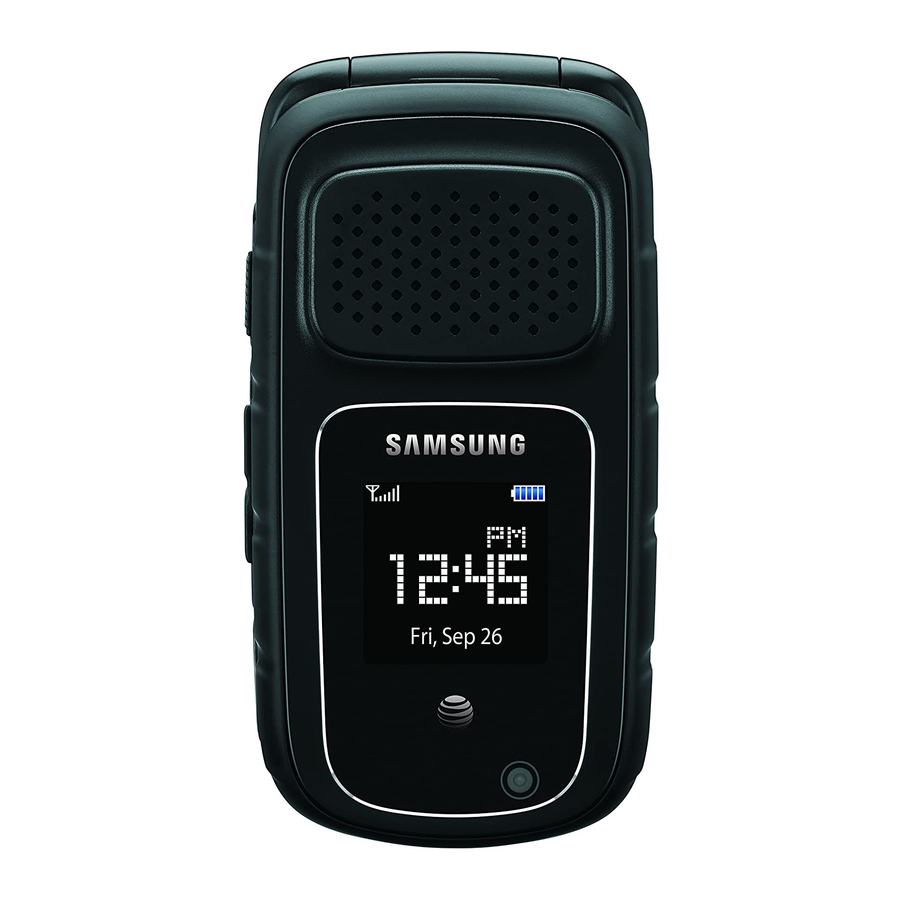
Page 6: Front View
Front View Earpiece Main display Centre/Select key Clear key Navigation keys Left soft key Right soft key Voice recognition key Multitasking key Send key Power/Exit/End key Alphanumeric keypad Asterisk key Pound key Microphone • • Alphanumeric keypad: Use these keys to enter Clear key: Delete characters in text mode. - Page 7 • • Multitasking key: Press to bring up the Power/Exit/End key: Press and hold this key to Application Switch window, which allows you turn the phone on and off. When on a phone call, to switch to another application without closing press this key to end the call.
-
Page 8: Closed And Side Views
Closed and Side Views Speaker Speaker key PTT Hotkey USB/Headset Volume keys port Cover display Camera • • Camera: Takes pictures and record videos. Speaker key: During a call, press this key to turn the speaker on. When the phone is turned •... -
Page 9: Assemble Your Device
Assemble Your Device Prior to use, it is necessary to Warning: Do not bend or twist the back cover excessively. Doing so may damage the cover. install the SIM card, optional memory card (not included), Install the SIM Card and the battery. When you subscribe to a cellular network, you are provided with a plug-in SIM card. -
Page 10: Install The Battery
Install an Optional Memory Card Install the Battery You can install an optional microSD or microSDHC memory card (not included) to expand available memory space. Note: A memory card can be installed at any time; it is not necessary to install it prior to using the device. To add additional memory to your phone, you can insert a microSD card into the memory card slot, located on top of the SIM card, inside the back of... -
Page 11: Charge The Battery
When the battery level becomes too low, the device automatically turns off. Caution: Use only Samsung-approved charging devices and batteries. Samsung accessories are ► For a quick check of your battery level, view the designed to maximize battery life. Using other battery charge indicator located in the Status Bar... -
Page 12: Set Up Your Device
Set Up Your Device Turning the Phone On or Off 4. Time: Set the current time and your preferred time format. By default, the device updates its 1. Open the phone. clock according to the time on the network (either mobile or Wi-Fi network). Press the Power key until the phone 2. - Page 13 Changing the Voicemail Name and Number Your SIM card gives you the default service number of the voicemail centre. However, you may need to change the number. Use the following procedures to change your voicemail number. 1. From a Home screen, press Menu > Messaging >...
-
Page 14: Know Your Device
Know Your Device Learn some of the key features of your mobile device, including the screens and icons, as well as how to navigate the device and enter text using the keyboard. -
Page 15: Home Screen
Home Screen Status bar Edit Customizable display Soft key options • • Customizable display: Certain Widgets can Soft key options: Dynamic options that appear for the Right and Left soft keys. In some cases, an be added to the main display screens for convenience. -
Page 16: Viewing Received Messages
Change Display Appearance The Home screen is the starting point for using your device. You can change and customize several features of the Main and Cover display. See Display for more details. Manage Pages and Widgets Viewing Received Messages Your device comes with eight customizable pages for the Main display. -
Page 17: Status Bar
Status Bar The Status Bar at the top of the Status Bar Icons Main display provides device An optional memory card is installed. information (such as network Connected to a computer using a status, battery charge, and time) USB cable. and message notifications. New voicemail message has been received. -
Page 18: Navigation
Navigation Command Keys End Key End key can be used for the following There are several command keys that you can use functions: to navigate your phone. These keys are referenced throughout this user manual. • Press and hold it to turn your phone on or off. •... -
Page 19: Menu Navigation
Menu Navigation To see the shortcuts that can be added, from Idle mode, press Menu > Settings > Phone > Shortcuts. Menus and sub-menus can be accessed by scrolling The following shortcuts are available: through them using the Navigation keys or by using •... -
Page 20: Entering Text
Entering Text Learn how to select the desired T9 Predictive Text Input Method (T9Eab, T9EAb, and T9EAB) text input method when entering Use this input method to enter words with only text and characters. This section one keystroke per letter. Each key on the keypad also describes how to use the has more than one letter;... -
Page 21: Using Predictive Text
Using the Alphabetic Input Using Predictive Text Method T9 Predictive Text input method is based on a built- in dictionary. A series of keystrokes is interpreted To use the ABC Alphabetic input method, use the by the phone using this dictionary to determine the Two through Nine keys to enter your text. -
Page 22: Using The Symbols Input Method
Using the Symbols Input Method Add a New Word to the T9 Dictionary 1. After pressing the keys corresponding to The Symbol input method enables you to insert the word you want to add, press the Down symbols and punctuation marks into text. navigation key to display the alternative words. -
Page 23: Calling
Calling Make telephone calls using a variety of calling features and services. -
Page 24: Calling
Calling Learn how to make or answer To enter a missing digit, press the Left or Right Navigation key until the cursor is in a call. Explore features and position and enter the digit. functionality associated with To clear the whole display, press and hold making or answering a call. -
Page 25: Answering A Call
Answering a Call Redialing the Last Number To display the last number dialed: When you receive a call, the phone rings and displays the caller’s phone number or name, if Send key 1. From a Home screen, press the stored in the Address Book. to view the Recent Calls menu. -
Page 26: Options During A Call
Viewing Options for a Missed Call Deleting a Missed Call To view the options for a selected missed call, use To delete a missed call entry: the following steps: 1. After missing a call, press Open. 1. After opening a missed call, press View. 2. - Page 27 Using the Speakerphone During an Active To make a new call while a call is in progress: Call 1. While on a call, press Hold. While in an active call, you can enable the 2. Enter the new phone number you want to dial speakerphone feature.
- Page 28 Searching for a Number in Address Book 3-Way Calling (Multi-Party Calling) You can search for a number from the Address Book The 3-Way or Multi-Party feature is used to answer during a call. a series of incoming calls and place them on hold. If this service is supported by the network, all 1.
-
Page 29: Applications
Applications The Apps screen displays all applications installed on your device. Learn how to use and arrange your apps. -
Page 30: Menu
Menu The Menu screen shows all apps on the device. Accessing Applications ► From a Home screen, press Menu. Organize Your Apps The Apps icons can be organized in your own custom order. Move Apps 1. On a Menu screen, highlight the App you want to move and press Options. -
Page 31: Address Book
Address Book Contact information is stored in the Address Book, 10. Highlight the Group field to assign the contact to which organizes contacts and allows you to make one or more groups. calls, send messages, and send contact information. 11. Press Save. Note: When storing an Address Book entry into your Note: By default, contacts are saved on the SIM card, note that only the name, phone number,... -
Page 32: Finding An Address Book Entry
Creating New Group 4. Enter the caller’s information. 1. From a Home screen, press Menu > Address Deleting an Address Book Entry Book. You can delete contacts from both the Phone and 2. Use the Navigation keys to scroll over to the SIM card. -
Page 33: Managing Address Book Entries
Copying an Entry to the Phone 6. Press Remove, if multiple contacts are being deleted. 1. From a Home screen, press Menu > Address Book > Options > Settings > SIM Management Renaming a Caller Group > Copy Contacts from SIM and press Select or Centre key. -
Page 34: Used Space
Checking the Address Book’s Used Space You can check how many names and numbers are stored in the Address book, in both SIM card and the phone memory. You can also see the capacity of both memories. ► From a Home screen, press Menu > Settings > Memory >... -
Page 35: Alarms
Alarms This feature allows you to create Type: Press Edit to select a new type of alert notification (Melody, Vibration, or Vibration and alarms that work even if the Melody). phone is turned off. Tone: Press Edit to select a tone from the Tones folder. -
Page 36: Ptt
Push To Talk (PTT) feature allows 2. Press Yes or the Centre key to initialize PTT. you to contact your family, – or – friends, and co-workers instantly. Press No to exit. 3. To initialize or change the display name, press Note: Push To Talk requires a service subscription Options >... -
Page 37: Ptt Icons
PTT Icons PTT Contact Availability The following icons appear next to individuals in This section covers the icons that display next to your PTT Contacts list and indicate their availability. individuals and groups in your PTT Contacts list indicating their availability. Unavailable: The Contact is unavailable to receive PTT calls because the Contact has My Availability... - Page 38 PTT Contacts Screen Options 3. With + New Group highlighted, press Options and choose from the following options: The PTT Contacts screen shows your contacts that Search: Perform a search for a PTT contact have PTT service and their availability. group.
-
Page 39: Adding A Contact
Adding a Contact 3. Enter the Name of the new Group. 4. Highlight Set as Favorite and press the Note: The maximum number of Contacts is 1300. Centre key to check the box and make this 1000 contacts are managed by the Administrator and Group a favorite. -
Page 40: Making A Ptt Call
Deleting a Group Removing Contacts and Groups from Favorites Note: If your corporate Administrator has restricted your phone, you may not be able to delete Groups. To remove Contacts or Groups from your Favorite list: To delete a PTT Group: 1. -
Page 41: Call Waiting
Settings Logout: Select to log out of the PTT service Auto start: Enable or disable auto start of the The following settings are available when you enter PTT service when you turn on your phone. the PTT Settings menu. PTT keylock: Enable or disable locking the 1. -
Page 42: Bluetooth
Bluetooth You can activate and manage Visibility Bluetooth connectivity with other The Visibility option allows your phone to broadcast devices, including computers its name and status when Bluetooth is activated. This can be useful if you are attempting to connect and headsets. - Page 43 3. Enter the passkey (if applicable). If connecting to a Bluetooth device, consult your Bluetooth device user manual for your assigned passkey (or PIN). If connecting to another handset, enter the same user-defined passkey on both handsets. Note: The first time you try to pair with a handset, you and the owner of the other handset must enter the same Passkey.
-
Page 44: Browser
Browser Browser is your access to To execute a hyperlink to another location on the web: the mobile web. This section 1. Highlight the field and press Open. The new web explains how to navigate page displays. Browser and introduces you to 2. -
Page 45: Adding Bookmarks
Deleting Cookies Accessing a Website Using Bookmarks To access a bookmark: A cookie is a small file which is placed on your phone by a website during navigation. In addition 1. From a Home screen, press Menu > Browser > to containing some site-specific information, it can Options >... -
Page 46: Camera
Camera Use the Camera application View a Photo to take still photos and record After you have taken a photo: videos (camcorder function). 1. Press View to view the photo. 2. To see options, press Options. Highlight an option and press the Centre key. - Page 47 Camcorder View a Video 1. From a Home screen, press Menu > My Files > Use the Camcorder to record videos. Videos. Tip: When recording video in direct sunlight or in Note: To display videos saved on your microSD card, bright conditions, it is recommended that you provide use the Right Navigation key to select On Card and your subject with sufficient light by having the light...
-
Page 48: Downloads
Downloads View all files downloaded to your phone. To view Downloads: ► From a Home screen, press Menu > Downloads. Applications Downloads... -
Page 49: Messaging
Messaging Messaging helps organize and Tip: When manually entering recipients in the To field, use a semicolon to separate recipients. create text and media messages 3. Use the Down Navigation key to move the cursor sent to and from your phone. to the text field and begin writing your text message. - Page 50 Outbox Tip: When viewing a text message, press the Up Volume key to increase the font size of the message This message box contains messages that will be or text, or press the Down Volume key to decrease the are in the process of being sent. font size.
-
Page 51: Broadcast Messages
Voicemail MMS Card You can create multimedia message templates This option allows you to access your voicemail. (called cards) that include both text and media. These templates are useful as greeting cards for Note: These steps may be different depending on special occasions. - Page 52 Spambox The Spambox contains messages that are identified as spam (unsolicited or unwanted messages). This box separates spam messages from your Inbox. It also provides a way to check for potentially wanted messages that may have been misidentified as spam. ►...
-
Page 53: Music Player
Music Player Play and organize music and 4. Press the Left Navigation key Rewind (skip to the previous song). audio files with the Music Player. Press the Centre key to Pause or Resume playing the song. The Music Player app supports files with extensions AAC, AAC+, eAAC+, MP3, WMA, 3GP, MPEG, MP4, Press the Right Navigation key to Fast Forward and M4A. -
Page 54: Using Playlists
Playing Music while Using the 3. Use the keypad to enter the name of the playlist in the Name box and press Save. Phone 4. Select the new playlist by highlighting it pressing The Music Player allows you to play music in the Centre key. -
Page 55: My Files
My Files My Files is a file management Adding Files to a Folder app that helps you find and To add files to a folder: manage files on your phone, 1. Navigate to a file to add to the folder. especially images, videos, and 2. -
Page 56: Deleting A Folder
Deleting a folder To delete a folder: 1. Navigate to the level that contains the folder and highlight it (do not open the folder). 2. Press Options > Delete. 3. A notice appears warning that the folder and all of its contents will be deleted. To proceed, press Yes. -
Page 57: Settings And Tools
Settings and Tools You can configure settings for your phone under Settings. In Tools, a variety of useful electronic tools are provided, including a voice recorder, calculator, calendar, timer, and stopwatch. For more details, see the sections Settings Tools. Applications Settings and Tools... -
Page 58: Wi-Fi
Wi-Fi Your phone supports Wi-Fi WPS PBC: Enable a Wi-Fi Protected Setup connection. Follow the instructions shown on connectivity, which allows you the screen to connect to a router that supports to access data using a wireless WPS connections. network when connected. Find hidden networks: Search for a Wi-Fi network that does not broadcast its name or SSID. -
Page 59: Settings
Settings This section explains how to change and customize the display settings, call handling, security settings, and other settings and features of your phone. -
Page 60: Sound Profiles
Sound Profiles • You can customize various Message alert tone: Select the tone to be played upon receipt of a message. sound profiles for your phone by • Keypad tone: Choose between Beep, Lucid, and changing the sound settings. Mute (no tone) for keystrokes on the phone. •... - Page 61 Driving Outdoor The Driving profile keeps the speaker active and The Outdoor profile keeps the speaker active, launches the currently selected ringtone or melody the volume settings are raised to their highest when the associated notification activates. You may levels, any currently active ringtones or melodies also set the phone to automatically reply to a voice are activated, and the phone’s vibrate feature call or send an automated reply to an incoming text...
-
Page 62: Display
Display • Use this menu to change various Dialing display: Customize the size and colour of numbers that are dialed. settings for the main and from Type: Choose the colour for the dialing display displays. by selecting either the Current theme or Custom. -
Page 63: Cover Display
Cover Display slogan. Press the Clear key to delete the default slogan, then use the text entry options • Wallpaper: Select the default screen for the Cover and the keyboard to enter your slogan. Press Display. Choose from Clock or Screen slogan. Save or the Centre key to confirm your selection. -
Page 64: Time And Date
Time and Date • Use the Time and Date menu Time: This option is only available if Automatic time update is Deactivated. Press to change the current time and Change to edit the time. Enter the current time date displayed. You can also find using either the keypad or Navigation keys. -
Page 65: Phone
Phone Phone settings provide To add or remove applications to the Shortcuts menu: configuration parameters to ► Scroll through the list of applications and press Flight mode, Language, the Centre key to either place or remove a Shortcuts menu, and GPS for check mark next to the applications. -
Page 66: Call
Call The Call menu allows you to To manually add a number to reject: change the actions taken by 1. From a Home screen, press Menu > Settings > Call > All Calls > Auto Reject. the phone when dialing and 2. -
Page 67: Answering Mode
Answering Mode Reject Call With Message This feature allows you to select how your phone This feature allows you to set up text messages for answers incoming calls. rejected calls. When activated, you have the option to reject an incoming call and choose a text message 1. -
Page 68: Voice Call
If no reply: Forward Voice Calls to a 2. Under Prefix number, press the Centre key designated number instead of your voicemail to view the existing prefixes to select. Up to five number when if you do not answer your messages can be configured. - Page 69 Auto Redial Use this feature to turn automatically redial the last number if the call was either cut off or you were unable to connect. 1. Highlight either On or Off and press the Centre key to make your selection. 2.
-
Page 70: Backup Manager
Backup Manager Use this feature to backup and 3. Use the Navigation keys to scroll through the list and press the Centre key to select the data restore data on the phone to or to back up. from a memory card. Contacts, –... -
Page 71: Security
Security The Security feature enables you SIM Lock to restrict the use of your phone When the SIM Lock feature is enabled, your phone by others and to restrict the only works with the current SIM card. You must enter the lock code to unlock the SIM card so types of calls that can be made. -
Page 72: Privacy Lock
Privacy Lock Change PIN Privacy lock secures various applications. Once This option allows you to change your current PIN, you lock the contents, you must enter the phone’s provided that the PIN Lock feature is enabled. You password to access the associated menus. must enter the current PIN before you can specify a new one. -
Page 73: Pc Connections
► From a Home screen, press Menu > Settings > PC connections. Choose from the following options: • Samsung Kies: Connect to a computer using Samsung Kies. • Mass storage: Connect to a computer as a mass storage drive. The phone appears on the computer as an external drive. -
Page 74: Network
Network Network settings allow you Internet Profiles to create and customize the Internet profiles are listed on this screen. You can profiles containing the settings add new profiles in addition to the ones from your mobile service provider. for connecting your phone to the To create a new Internet Profile, use the following network. -
Page 75: Data Service
Data Service The Data Service settings determine how the phone connects to mobile data. Note: Mobile data services incur additional charges. Contact your service provider to find out what these charges are and what data services are available for your phone. The available features are: •... -
Page 76: Memory
Memory You can easily check the amount Memory Status of memory being used for Select Memory Status to view usage of the phone’s storing data. You can also format storage space. The following categories are available: an installed memory card. •... -
Page 77: Default Memory
Default Memory You can specify where to store certain types of data if a microSD card is installed. If a microSD card is not available, then you can only store data on the phone. The following types of data can be stored either on the Phone or on an installed Memory card: Internet download, Message download, Bluetooth, Camera, Camcorder, and Voice Recorder. -
Page 78: Reset
Reset You can reset your phone to its To perform a Master reset of your phone: default settings. Warning! All User Data (such as contacts, messages, pictures, videos, and music) is deleted. If a microSD card is installed, remove it before performing the To access the Reset menu: Master reset to protect it from erasure. -
Page 79: Software Update
Software Update The Software Update feature enables you to use your phone to connect to the network and upload any new phone software directly to your phone. 1. From a Home screen, press Menu > Settings > Software Update. 2. Select one of the following options: Check for update: Checks the service provider’s server to see if there are new software updates available. -
Page 80: About Phone
About Phone This menu shows you the phone number on the SIM card (within the phone), the manufacturer, the model number, and various other information related to your phone. You may be asked for this information if you have to talk to Customer Service because of a problem. -
Page 81: Talkback
TalkBack The TalkBack feature provides voice feedback and some instructions regarding the phone’s interface. To access the TalkBack menu: ► From a Home screen, press Menu > Settings > TalkBack. The following options are available: • TalkBack: Turn the TalkBack feature either On or Off. -
Page 82: Ptt Hotkey
PTT Hotkey Use the PTT Hotkey setting to change the function of the PTT Hotkey. The Push-to-Talk (PTT) Hotkey is located on the side of the phone and can be assigned either to the PTT function or to launch an application. This is useful if you do not have a PTT subscription and would like to use the hotkey as a shortcut for an application. -
Page 83: Tools
Tools The Tools menu provides a variety of useful utilities, including voice recognition, calculators, and timers. -
Page 84: Voice Recognition
Voice Recognition • Nuance Voice Recognition Check <Item>: Check your phone’s status in the same report (Status, Messages, Missed Calls, software is an advanced speech Time, Signal strength, Network, Battery, My Phone recognition software that can be Number, and Volume). used to activate a wide variety of While the Say a Command screen displays you have two options:... - Page 85 Contacts List Voice Activation On startup, Nuance Voice Recognition software reads your Contacts list and voice-activates all the names. When you add or change contacts, the software automatically reloads and voice-activates the list when you add or modify a contact. Tools Voice Recognition...
-
Page 86: Voice Recorder
Voice Recorder Voice Recorder allows you to 8. On the Sounds page, press Options to display the following options: record voice memos. It also Send via: Attach the voice recording to a allows you to send your audio Multimedia Message or send it to a Bluetooth file to other people as an device. - Page 87 Sounds Folder This folder shows a list of audio files. Audio files include default tones that come with the handset, audio files you have downloaded, and audio files you have recorded. When a voice memo is recorded and saved, it is stored in the Sounds folder. To access this folder, use the following steps: 1.
-
Page 88: Calendar
Calendar Use the Calendar tool to keep Creating an Event track of important appointments To create an appointment, an anniversary, holiday, and events. important date, or private event: 1. From a Home screen, press Menu > Tools > To access the Calender, use the following steps: Calendar. -
Page 89: Viewing An Event
Repeat until: Set as duration for this appointment by assigning an expiration date. Only appears if Repeat is set to any period other than None. Location: Location description for this appointment (up to 40 characters). Details: Description or details for this appointment (up to 100 characters). -
Page 90: Logs
Logs The phone stores the numbers of the calls you have dialed, received, or missed in the Logs menu. If the number or caller is listed in your Address Book, the associated name displays. To access the call Logs: 1. From a Home screen, press Menu > Tools > Logs. -
Page 91: Compass
Compass Use the Compass application as you would any compass. The red end of the compass needle indicates magnetic north and the direction that the cover of the phone is facing is indicated below the diall. To use the compass: 1. -
Page 92: Tasks
Tasks The Tasks option allows you to create a “to do” or task list. To create a Task and add it to the task list: 1. From a Home screen, press Menu > Tools > Tasks. 2. If there are no tasks yet, press Create. If there are tasks listed, then press Options >... -
Page 93: Memo
Memo Use the Memo tool to create notes to remember. To use the Memo tool: 1. From a Home screen, press Menu > Tools > Memo. If there are no tasks yet, press Create. If there are tasks listed, then press Options > Create memo. -
Page 94: Calculator
Calculator The Calculator provides basic arithmetic functions. This tool lets you use the phone as a calculator. The calculator provides the basic arithmetic functions: addition, subtraction, multiplication, and division. 1. From a Home screen, press Menu > Tools > Calculator. 2. -
Page 95: Tip Calculator
Tip Calculator Use the Tip Calculator to calculate the amount of money to leave as a tip based on parameters such as total bill amount, tip percentage, and number of members in your group. 1. From a Home screen, press Menu > Tools >... -
Page 96: Converter
Converter The Converter menu provides the following conversion categories: Currency, Length, Weight, Volume, Area, and Temperature. To use the Converter: 1. From a Home screen, press Menu > Tools > Converter. 2. Highlight a Converter function, and press Select or the Centre key. -
Page 97: World Clock
World Clock World Clock allows you to view the time around the world. It displays time in 30 cities and areas, within all 24 time zones, around the world. To add a new time zone to the World Clock main screen: 1. -
Page 98: Timer
Timer Use the Timer to set a countdown timer. To enable the Timer, use the following options: 1. From a Home screen, press Menu > Tools > Timer. 2. Begin by setting the length of time. Use the Left or Right Navigation key to highlight the hour, minutes, and seconds. -
Page 99: Stopwatch
Stopwatch Use the Stopwatch to measure split and lap times. Up to fifty separate times can be recorded. 1. From a Home screen, press Menu > Tools > Stopwatch. 2. Use the Right and Left Navigation keys to select either Split or Lap modes. Note: Split times are measured from the clock’s start time. -
Page 100: Safety Information
Safety Information This safety information contains content for mobile devices. Some content may be not applicable to your device. To prevent injury to yourself and others or damage to your device, read the safety information about your device before using the device. -
Page 101: Warning
Warning • Failure to comply with safety Samsung cannot be responsible for the user’s safety when using accessories or supplies that warnings and regulations can are not approved by Samsung. cause serious injury or death Do not drop or cause an impact to the charger or... - Page 102 Do not use or store your device in areas with high concentrations of dust or airborne materials Dust or foreign materials can cause your device to malfunction and may result in fire or electric shock. Do not bite or suck the device or the battery •...
-
Page 103: Caution
Samsung Service Centre • Electronic devices in your car may malfunction, Failure to do so may result in fire or explosion. - Page 104 • Samsung does not guarantee that the device will Maintaining water and dust resistance operate normally if it is used in water or other The device may be damaged if water or dust enters liquids.
- Page 105 Your device has been tested in a controlled Do not use your device with the back cover re- environment and shown to be water and dust moved resistant in certain circumstances (meets The battery may fall out of the device, which may requirements of classification IP67 as described by result in damage or malfunction.
- Page 106 Hold the device upright, as you would with a Broken glass or acrylic could cause injury to your traditional phone. hands and face. Take the device to a Samsung Service Centre to have it repaired. • Speak directly into the microphone.
- Page 107 Any changes or modifications to your device can card with a soft cloth. void your manufacturer’s warranty. If your device needs servicing, take your device to a Samsung • Inserting a card or connecting a cable by force Service Centre.
- Page 108 Cautions • Do not download unknown applications. Any changes or modifications to your phone not expressly approved by Samsung could void your • Do not visit untrusted websites. warranty for this equipment, and void your authority •...
-
Page 109: Certification Information
For more information, visit www.samsung. com/sar and search for your device with the model number. - Page 110 YOU OR ANY THIRD PARTY, EVEN IF ADVISED OF THE POSSIBILITY OF SUCH DAMAGES.” Third party services may be terminated or interrupted at any time, and Samsung makes no representation or warranty that any content or service will remain available for any period of time.
Need help?
Do you have a question about the RUGBY 4 and is the answer not in the manual?
Questions and answers
can't remove a voicemol call