
Related Manuals for Zoom Q4


Summary of Contents for Zoom Q4
- Page 1 User Guide Safety and Operation Precautions must be read before using the unit. © 2013 ZOOM CORPORATION Copying or reproduction of this User Guide in part or in whole without permission is prohibited.
-
Page 2: Included Items
Q Q Q Q Q Q Q Q Q Q Q Q Q Q Q Q Q Q Q Q Q 4 Q 4 4 4 © 2013 ZOOM CORPORATION Copying or reproduction of this User Guide in part or in whole without permission is prohibited. - Page 3 Parts of the recorder Right side view Remaining battery LED INPUT Charging LED LEVEL Remaining SD LED Accessory MANUAL GAIN mount +/– GAIN switch keys switch switch Remaining battery LED Green 50% or more remaining battery charge Orange 20-50% remaining battery charge 20% or less remaining battery charge Blinking red Almost no remaining battery charge...
- Page 4 Parts of the recorder (continued) POWER button button Bottom Tripod mounting Battery/SD card screw cover Battery slot Battery lock SD card slot Installing the battery Open the battery/SD card cover. Make sure the battery is facing the correct direction and push it in completely until it locks. After confirming that the battery is locked, securely close the battery/SD card cover.
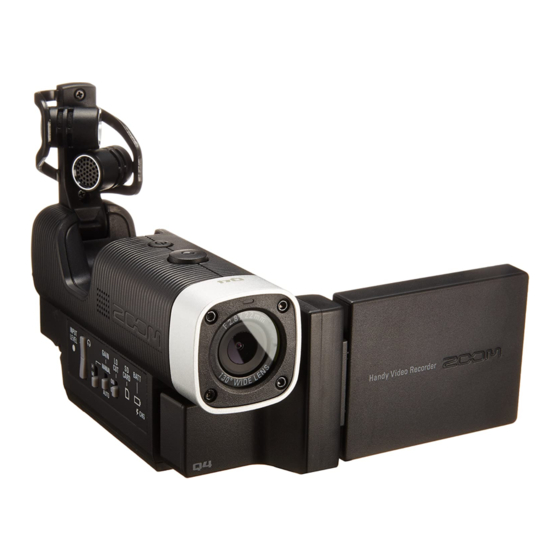
- Page 5 Back Front XY mic Lens HDMI connector port DC5V HDMI OUT External Headphones input jack EXT IN jack LCD unit connector XY mic Raise when recording. LCD unit Operation buttons...
- Page 6 Parts of the recorder (continued) Attaching and detaching the LCD unit Attaching the LCD unit Align the LCD unit with the guide rail and push it in until it is attached. Detaching the LCD unit On the menu screen, select SETTING and press (See "Working with menus"...
-
Page 7: Main Screen
Main screen Level meters Timecode Remaining battery charge Status icon Monitoring volume Video quality setting LO CUT setting Audio quality Mic gain setting Navigation SCENE setting Input settings buttons Status icon Audio quality setting This shows the current operation This shows the audio format and bit status. -
Page 8: Working With Menus
Working with menus Use the menu to make detailed settings. Open the menu screen Press while the main screen is open. This opens the menu. NOTE I f t h e L C D u n i t i s t u r n e d , t h e n a v i g a t i o n b u t t o n d i s p l a y w i l l change according to the positions of the unit operation buttons. - Page 9 Working with menus to select a menu item. Press to confirm a menu selection. The setting item list opens. to select a setting item. Press to confirm a setting selection. The setting value list opens. to select a setting value. Press to confirm a setting value.
-
Page 10: Charging The Battery
Charging the battery Turn the off. Connect to a USB power supply (running computer or ZOOM AD-17 AC adapter (sold separately)). The Charging LED stays lit while the battery is charging. After charging completes, disconnect the cable from the USB power supply. -
Page 11: Setting The Time
Setting the time When the date and time are set, the recorder can store accurate recording date and time information in files. On the menu screen, select SETTING and press to select Set Date. Press to select each item. to set the values for the current date and time. -
Page 12: Formatting Sd Cards
Formatting SD cards SD cards must be formatted by the for use with it. On the menu screen, select SETTING and press to select SD Format. Press to select "Yes" . Press The SD card will be formatted. Select “No” to return to the SETTING menu. -
Page 13: Adjusting The Recording Level
Adjusting the recording level You can adjust the recording level to suit the recording conditions. Adjusting the recording level manually Slide the GAIN switch to the MANUAL position. This turns automatic recording level adjustment off. Use the MANUAL GAIN switch to adjust the recording level. -
Page 14: Reducing Noise
Reducing noise Turn the low-cut filter on to reduce wind sounds and other noise. Slide the LO CUT switch to ON. NOTE Cover the mic with the included windscreen to further reduce noise. Monitoring audio Using headphones, you can monitor the audio being recorded. Connect headphones or other audio equipment to the headphones jack on the back of the recorder. -
Page 15: Video Settings
VIDEO settings You can set the resolution, frame rate and other recording settings. Increasing the resolution decreases the possible recording time. to select an item. Press After completing the setting, press Resolution: resolution and frame rate used when recording Picture Frames/ Setting Main applications... -
Page 16: Audio Settings
AUDIO settings You can set the audio quality to use when recording video. Increasing the audio quality decreases the possible recording time. to select an item. Press After completing the setting, press Format: audio quality when recording video Setting Description File size WAV 96kHz/24bit Larger... -
Page 17: Recording Video
“Low Speed Card!” appears on the screen and recording stops. To avoid this, we recommend using cards that are Class 4 or faster. Information about SD cards that can be used with this unit can be found at www.zoom.co.jp. -
Page 18: Playing Recordings
Playing recordings You can play back recorded video. Press on the main screen. This starts playback of the last recorded video. if you want to play a different file. Press to stop playback. The main screen reappears. Functions of other buttons Play previous/next recording …... -
Page 19: Deleting Recordings
Deleting recordings You can delete videos to increase the open space on the media. Press on the main screen. A list of videos appears. to select the video that you want to delete. Press A check mark appears on the selected video. - Page 20 Deleting recordings (continued) to select "Yes" . Press The selected video will be deleted. Select "No" to cancel. to select "Exit Trash" and press to return to the main screen. Press...
- Page 21 Connecting to the external input jack Audio from an external mic or other audio equipment can be input and recorded. Connect an external mic or other audio equipment to the EXT IN jack. Press EXT IN This starts recording. NOTE When an external device is connected to EXT IN, the built-in XY mic is disabled.
-
Page 22: Hdmi Output
Headphones/line output jack You can listen to the audio with headphones or an external audio amplifier. C o n n e c t h e a d p h o n e s o r a u d i o DC5V equipment to the headphones... -
Page 23: Usb Connections
USB connections By connecting with a computer or iPad using a USB cable, you can use this recorder as a USB mic and to stream audio and video as a web camera. Using as a card reader or mic (computer/iPad) Select USB on the menu screen and press to select "Card Reader"... - Page 24 USB connections (continued) Using as a web camera (computer) NOTE Download the audio driver necessary for use as a web camera from the ZOOM website (www.zoom.co.jp). Use the USB cable to connect to the computer, select USB on the menu screen and press to select "WebCam".
-
Page 25: File List
LCD Rotation settings You can lock the rotation of the LCD screen. to select an item. Press After completing the setting, press Setting Description Unlock Rotate the screen according to LCD unit orientation. Lock Keep the screen in the current state. FILE list Use this menu to view video files saved on the SD card in a thumbnail list and play them back. -
Page 26: System Settings
System settings Make settings related to the system. to select an item. Press After completing the setting, press Setting Description Set the date and time of the internal clock. Set Date (See "Setting the time" on page 10.) Set whether a beep sound is made when the starts and Beep is operated. -
Page 27: Upgrading The Firmware Version
Copy the file for upgrading the firmware to the root directory on the SD card. • The latest version of the firmware can be downloaded from www. zoom.co.jp. Insert the SD card into the unit’s card slot. While pressing and holding... -
Page 28: Specifications
Note: USB bus power supported Power supply Lithium-ion battery: DC 4.2V maximum voltage, DC 3.7V nominal voltage, 1050mAh capacity AC adapter (ZOOM AD-17, sold separately): DC 5V/1A Recharging times By USB: about 3 hours Using ZOOM AD-17: about 2 hours 15 minutes... -
Page 29: Safety Precautions
An action that is prohibited Warnings Operation using an AC adapter Use only a ZOOM AD-17 AC adapter (sold separately) with this unit. Do not do anything that could exceed the ratings of outlets and other electrical wiring equipment. Alterations Do not open the case or modify the product. -
Page 30: Usage Precautions
If the unit becomes broken or malfunctions, immediately disconnect the AC adapter, turn the power OFF and disconnect other cables. Contact the store where you bought the unit or ZOOM service with the following information: product model, serial number and specific symptoms of breakdown or malfunction, along with your name, address and telephone number. - Page 31 Warnings and requests regarding safe battery use Carefully read the following warnings in order to avoid serious injuries, burns, fires and other problems caused by leaking, heat generation, combustion, rupture or accidental swallowing. DANGER Do not charge the lithium-ion battery (BT-02) in any way other than using the and either an AD-17 (sold separately) or a USB port.
- Page 32 MERCIAL ACTIVITY AND/OR WAS OBTAINED FROM A VIDEO PROVIDER LICENSED TO PROVIDE AVC VIDEO. NO LICENSE IS GRANTED OR SHALL BE IMPLIED FOR ANY OTHER USE. ADDITIONAL INFOR- MATION MAY BE OBTAINED FROM MPEG LA, L.L.C. SEE HTTP://WWW.MPEGLA.COM ZOOM CORPORATION 4-4-3 Surugadai, Kanda, Chiyoda-ku, Tokyo 101-0062 Japan http://www.zoom.co.jp...
Need help?
Do you have a question about the Q4 and is the answer not in the manual?
Questions and answers