Table of Contents
Advertisement
Available languages
Available languages
Advertisement
Table of Contents

Related Manuals for Intek MX-825V


Summary of Contents for Intek MX-825V
- Page 1 MX-825V 136-174 MHz VHF FM / 199CH / 10W-25W PROFESSIONAL MOBILE RADIO PC PROGRAMMABLE MX-825U 400-470 MHz UHF FM / 199CH / 10W-25W PROFESSIONAL MOBILE RADIO PC PROGRAMMABLE INSTRUCTION MANUAL MANUALE DI ISTRUZIONI...
-
Page 2: Table Of Contents
Declaration of Conformity MX-825V ........ -
Page 3: General Information
As regulations are usually subject to possible modifications, please check the current regulations in your country with your dealer or local supplier. INTEK does not take any responsibility for illegal use and operation of this product not in accordance with the regulation of the country where the product is used. -
Page 4: General Information - User Information
General Informations - User Information GENERAL INFORMATIONS • Do not attempt to operate your vehicle transceiver while driving. To avoid the high risk. • Do not operate your transceiver while someone touching antenna or standing within 2-3 feet away from antenna; it could protect you from burn or others hurt. •... -
Page 5: Unpacking And Checking Parts - Supplied Accessories
Unpacking and Checking Parts - Supplied Accessories Unpacking and checking parts Carefully unpack the product. Please identify all the parts listed below, before wasting the packaging. If any part is missing or if the packaging shows any damage, please contact your dealer immediately. Supplied accessories Microphone Microphone Hanger... -
Page 6: Installation
Installation INSTALLATION Transceiver Installation To install the transceiver, select a safe, convenient location inside your vehicle that minimizes danger to your passengers and yourself while the vehicle is in motion. Consider installing the unit at an appropriate position so that knees or legs will not strike it during sudden braking of your vehicle. Try to pick a well ventilated location that is shielded from direct sunlight. - Page 7 Installation To prevent the risk of short circuits, disconnect other wiring form the negative (-) battery terminal before connecting the transceiver. Confirm the correct polarity of the connections, then attach the power cable to the battery terminals; red connects to the positive (+) terminal and black connects to the negative (-) terminal. •...
-
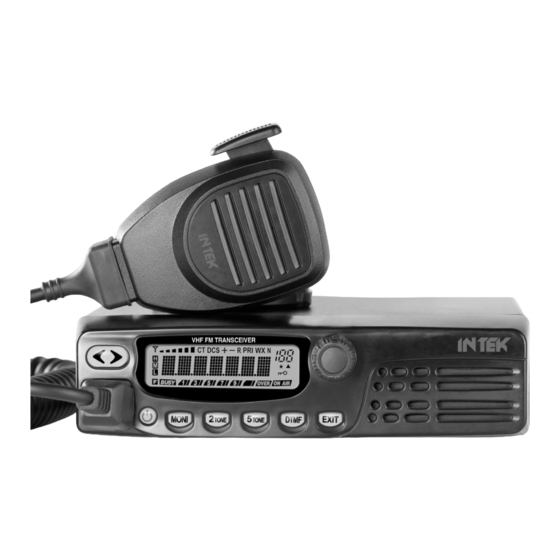
Page 8: Getting Acquainted With The Product
Getting Acquainted with the Product Front Panel Down Key This key allows adjust the volume level downward. By keeping this key pressed, the quick volume level selection mode will be enabled. Up Key This key allows to select the operating channel upward. By keeping this key pressed, the quick volume level selection mode will be enabled. - Page 9 Getting Acquainted with the Product 5 TONE Key Press this key to enter 5-Tone Mode. Use Rotary Switch (4) to select the desired 5-Tone group. 2 TONE Key Press this key to enter 2-Tone Mode. Use Rotary Switch (4) to select the desired 2-Tone group. 10.
- Page 10 Getting Acquainted with the Product Microphone PTT (Push-to-Talk) Key Transmitter key. Press the PTT key (16) to transmit and release it to return to the receive mode. LCD Display Signal Digital Bar Meter Indicates the received signal strenght in the receive mode. CT Icon The CT Icon (B) is lighted when the CTCSS function is enabled.
-
Page 11: Getting Acquainted With The Product
Getting Acquainted with the Product + - Icons Not available on this model. R Icon This icon is lighted when the Reverse Frequency function is enabled. Please refer to REVERSE FREQUENCY FUNCTION at page 13. PRI Icon This icon is lighted when the Priority Scan function is enabled. Please refer to PRIORITY SCAN FUNCTION at page 14. -
Page 12: Getting Started
Getting Started - Menu Operation GETTING STARTED Power ON Switch on the transceiver by pressing the ON/OFF Key (11); the Welcome indication (P) appears on the LCD display (3) and radio now is in Stand-by Mode. Press and hold the ON/OFF Key (11) to switch OFF the radio. Volume adjustment Press or hold the DOWN key (1) to decrease the volume level and press or hold the UP key (2) to increase the volume level. - Page 13 Menu Operation - Advanced Functions Menu function sequence MODE (Operating modes) ---> TX.POW (transmitter power High-Middle-Low) --> SQH.LEV (Squelch Level) --> SQH.MOD (Squelch modes) --> ZONE (Zone selection) --> MONI (Monitor modes) --> TOT (Time Out Timer) --> SCN.MO (Scan modes) --> SCN.TY (Scan Type) --> REVERSE (Reverse Frequency) -->...
-
Page 14: Advanced Functions
Advanced Functions Keypad Lock Press the Power ON/OFF Key (11) then the EXIT Key (6) to lock the keypad; the Keylock Icon (M) will appear on LCD Display (3). Repeat the same procedure to unlock the keypad; he Keylock Icon (M) will disappear on LCD Display (3). - Page 15 Advanced Functions TIMER SCAN : If this option is selected, SCAN will automatically stop when a signal is detected on one channel, and re-start automatically after a programmed time. CARRIER SCAN : If this option is selected, SCAN will automatically stop when a signal is detected on one channel, in order to listen to the communication and SCAN will re-start when no more signal is detected on that channel.
- Page 16 Advanced Functions Decode Continuance Time During Scan process, when a signal is detected on one channel, if transceiver can' t decode successfully, it will resume to scan next channel. Note : This function is programmed by PC software and it is available only in CHANNEL MODE. CTCSS / DCS FUNCTION Any channel may be associated to a programmed private protection CTCSS/DCS tone.
- Page 17 Advanced Functions DTMF (Dual Tones Multi-Frequency) Press DTMF Key (7) to enterDTMF mode and use the Rotary Switch to select the desired DTMF code (32 groups maximum). Press PTT Key (16) to transmit the selected Tone directly. To EXIT the DTMF Mode, press EXIT Key (6). SQUELCH SETTING This function allows to silent the receiver by cutting the background noise, when no signals are received.
-
Page 18: Advanced Functions
Advanced Functions TRANSMITTING • Press 2-Tone (9), 5-Tone (8) or DTMF key (9) to enter encoding menu item. • Use the Rotary Switch (4) to select the desired encoding group (1-32). • Press and hold the PTT key (16) to transmit the desired encoding tones. •... -
Page 19: Auxiliary Functions
Auxiliary Functions AUXILIARY FUNCTIONS Busy Channel Lockout This function prevents interferences of other incoming signals. If the selected channel is busy and the Busy Channel Lockout function has been enabled, the trasmission is disabled. When this function is enabled and the selected channel is Busy, if user press PTT Key (16), an alarm will be emitted. -
Page 20: Auxiliary Functions
Auxiliary Functions Beep Function Enter the MENU Mode and select the BEEP function setup. Press MENU Key (4) to confirm and use the Rotary Switch to select the OFF (function disabled) or ON (function enabled) options. Confirm the selection by pressing the MENU Key (4) and press the EXIT Key (6) to return to Stand-by Mode. -
Page 21: Specifications - Optional Accessories
Specifications - Optional Accessories SPECIFICATIONS General Frequency VHF 136-174 MHz (MX-825V) UHF 400-470 MHz (MX-825U) Channels Channel spacing 12.5 / 20 / 25 KHz DC input voltage 13.8 VDC +/- 15% Operating temperature -20/+55° Dimensions L 158 x H 40 x D 155 mm Weight 1140 gr. - Page 22 Dichiarazione di Conformità MX-825V ........
- Page 23 Informazioni per l' utente Grazie ! Vi ringraziamo per aver scelto INTEK per applicazioni civili. Siamo certi che questo ricetrasmettitore di facile uso vi consentirà di comunicare in modo affidabile e di svolgere le vostre attività professionali con la massima efficienza. Questo ricetrasmettitore incorpora la più avanzata tecnologia e sarete soddisfatti del suo livello di qualità...
- Page 24 Informazioni Generali - Avviso agli utenti INFORMAZIONI GENERALI Avvisi per l' utente • Non azionare il ricetrasmettitore durante la guida del veicolo. • Non utilizzare il ricetrasmettitore mentre qualcuno tocca l' antenna o si trova nelle immediate vicinanze. • Non utilizzare il ricetrasmettitore in presenza di sostanze infiammabili •...
- Page 25 Disimballaggio e verifica delle parti - Accessori forniti Disimballaggio e verifica delle parti Disimballate accuratamente il ricetrasmettitore. Si raccomanda di identificare tutte le parti elencate nella tabella seguente, prima di eliminare l’imballo. Se vi sono stati danni o mancanze durante la spedizione, contattate immediatamente il vostro fornitore.
- Page 26 Installazione INSTALLAZIONE Installazione del ricetrasmettitore Installare il ricetrasmettitore scegliendo una posizione opportuna in modo che sia pratico e confortevole l’ utilizzo dello stesso e che non sia in nessun modo di ostacolo alla guida del veicolo. Considerare di installare l’ apparato in una posizione appropriata in modo che le ginocchia o le gambe non lo colpiscano durante una frenata improvvisa del veicolo.
- Page 27 Installazione Verificare la corretta polarità dei collegamenti, quindi collegare il cavo di alimentazione ai terminali della batteria, il rosso al terminale positivo (+) e il nero al negativo (-) della batteria. • Utilizzare la lunghezza del cavo senza tagliare l' eccesso anche se il cavo è più lungo di quanto richiesto.
- Page 28 Familiarizzare con il prodotto Pannello Frontale Down Key Questo tasto permette di diminuire il livello del volume di ascolto. Tenendo premuto questo tasto, la regolazione del livello di volume avverrà in modo rapido. Up Key Questo tasto permette di aumentare il livello del volume di ascolto. Tenendo premuto questo tasto, la regolazione del livello di volume avverrà...
- Page 29 Familiarizzare con il prodotto 5 TONE Key Premere questo tasto per entrare in Modalità 5-Tone. Utilizzare il selettore rotativo (4) per selezionare il gruppo 5-Tone desiderato. 2 TONE Key Premere questo tasto per entrare in Modalità 2-Tone. Utilizzare il selettore rotativo (4) per selezionare il gruppo 2-Tone desiderato.
- Page 30 Familiarizzare con il prodotto Microfono 16. Tasto PTT (Push-to-Talk) Tasto di trasmissione. Premere il tasto PTT(16) per trasmettere e rilasciarlo per tornare in modalità ricezione. Display LCD Strumento digitale a barre S-Meter indica l' intensità del segnale in ricezione. In assenza di segnale, l' indicatore è spento. L' icona CT (B) è...
- Page 31 Familiarizzare con il prodotto Icone + - Non disponibili su questo modello. Icona R L' icona R (E) è accesa quando è attiva la funzione Reverse Frequency. Fare riferimento al paragrafo FUNZIONE REVERSE FREQUENCY a pag. 33. Icona PRI L' icona PRI (F) è accesa quando la funzione Priority Scan è attiva. Fare riferimento alla funzione PRIORITY SCAN a pag.
-
Page 32: Operazioni Di Base
Operazioni di base OPERAZIONI DI BASE Accensione Accendere il ricetrasmettitore rpremendo il tasto ON/OFF (11); l' indicazione Welcome (P) compare sul display LCD (3) e la radio è ora in modalità Stand-By. Mantenere premuto il tasto ON/OFF (11) per spegnere la radio. Regolazione del volume Mantenere premuto il tasto DOWN (1) per diminuire il livello del volume di ascolto e mantenere premuto il tasto UP (2) per aumentarlo. - Page 33 Molte funzioni di questa radio possono essere abilitate e/o configurate esclusivamente utilizzando il software dedicato per PC, liberamente scaricabile dal sito www.intek-radios.com. Per accedere alla MODALITA' MENU e per operare con le varie funzioni e parametri del menu, procedere come descritto di seguito : Premere il tasto MENU/SELETTORE ROTATIVO (4) per entrare in MODALITA' MENU;...
- Page 34 Utilizzo del menu Funzione Monitor Questa funzione consentre di aprire lo Squelch e per poter ascoltare il rumore di fondo e segnali deboli. La funzione Monitor dispone di 4 opzioni. Nella Modalità MENU entrare nel setup della funzione MONI e utilizzare il selettore rotativo (4) per selezionare l' opzione desiderata come descritto di seguito : MONI A (Invalidazione istantanea Tone Squelch) Se viene selezionata questa opzione, mantenere premuto il tasto MONI (10) per aprire lo Squelch su canali con toni CTCSS/DCS, DTMF, 2/5-Tone e rilasciare questo tasto per chiudere nuovamente lo Squelch.
- Page 35 Funzioni Avanzate SCN.ZO : la scansione verrà effettuata su tutti i canali nella zona selezionata SCN.CH: la scansione verrà effettuata su tutti i canali di tutte le zone Premere il tasto MENU (4) per confermare la selezione e premere il tasto EXIT (6) per tornare in modalità...
- Page 36 Funzioni Avanzate Nota : Questa funzione è totalmente programmabile tramite il software dedicato per PC ed è operativa solo nella MODALITA' CANALE. Cancellazione temporanea del Canale Prioritario Quando la scansione automatica si arresta sul canale prioritario, premere il tasto EXIT (6) per rimuovere temporaneamente il canale dalla scansione.
- Page 37 Funzioni Avanzate Funzione CTCSS / DCS in trasmissione Per trasmettere un segnale con un tono CTCSS o DCS associato, in modalità MENU entrare nel setup della funzione CTC/DCS. Selezionare e confermare l' opzione ENCODE e utilizzare il selettore rotativo (4) per selezionare il numero del tono CTCSS o DCS desiderato o selezionare OFF per disabilitare la funzione.
- Page 38 Funzioni Avanzate IMPOSTAZIONI DELLA FUNZIONE SQUELCH Questa funzione permette di silenziare il ricevitore, per poter ascoltare il rumore di fondo se nessun segnale viene ricevuto. Selezione del livello di Squelch La soglia di Squelch è regolabile in 10 livelli, da 0 a 9. Nella Modalità MENU entrare nel setup della funzione SQH.LEV e utilizzare il selettore rotativo (4) per selezionare il livello di Squelch desiderato, da SQL-0 (Squelch aperto) a SQL-9 (bassa sensibilità).
- Page 39 Funzioni Avanzate TRASMISSIONE • Premere i tasti 2-Tone (9), 5-Tone (8) o DTMF key per entrare nei menu di codifica desiderati. • Utilizzare il selettore rotativo (4) per selezionare il gruppo di codifica desiderato (1-32). • Mantenere premuto il tasto PTT (16) per trasmettere il tono di codifica desiderato. •...
- Page 40 Funzioni Supplementari FUNZIONI SUPPLEMENTARI Funzione Busy Channel Lockout Questa funzione previene interferenze su altre comunicazioni in arrivo. Se il canale selezionato è occupato da una comunicazione e la funzione Busy Channel Lockout è attiva, la trasmissione è disabilitata. Se questa funzione è abilitata e il canale selezionato è occupato, premendo il tasto PTT (16) viene emesso un allarme sonoro.
- Page 41 Funzioni Supplementari - Specifiche tecniche - Accessori opzionali Funzione Beep Entrare nella modalità MENU e selezionare il setup della funzione BEEP. Premere il tasto MENU (4) per confermare ed utilizzare il selettore rotativo (4) per selezionare OFF (funzione disabilitata) o ON (funzione abilitata).
- Page 42 Specifiche tecniche - Accessori opzionali SPECIFICHE TECNICHE Generali Gamma di frequenza VHF 136-174 MHz (MX-825V) UHF 400-470 MHz (MX-825U) Canali Canalizzazione 12.5 / 20 / 25KHz selezionabile Tensione di alimentazione 13.8 VDC +/- 15% Temperatura di funzionamento -20/+55° Dimensioni L 158 x H 40 x D 155 mm Peso 1140 gr.
- Page 43 MX-825V / MX-825U N. di serie : Data: Timbro e firma del rivenditore Prodotto importato e distribuito da INTEK S.R.L. Via G. Marconi, 16 - 20090 Segrate (MI) - Tel. 02-26950451 - Fax. 02-26952185 www.intek-radios.com / e-mail : info@intek-radios.com - 42 -...
-
Page 44: Declaration Of Conformity Mx-825V
Declaration of Conformity MX-825V EC Certificate of Conformity (to EC Directive 2006/95, 2004/108, 99/5) DECLARATION OF CONFORMITY With the present declaration, we certify that the following products : INTEK MX-825V comply with all the technical regulations applicable to the above mentioned products in accordance with the EC Directives 2006/95/EC, 2004/108/EC, 1999/5/EC. -
Page 45: Declaration Of Conformity Mx-825U
EN 62311:2008 Manufacturer : INTEK S.R.L. Via G. Marconi, 16 20090 Segrate, Italy Tel. 39-02-26950451 / Fax. 39-02-26952185 E-mail : info@intek-radios.com Notified Body : Bay Area Compliance Laboratories Corp. 1274 Anvilwood Ave, Sunnyvale CA 94089, USA Identification Number : 1313... -
Page 46: Frequency / Channels Programming
Frequency / Channels Programming - Programmazione Canali FREQUENCY / CHANNELS PROGRAMMING - PROGRAMMAZIONE CANALI FREQUENCY FREQUENCY CTCSS / DCS CHANNEL TONE .................................................................................... -
Page 47: Notes
Notes - 46 -...
Need help?
Do you have a question about the MX-825V and is the answer not in the manual?
Questions and answers