Akai MPC Studio Quick Start Manual
Akai mpc studio audio controller
Hide thumbs
Also See for MPC Studio:
- Quick start manual ,
- User manual (373 pages) ,
- Reference manual (136 pages)
Table of Contents
Advertisement
QUICKSTART GUIDE (ENGLISH)
INTRODUCTION
MPC Studio offers the most streamlined MPC experience yet. At under one-inch thin, with low-profile controls
and a brushed aluminum body, it's made to move. MPC Studio merges real MPC pads, iconic workflow, and
the same MPC Software used by MPC Renaissance to give you a fully integrated portable production solution.
Welcome to production anywhere. The world is now your studio.
BOX CONTENTS
•
MPC Studio
•
USB cable
•
Two 1/8"-MIDI adapters
•
Software/driver DVD
•
Quickstart Guide
•
Safety Instructions & Warranty Information booklet
SETUP DIAGRAM
EXTERNAL MIDI DEVICE
MONITORS (for main mix)
IMPORTANT: Do NOT connect audio devices (e.g., headphones,
monitors, etc.) to the 1/8" MIDI IN or MIDI OUT jacks. Use the
included 1/8"-MIDI adapters to connect MIDI devices only.
MICROPHONE
2 TK
2 TK
3
COMPUTER
USB MIXER
2 TK
Any items shown here but not
mentioned in the BOX CONTENTS
are sold separately.
Advertisement
Table of Contents

Related Manuals for Akai MPC Studio


Summary of Contents for Akai MPC Studio
-
Page 1: Box Contents
MPC Studio offers the most streamlined MPC experience yet. At under one-inch thin, with low-profile controls and a brushed aluminum body, it’s made to move. MPC Studio merges real MPC pads, iconic workflow, and the same MPC Software used by MPC Renaissance to give you a fully integrated portable production solution. -
Page 2: System Requirements
2. CONNECT Follow this sequence of steps whenever you use MPC Studio with your computer: 1. Connect MPC Studio's COMPUTER USB PORT to a free USB port on your computer, using a full-speed or high-speed USB cable. 2. Power on MPC Studio. -
Page 3: Mpc Software Overview
This is just a broad overview of the MPC software's features. Virtually all of the software elements can be accessed and controlled by MPC Studio. Please also refer to the in-depth Reference Manual (in the Help menu). The Reference Manual contains a quick tutorial on how to get started making a song so you can use MPC's features right away –... -
Page 4: Assign Samples To The Pads
1. Connect MPC Studio to a USB port on your computer, as shown in the CONNECTION DIAGRAM. 2. Power on MPC Studio and open MPC software. (The first time you open the software, you will be asked for information required for authorization. Follow the on-screen instructions to authorize your software.) 3. -
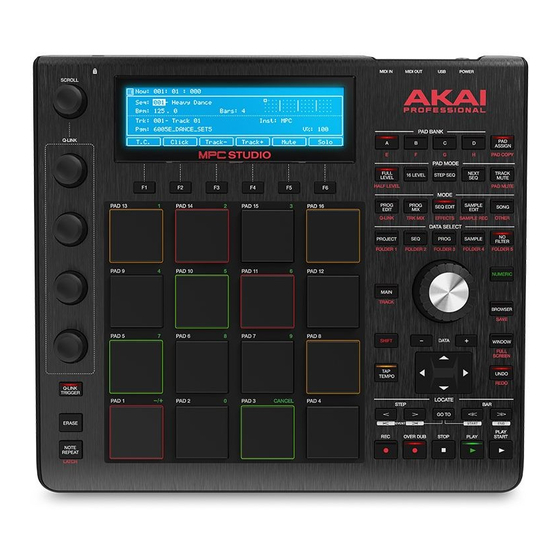
Page 5: Top Panel
FEATURES MPC Studio is hardware specifically designed to control the MPC software. This section describes all the hardware controls. For a complete explanation of the software, please see the MPC Reference Manual in the software in the Help menu. TOP PANEL... -
Page 6: Pad / Q-Link Knob Controls
DATA DIAL – Use this dial to scroll through the available menu options or adjust the parameter values of the selected field in the DISPLAY. -/+ – Press these buttons to increase/decrease the value of the selected field in the display. NUMERIC –... -
Page 7: Transport / Recording Controls
SEQ EDIT / EFFECTS – Press this button to enter Sequence Edit mode. Hold down SHIFT and press this button to enter Effects mode, where you can select and route effects as well as edit effects' parameters. SAMPLE EDIT / SAMPLE REC – Press this button to view the Sample Edit screen in the display and software. -
Page 8: Specifications
SPECIFICATIONS HARDWARE 360 x 96 dot graphic LCD w/backlight Display 0.89" x 11.2" x 10.1" Dimensions (H x W x D) 22.6 mm x 284 mm x 257 mm 1.96 lbs.; 0.89 kg Weight Power Supply USB bus-powered MIDI Inputs 5-pin DIN x 1 via 1/8"-TRS-to-MIDI adapter MIDI Outputs 5-pin DIN x 1 via 1/8"-TRS-to-MIDI adapter...
Need help?
Do you have a question about the MPC Studio and is the answer not in the manual?
Questions and answers