Table of Contents
Advertisement
Quick Links
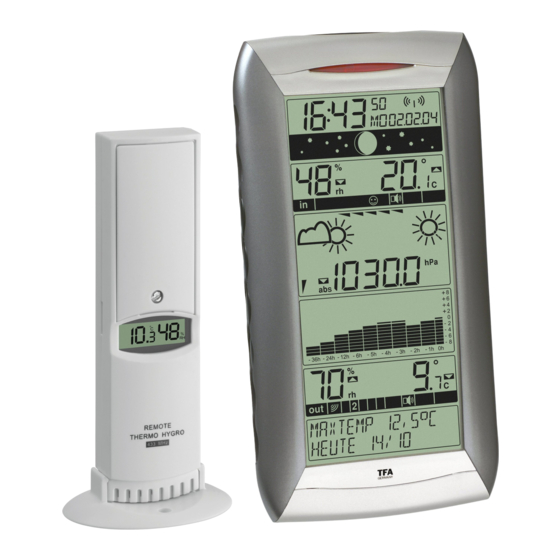
INTELLIGENT WEATHER STATION
INTRODUCTION:
Congratulations on purchasing this state-of-the-art weather station as an example of excellent
design and innovative measuring technique. Featuring radio controlled time, date, calendar,
weather forecast, moon phase, indoor and outdoor temperature and humidity, air pressure and
various alarm settings for different weather conditions, this weather station will never keep you
guessing on current and future weather conditions. Operation of this product is simple and
straightforward. By reading this operating manual, the user will however receive a better
understanding of the Intelligent Weather Station together with the optimum benefit of all its
features.
FEATURES:
The Intelligent Weather Station
Function
Keys on both
sides of the
weather station
LCD Display
Weather
information text
•
DCF-77 Radio controlled time with manual setting option
•
DCF reception ON/OFF (user selectable)
•
12/24 hour time display
•
Time zone option ±12 hours
•
Calendar display (weekday, date, month, year)
•
Time alarm settings
•
12 Moon phases display throughout the year
•
Weather forecasting with 4 weather icons and weather tendency indicator
•
Temperature display in °C/ºF
•
Humidity display as RH%
•
Indoor temperature and humidity display with MIN/MAX and time/date of recording
•
Indoor comfort indicator
•
Low/High indoor temperature alarm
•
Low/High indoor humidity alarm
•
Outdoor temperature and humidity display with MIN/MAX and time/date of recording
•
Low/High outdoor temperature alarm
•
Low/High outdoor humidity alarm
•
Relative air pressure unit in hPa, inHg, or mmHg
•
Air pressure tendency indicator for last 36h (bar graph format)
•
Low pressure alarm
TFA IQ-WS 35.1040
Instruction Manual
25
Hanging hole
Battery
compartment
Foldable
stand
Advertisement
Table of Contents

Related Manuals for TFA IQ-WS 35.1040


Summary of Contents for TFA IQ-WS 35.1040
- Page 1 TFA IQ-WS 35.1040 INTELLIGENT WEATHER STATION Instruction Manual INTRODUCTION: Congratulations on purchasing this state-of-the-art weather station as an example of excellent design and innovative measuring technique. Featuring radio controlled time, date, calendar, weather forecast, moon phase, indoor and outdoor temperature and humidity, air pressure and various alarm settings for different weather conditions, this weather station will never keep you guessing on current and future weather conditions.
- Page 2 • “Intelligent” weather information display • Can receive up to 3 transmitters • LCD contrast selectable • Low battery indicator • EL back-light • Display in 3 languages selectable: German, English and French • Wall mounting or table standing The Thermo-hygroTransmitter •...
-
Page 3: Battery Change
To install and replace the batteries, please follow the steps below: Insert finger or other solid object in the space at the bottom center of the battery compartment and lift up to remove the cover. Insert batteries observing the correct polarity (see battery compartment marking). -
Page 4: Function Keys
• During nighttime, the atmospheric disturbances are usually less severe and reception is possible in most cases. A single daily reception is adequate to keep the accuracy deviation below 1 second. FUNCTION KEYS: Weather Station: The Weather Station has 6 easy to use function keys on the sides and 1 key on the top ALM STOP key ALM TIME SET key... - Page 5 • Reset all MIN/MAX records MIN/- key • Display MIN indoor and outdoor temperature and humidity records with time of recording • Activate/deactivate the time alarm • Decrease the alarm time (hour and minutes) • Decrease all values in manual setting modes •...
-
Page 6: Lcd Screen
LCD SCREEN The LCD screen is split into 8 sections displaying the information for time and date, moon phase, indoor data, weather forecast, air pressure, air pressure history, outdoor data, “intelligent” weather information display. Time alarm icon Seconds display DCF reception icon (for DCF time) Time display Calendar display... - Page 7 LCD CONTRAST SETTING Last digit flashing The LCD contrast can be set within 8 levels, from LCD 1 to LCD8 (default setting is LCD 5): Press and hold the SET key for around 3 seconds until the digit start flashing. Use the MAX/+ or MIN/- key to view all levels of contrast.
-
Page 8: C/°F Temperature Unit Setting
The date default of the Weather Station is 1. 1. in the year 2004. Once the radio-controlled time signals are received, the date is automatically updated. However, if the signals are not received, the date can also be set manually. The year starts flashing. -
Page 9: Language Display Setting
worse), pressure above as high-pressure area (weather to improve). The relative air pressure can be manually set to another value within the range of 960 – 1040 hPa (28.30 – 30.80 inHg or 720 – 781 mmHg) for a better reference. Digit flashing The current relative pressure value will start flashing Use the MAX/+ or MIN/- key to increase or decrease the value. - Page 10 • HIGH outdoor temperature alarm • LOW indoor humidity alarm • HIGH indoor humidity alarm • LOW outdoor humidity alarm • HIGH outdoor humidity alarm • LOW air pressure alarm Default alarm values: Temperature 0ºC High 30ºC Humidity High Air pressure 1000hPa LOW INDOOR TEMPERATURE ALARM SETTING Note:...
- Page 11 LOW OUTDOOR TEMPERATURE ALARM SETTING Note: Within the LOW outdoor temperature alarm setting there are optional sub-settings which can be set individually. Note: The outdoor temperature alarm can only be set for channel 1 transmitter. To set the LOW outdoor temperature alarm (default OFF): Buzzer ON/OFF (alarm sounding): Press the ALM STOP key to set buzzer ON/OFF.
- Page 12 Use the MAX/+ or MIN/- key to set the alarm value. Press the SET key to confirm and enter the HIGH indoor humidity alarm setting. If no LOW indoor humidity setting is needed, please press the ALM DATA key to enter the HIGH indoor humidity alarm setting.
- Page 13 Set the alarm ON/OFF: Press the MAX/+ or MIN/- key to activate the alarm ON/OFF. III. Set the alarm value (default 90%) Press the SET key to enter the alarm value setting (alarm value flashing) Use the MAX/+ or MIN/- key to set the alarm value. Press the SET key to confirm and enter the LOW air pressure alarm setting.
-
Page 14: General Alarm
Weather data Hysteresis Temperature 1°C Humidity 3% RH Air pressure 1 hPa GENERAL ALARM General alarm indicator General indoor alarm icon General outdoor alarm icon The general alarm indicator (red LED) and the general alarm icon will flash when any Weather Alarm occurs. - Page 15 Full Moon New Moon Large Waning Gibbous Small Waxing Crescent Large Waxing Crescent Small Waning Gibbous First Quarter Last Quarter Large Waning Crescent Small Waxing Gibbous Small Waning Crescent Large Waxing Gibbous WEATHER FORECAST AND WEATHER TENDENCY: WEATHER FORECASTING ICONS: There are 4 weather icons in the fourth section of LCD which can be displayed in any of the following combinations: Sunny...
-
Page 16: Bar Graph Display
sufficient time for the Weather Station to collect air pressure data at a constant altitude and therefore result in a more accurate forecast. If the Intelligent Weather Station is moved to another location significantly higher or lower than its initial standing point (for example from the ground floor to the upper floors of a house), set again the relative air pressure value, and discard the weather forecast for the next 12-24 hours. - Page 17 Note: For accurate barometric pressure trend, the Intelligent Weather Station should operate at the same altitude. For example, it should not be move from the ground to the second floor of the house. Should the unit be moved to a new location, discard readings for the next 12 – 36 hours. INDOOR RELATIVE HUMIDITY AND INDOOR TEMPERATURE: The indoor temperature and humidity data are automatically updated and displayed on the third of the LCD.
- Page 18 To toggle between transmitters, press the CH key: Once to show transmitter 2 Twice to show transmitter 3 Three times to return to transmitter 1 While the outdoor MIN/MAX humidity and temperature date is being displayed, press the CH key. The display will toggle between the different channels MIN/MAX data. Note: For example, when the MIN outdoor temperature data is displayed and the MAX/+ key is pressed, MAX data outdoor temperature will be displayed.
- Page 19 • Probability of glazed frost • Probability of tempest • Probability of strong wind • Probability of storm DETAILED INFORMATION SHOWN IN THE WEATHER DISPLAY: Language selected English German French Timeframe for weather Forecast period 6 Vorhersagedauer 6 Period prevision 6 forecast hours Stunden...
-
Page 20: Positioning The Weather Station
The transmission range of the Outdoor Thermo-hygro transmitter may be affected by the ambient temperature. At cold temperatures the transmitting distance may be decreased. Please bear this in mind when placing the transmitter. To install the Thermo-hygro transmitter outside, choose a shady and dry place. Before fixing the Thermo-hygro transmitter with the enclosed screws, wait for 30 minutes to see if the receiver is able to scan the signal from this location. -
Page 21: Care And Maintenance
POSITIONING THE THERMO-HYGRO TRANSMITTER: The Thermo-hygro transmitter can be placed onto any flat surface or wall mount using the bracket which doubles as a stand or wall mount base. To wall mount: Secure the bracket onto a desired wall using the screws and plastic anchors. -
Page 22: Liability Disclaimer
Dimensions (L x W x H) Weather Station : 117 x 75 x 205 mm (including stand) Thermo-hygro transmitter 75 x 55 x 160mm (including stand) LIABILITY DISCLAIMER • The manufacturer and supplier cannot accept any responsibility for any incorrect readings and any consequences that occur should an inaccurate reading take place.
Need help?
Do you have a question about the IQ-WS 35.1040 and is the answer not in the manual?
Questions and answers