Xantrex xPower 300 Owner's Manual
Portable household power 300-watt
Hide thumbs
Also See for xPower 300:
- Owner's manual (64 pages) ,
- Owner's manual (41 pages) ,
- Owner's manual (40 pages)
Table of Contents
Advertisement
Quick Links
Advertisement
Table of Contents

Related Manuals for Xantrex xPower 300


Summary of Contents for Xantrex xPower 300
- Page 1 Owner’s Guide xPower 300 Portable Household Power...
- Page 2 About Xantrex Trademarks CHARGE Notice of Copyright Disclaimer Date and Revision Part Number Contact Information...
-
Page 3: Table Of Contents
Contents Safety First … Introduction Quick Start Guide Overview ..................4 An Explanation of Power Ratings and Battery Life ......5 Operating 115-Volt AC Products ............5 Operating 12-Volt DC Accessories ........... 6 Recharging xPower300 ..............6 Using xPower300 to Jump-Start Your Vehicle ........6 Indicators, Controls and Connectors Display Panel ................... - Page 4 Recharging with a Solar Panel ............18 Connecting to an External Battery Extended Operating Time ............... 20 Connecting an External Battery ............. 20 Troubleshooting 10 Specifications 11 Limited Warranty (USA and Canada only) 12 Out-of-Warranty Service Information 13 Other Products from Xantrex...
-
Page 5: Safety First …
Safety First … Misuse of xPower300 may result in danger to the user. We urge you to pay special attention to all CAUTION and WARNING statements. CAUTION statements identify conditions or practices that may result in damage to xPower300 or to other equipment. WARNING statements identify conditions that may result in personal injury or loss of life. - Page 6 CAUTION • Do not expose xPower300 to temperatures in excess of 104°F (40°C). CAUTION • Do not connect any AC load, whose neutral conductor is connected to ground, to xPower300. CAUTION: Do not use the xPower300 with the following equipment: •...
-
Page 7: Introduction
Introduction Thank you for purchasing xPower300 , the 300-watt electronic generator. ™ Designed for best-in-class performance and value, xPower300 can temporarily power a wide variety of electrical products and equipment when utility power is unavailable or during a power outage, and can even jump-start your car in an emergency. -
Page 8: Quick Start Guide
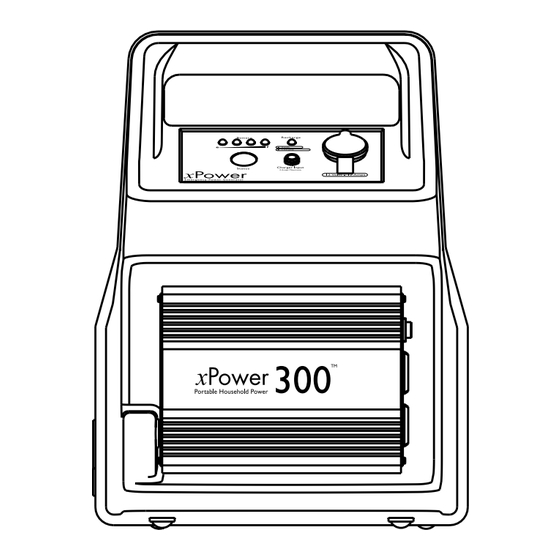
Quick Start Guide Overview The following basic instructions are intended to provide a brief overview of xPower300’s key features. For complete information, be sure to read this guide fully. The diagram below shows xPower300’s key features and accessories. Figure 1 - Key Features... -
Page 9: An Explanation Of Power Ratings And Battery Life
An Explanation of Power Ratings and Battery Life AC powered products are rated by how much electrical power (in watts) they consume. xPower300’s AC inverter is capable of generating a maximum of 300 watts to power AC products plugged into the AC receptacles. As an example, a 40 watt light bulb can be operated from xPower300 for up to 3½... -
Page 10: Operating 12-Volt Dc Accessories
Operating 12-Volt DC Accessories 1. Ensure xPower300’s battery is fully charged. See Section 7 for details. 2. Plug the accessory into xPower300’s DC Power Socket, and switch the accessory on (if required). xPower300 will operate any 12-volt DC auto or marine accessory that draws 12 amps or less. -
Page 11: Indicators, Controls And Connectors
Indicators, Controls and Connectors Refer to Figure 1 in Section 2 for location of the items identified below. Display Panel The display panel is located on the front of xPower300, directly below its carrying handle. Located on the display panel, you will find xPower300’s DC Power Socket, the Charger Input Socket, a Recharge Status Indicator light, and a Battery Level Indicator that is actuated by the Battery Status Button. -
Page 12: Ac Inverter
Charger Input Socket The AC Charger supplied with xPower300 connects to this socket when recharging is required. Other low power charging devices can also be connected here. See Section 7 - Recharging with a Solar Panel for full details. DC Power Socket The DC Power Socket is a cigarette lighter style connector used for powering 12-volt DC auto or marine accessories (see Section 5), and for recharging xPower300 from your vehicle’s... -
Page 13: Powering 115-Volt Ac Products General Information
Powering 115-Volt AC Products General Information xPower300 is capable of powering most 115-volt AC products and equipment that use 300 watts or less. Its AC output waveform, called a “quasi-sine wave” or “modified sine wave”, is designed to function similarly to the sine wave shape of utility power. -
Page 14: Automatic Protection: Overload, Overheating And Low Battery
4. As the battery becomes nearly discharged, or “empty”, a low voltage warning will sound. This will give you time to shut down a computer, for example. If this warning is ignored, the inverter will switch off automatically a few minutes later to prevent battery damage. -
Page 15: Battery Operating Times
Television Interference xPower300’s AC inverter is shielded to minimize interference with TV signals. In some cases, particularly with weak TV signals, some interference may still be visible in the form of scrolling lines across the screen. In this case, take the following corrective measures: 1. -
Page 16: Powering 12-Volt Dc Accessories
Powering 12-Volt DC Accessories Connecting 12-Volt DC Accessories xPower300 can operate any accessory that is intended to run from a vehicle’s lighter socket. Simply insert the accessory’s plug into the DC Power Socket on xPower300’s display panel. xPower300’s DC Power Socket will operate any 12-volt DC auto, marine or other 12-volt accessory that draws 12 amps or less. -
Page 17: Battery Operating Times
CAUTION: Use the Emergency Light indoors only. Do not expose to rain or moisture. Should lamp tube replacement be necessary, first unplug the light, then remove the clear cover by grasping it on each side at the end furthest from the switch. Squeeze firmly inward and pull the top of the cover away from the housing. -
Page 18: Vehicle Or Boat Engine Starting Assistance
Vehicle or Boat Engine Starting Assistance Jump-Starting Direct to the Battery xPower300 may be used to jump-start a 12-volt vehicle or small boat engine using the Jump-Start Cable supplied. Jump- starting causes very high current surges and possible sparking. Unless care is taken, the possibility of battery explosion exists. -
Page 19: Jump-Starting Via A Vehicle’S Lighter Plug Socket
9. After the vehicle is started and while the cables are still connected, it is a good idea to run the motor at fast idle for 2 minutes to fast-charge xPower300’s battery. After recharging, unplug the Jump-Start Cable from xPower300, disconnect the black (negative) cable clamp, and then as a last step, disconnect the red (positive) cable clamp. -
Page 20: Recharging Xpower300
To ensure safe recharging and maximum battery life, charge only with Xantrex supplied or approved products. CAUTION: Due to inherent self-discharge, lead acid batteries must be charged at least every 3 months, especially in a warm environment. -
Page 21: Recharging With The Ac Charger
Recharging with the AC Charger Recharging with the AC Charger is a true “plug-in-and-forget” charging method. To use it, follow these steps: 1. Disconnect any 12-volt DC accessories and switch the inverter OFF. 2. Insert the AC Charger plug into the Charger Input Socket on xPower300’s display panel. -
Page 22: Recharging With A Generator’S 12-Volt Dc Power Outlet
IMPORTANT: This charging method must not be used with vehicles having abnormally high voltage electrical systems that operate above 15 volts DC. Do not leave xPower300 permanently connected to the vehicle’s lighter socket or 12- volt accessory outlet. CAUTION: While xPower300 is being recharged with the DC Charging Cable from your vehicle, do not oerate AC products over 120 watts from the AC inverter at the same time. - Page 23 Figure 3 - Typical DC Coaxial Connector Connection 3. Insert the plug into the Charger Input Socket and place the solar panel in the sun. xPower300 will charge automatically just as with the AC Charger. (See Section 7 - Recharging with the AC Charger.) A 3 amp solar panel will charge xPower300 in about 8 hours in direct sunlight.
-
Page 24: Connecting To An External Battery
Connecting to an External Battery Extended Operating Time Much longer battery operating time is possible when connecting xPower300 to a larger external battery. For example, an external 60 amp-hour battery will give approximately 3 times the operating time of xPower300’s internal battery alone. WARNING: Use a sealed, non-spillable battery for indoor use. -
Page 25: Troubleshooting
Troubleshooting l l i t a r h t i , e t , s t i t a e t r o l r c r i t i u . s t g i l p i r t a r , s t i t r... - Page 26 r e t " i f i i s - " e a t l a " r " e t r r i u r e t r t " r " , r e t l o s e i t l u r e t .
-
Page 27: 10 Specifications
10 Specifications 12-Volt DC Section Internal battery type AGM, sealed lead acid Internal battery voltage (nominal) 12 Vdc Internal battery capacity (minimum) 21 Ah Cycle life at 100% discharge/recharge 170 cycles cycles at 68°F (20°C) Maximum load current through 12-volt DC 12 A Power Socket (breaker protected) Inverter (115-Volt) AC Section... -
Page 28: Limited Warranty (Usa And Canada Only)
What Will Xantrex Do? With the exception of the internal battery, Xantrex will, at its option, repair or replace the defective product free of charge. Xantrex will, at its own option, use new and/or reconditioned parts made by various manufacturers in performing warranty repair and building replacement products. - Page 29 You must obtain a Return Material Authorization (RMA) number from Xantrex before returning a product directly to Xantrex. Do not return a product to Xantrex without first obtaining an RMA number. When you contact Xantrex to obtain service, be prepared to supply the serial number of your product and its date of purchase as well as information about the installation or use of the unit.
-
Page 30: 12 Out-Of-Warranty Service Information
$85.00 US ($130.00 CDN). To return your xPower300 for out of warranty service, contact Xantrex customer service for a Return Material Authorization (RMA) number and follow the other steps outlined in the section “How Do You Get Service?”... -
Page 31: 13 Other Products From Xantrex
Xantrex also designs and manufactures the PROsine line of high performance true sine wave inverters and PROsine inverter-chargers, and the TRUECHARGE line of “smart” battery chargers. Contact your Xantrex retailer for more information or visit our web site at http://www.xantrex.com... - Page 32 1 800 670 0707 f 1 800 994 7828 support.xpower@xantrex.com www.xantrex.com...
Need help?
Do you have a question about the xPower 300 and is the answer not in the manual?
Questions and answers