Table of Contents
Advertisement
Advertisement
Table of Contents

Related Manuals for In Phase IPS920SD


Summary of Contents for In Phase IPS920SD
- Page 1 IPS920SD User manual In-Car Entertainment...
-
Page 2: Table Of Contents
Safety Information Contents PRECAUTIONS Safety Information..........2 Use only in a 12-volt DC negative-ground electrical system. Panel Controls............3 Disconnect the vehicle's negative battery terminal while mounting and connecting the unit. Basic panel operation/ejecting discs/ resetT..4 When replacing the fuse, be sure to use one with an identical amperage rating. Remote Controls(optional) ......5-6 Using a fuse with a higher amperage rating may cause serious damage to the unit. -
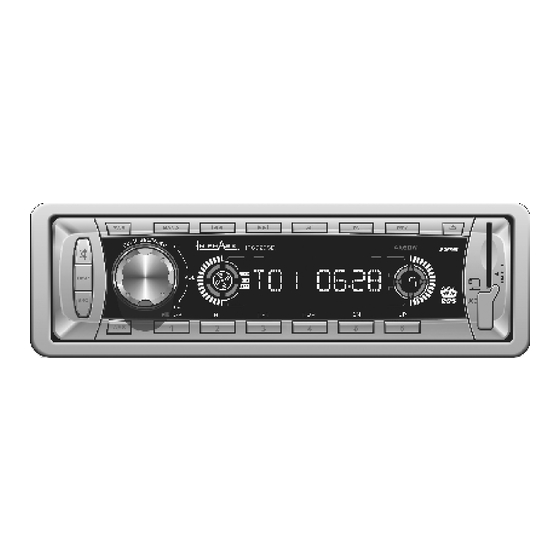
Page 3: Panel Controls
Panel Controls Power On : Press any button on the panel except to turn on the unit. REG ON/OFF Radio tune Power ON/OFF Alternative Frequency To fast search within Mute a track/ skip to next Traffic Announcements or previous track Identification BAND SWITCH Display switch... -
Page 4: Basic Panel Operation/Ejecting Discs/ Resett
Basic panel operation/ejecting discs/ reset Press the to open the panel and press to eject the disc. Disc slot: insert a disc for playback here. Disc Eject Panel status indicato r: RESET HOLE Lights up when you slide the panel down; Pressing the RESET hole will erase Note: the clock setting and stored stations. -
Page 5: Remote Controls(Optional)
Remote Controls (optional) Power On : Press any button on the remote control to turn on the unit. Radio Disc play Radio Tune (when disc inserted) To fast search within USB-dr ive a track/ skip to next Volu me (when USB inserted) Power on/off or previous track MEM-card... - Page 6 Remote Controls Replacing the lithium battery of remote control unit. * When the operation range of the card rem ote control WARNING: becomes shor t or does not function prop erly, replace S tore the batter y in place where children cannot re ach. the lithium battery with a new one.
-
Page 7: Button Tips
Button Tips Disc Load / Eject Load : press to flip down the panel. Eject : Press to flip down the panel. Inser t the disc into the slot . Press to eject the disc . Radio: To fine tune the radio, press or briefly. -
Page 8: Rds (Radio Data System)
( Radio Data System ) RDS service availability varies with area. Please note that if the RDS signal is not available same of the following functions may not work. RDS Basics AF( Alternative Frequency ) When the radio signal strength is poor, enabling the AF function will allow the unit to automatically search for another station with the same PI (program identification) as the current station but with stronger signal strength. -
Page 9: Traffic Announcements
Traffic Announcements Some RDS FM stations TP ( Traffic Program Identification ) TA ( Traffic Announcements Identification ) provide traffic information. Broadcasting of traffic information Radio announcements on traffic conditions TA Mode: Press the TA button to turn on and the TA function. When the TA mode is turned on, the TA indicator will be displayed. - Page 10 PTY Reception ( Program Type ) RDS FM stations provide a program type identification signal. PTY Type Preset Example: news, rock, info, sport, etc. Press PTY once to enter the MUSIC type or press PTY twice to enter the SPEECH type. PTY Mode: press the PTY button to turn on the Program Type reception, Then use function ①—⑥...
-
Page 11: Rds Menu Function
Menu Function Press the rotary volume control for more than 2 seconds to enter the menu mode, then each press changes the mode as follows: ESP mode TA mode MASK mode RETUNE mode DSP mode LOUD ON / OFF WOOF ON / OFF VO L (CD 12s, Mp3 45s) ≥... - Page 12 Menu Function ROCK CLASSIC FLAT DSP OFF DSP mode: Rotate the control to choose DSP sound effect: LOUD mode: Rotate the control to choose loudness on or off. VO L WOOF ON / OFF: Rotate the control to turn the subwoofer preouts on or off. ESP12:Selected as CD-ESP time 12 seconds.
-
Page 13: Cd Functions
CD Functions DISCS FOR PLAYBACK This set can play all digital audio CD, video finalised digital audio CD-Recordable(CDR)discs and MP3-CD. 1.Press once or more to on. 2.Press to open the panel, insert a CD with the printed side facing upward. 3.Push the panel back into place. - Page 14 CD Functions (continued) REPEAT You can play the current track, the program or the whole disc repeatedly. 1. During playback, press once or more. Note: If you do not select on, the system will play your entire disc/ program continuously. On the panel on the remote control Random track playback (For CD Only)
-
Page 15: Usb/Sd/Mmc/Mp3 Playback
USB/SD/MMC MP3 playback 1.Loading SD/MMC Card Insert the SD/MMC card into the slot, with the front side at right. The unit will play the music automatically and the LCD will show MEM-CARD. 2.Take out SD/MMC Card Push SRC button and switch to non MEM-CARD mode, slightly press the SD/MMC card and remove the card when it pops out. -
Page 16: Mp3 Playback
MP3 Playback While playing an M 3 disc/USB/SD/MMC-MP3 music file, the folder/file name and ID3 tag (Song title, Album and Artist) can scroll across the LCD. (Press the BAND button to show ID3 information) Elapsed playing time & Track number Folder name &... -
Page 17: Mp3 Character Search
MP3 Character Search Press AMS button three times to select "CHAR SCH" mode. Press the control and "A" is displayed. If you press the control for more than 0.5 seconds, a track beginning with the letter "A" will be played. If you want to select a track name beginning with a different letter. -
Page 18: Mp3 Overview
MP3 Overview Note on M 3 "MP3" technology ( MPEG audio layer3 ) reduces the digital data of an audio CD significantly while maintaining CD-like sound quality. MP3 is a music compression technology, MP3 ( MPEG audio layer3 ) reduces the digital data of an audio CD significantly while maintaining CD-like sound quality. This product allows playback of MP3 files on CD-ROM CD-R or CD-RW discs. -
Page 19: Electrical Connections
Electrical Connections Wiring Diagram Aux-in Black R ( Red ) AUDIO OUT L ( White ) Antenna (Green) Amplifi er Subwoofer out Fuse 15A Connector R(Red) Amplifier L(White) Rear Line-out (Gray) Front Line-out (Brown) R(Red) A mplifie r L(White) ISO Connector For som e VW/Audi or Opel(Vauxhall) Ignition key car models, you may need to modif y... - Page 20 Electrical Connections Using the ISO Connector 1.If your car is equipped with the ISO connector, then connect the ISO connectors as illustrated. 2. For connections without the ISO connectors, check the wiring in the vehicle carefully before connecting, incorrect connection may cause serious damage to this unit.
-
Page 21: Installation Guide
Installation Guide C arefully complete the electric al connections . C heck connecti ons before operation. Reset Press to flip down the panel. Then press the Reset hole with a pointed object to res et the unit to restore the system to the original fa ctory settings. -
Page 22: Anti-Theft System
Anti-Theft System This unit is designed with a flip-down detachable panel. The panel can be detached and taken with you, helping to deter theft. Removing the panel 1.Press PWR to switch off the power of the unit. 2.Press to flip down the panel. 3.At an angle hold the panel to pull it out. -
Page 23: Troubleshooting
Troubleshooting If you suspect something is wrong then immediately switch power to the unit off. Follow the trouble shooting guide below before contacting your supplier. Do not use the unit in abnormal condition, for example without sound, or with smoke or foul smell can cause fire or electric shock, immediately stop using it and call the store where you purchased it. -
Page 24: Specifications
Specifications MW Radio General Power supply: 12V DC(11V-16V) Frequency range: 522-1620K z H Test voltage 14.4V, negative ground Sensitivity(S/N=20dB): μ 30 dB Maximum power output: 60Wx4 channels Suitable speaker impedance: 4-8 ohm Disc Player Suitable speaker power: 80-100 Wx4 channels Disc digital audio system System: Pre-Amp output voltage:...
Need help?
Do you have a question about the IPS920SD and is the answer not in the manual?
Questions and answers