Table of Contents
Advertisement
Advertisement
Table of Contents

Related Manuals for D-Link DCS-2103


Summary of Contents for D-Link DCS-2103
-
Page 1: User Manual
Version 2.00 | 12/09/2014 User Manual HD Cube Network Camera DCS-2103... -
Page 2: Manual Revisions
Preface D-Link reserves the right to revise this publication and to make changes in the content hereof without obligation to notify any person or organization of such revisions or changes. Information in this document may become obsolete as our services and websites develop and change. -
Page 3: Table Of Contents
Using the Configuration Interface ........16 Logs ..................57 Live Video ................17 Help..................58 Setup ..................19 DI/DO Specifications ..............59 Setup Wizard ..............19 Technical Specifications ............60 Network Setup ..............24 Dynamic DNS ..............28 Image Setup ..............29 Audio and Video ..............31 Preset ...................33 Motion Detection ............35 D-Link DCS-2103 User Manual... -
Page 4: Product Overview
Section 1: Product Overview Product Overview Package Contents DCS-2103 HD Cube Network Camera CAT5 Ethernet cable Power adapter CD-ROM with User Manual and software Quick Installation Guide If any of the above items are missing, please contact your reseller. Note: Using a power supply with a different voltage than the one included with your product will cause damage and void the warranty for this product. -
Page 5: Introduction
Congratulations on your purchase of the DCS-2103 HD Cube Network Camera. The DCS-2103 is a versatile and unique solution for your small office or home. Unlike a standard webcam, the DCS-2103 is a complete system with a built-in CPU and web server that transmits high quality video images for security and surveillance. -
Page 6: Features
Features Simple to Use The DCS-2103 is a stand-alone system with a built-in CPU, requiring no special hardware or software. The DCS-2103 supports both ActiveX mode for Internet Explorer and Java mode for other browsers such as Firefox® and Safari®. -
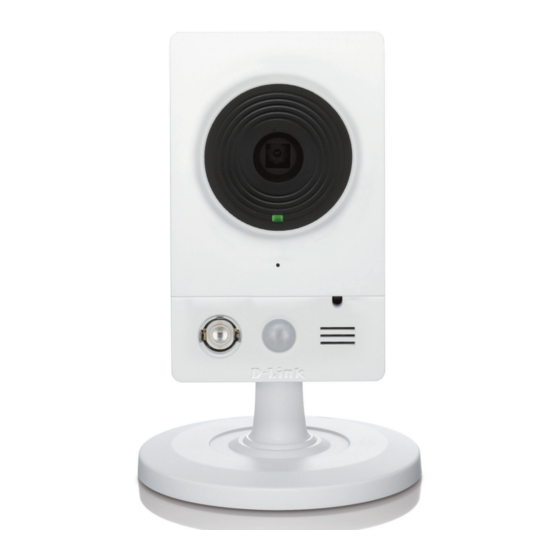
Page 7: Hardware Overview
Records video of the surrounding area Microphone Records audio from the surrounding area The light sensor monitors lighting conditions and switches between day and Light Sensor night vision modes accordingly Speaker Can play audio sent to camera for two-way communication D-Link DCS-2103 User Manual... -
Page 8: Rear
Connects to the included DC 5 V power adapter (not needed if using a PoE Power Connector connection) DI/DO Connector I/O connectors for external devices Adjustment Ring Tighten or loosen the adjustment ring to adjust the camera's position D-Link DCS-2103 User Manual... -
Page 9: Sides
Section 1: Product Overview Sides microSD Card Slot Insert a microSD card for storing recorded images and video locally D-Link DCS-2103 User Manual... -
Page 10: Installation
Insert the CD into the CD drive of your computer. The installation process for the setup wizard should start automatically. Make sure that your internet connection is active. Click Next to continue. Note: Do not plug in DCS-2103 yet Click Yes to accept the license agreement and continue the installation. D-Link DCS-2103 User Manual... - Page 11 The installation process will proceed and the installation progress will be displayed. If you want to start Setup Wizard SE after the installation, check the launch box. If you haven't plugged in the DCS-2103, please refer to "Manual Hardware Installation" on page 14 before continuing.
-
Page 12: Setup Wizard Se
Change box and enter the new Admin ID and Password. Click Next to continue. Set the IP address for the DCS-2103 by choosing either DHCP or Static IP. If Static IP is selected, enter the necessary details for the DCS-2103. Click Next to continue. - Page 13 DCS-2103. From a web browser open a new windor and type in the IP address of the DCS-2103. Enter the username and password that was configured during the setup wizard process to log in and continue configuring the DCS-2103.
-
Page 14: Manual Hardware Installation
Connect the Ethernet Cable Connect the included Ethernet cable to the network cable connector located on the panel at the rear of the DCS-2103 and attach it to the network. Attach the External Power Supply Attach the external power supply to the DC Power receptor located on the rear panel of the DCS-2103 and connect it to your wall outlet or power strip. -
Page 15: Mount The Camera
4. Place the base cover on the base and screw the camera stem clockwise into the mounting base. 5. Adjust the angle of the camera as desired, then tighten the collar on the camera stem to lock it in place. D-Link DCS-2103 User Manual... -
Page 16: Configuration
After completing the Camera Installation Wizard, you are ready to use your camera. The camera’s built-in Web configuration utility is designed to allow you to easily access and configure your DCS-2103. At the end of the wizard, enter the IP address of your camera into a web browser, such as Mozilla Firefox. -
Page 17: Live Video
Starts the automatic panning function. Stop Stops automatic panning. Preset Path Starts the camera's motion along the predefined path. ePTZ Speed: You may select a value between 0 and 64. 0 is the slowest and 64 is the fastest. D-Link DCS-2103 User Manual... - Page 18 Full screen mode Start/Stop Audio Out (to speaker) Taking a Snapshot Start/Stop Digital Output Go To (Preset List): If any presets have been defined, you can select them here to move the camera to the selected preset. D-Link DCS-2103 User Manual...
-
Page 19: Setup
To quickly configure your Network Camera’s motion detection settings, click Motion Detection Setup Wizard. If you want to enter your settings without running the wizard, click Manual Motion Detection Setup and skip to"Motion Detection" on page 35. D-Link DCS-2103 User Manual... -
Page 20: Internet Connection Setup Wizard
Section 3: Configuration Internet Connection Setup Wizard This wizard will guide you through a step-by-step process to configure your new D-Link Camera and connect the camera to the Internet. Click Next to continue. Select how the camera will connect to the Internet. -
Page 21: Dynamic Dns
If you have selected DHCP, you will see a summary of your settings, including the camera's IP address. Please write down all of this information as you will need it in order to access your camera. Click Apply to save your settings. D-Link DCS-2103 User Manual... -
Page 22: Motion Detection Setup Wizard
Step 2 This step allows you to enable motion detection based on a customized schedule. Specify the day and hours. You may also choose to always record whenever motion is detected. D-Link DCS-2103 User Manual... - Page 23 Click Next to continue. Step 4 You have completed the Motion Detection Wizard. Please verify your settings and click Apply to save them. Please wait a few moments while the camera saves your settings and restarts. D-Link DCS-2103 User Manual...
-
Page 24: Network Setup
Invalid gateway settings may cause the failure of transmissions to a different subnet. Primary DNS: The primary domain name server translates names to IP addresses. Secondary DNS: The secondary DNS acts as a backup to the primary DNS. D-Link DCS-2103 User Manual... - Page 25 PDAs. The default port number is 554. You may specify the address of a particular stream. For instance, live1.sdp can be accessed at rtsp://x.x.x.x/video1.sdp where the x.x.x.x represents the IP address of your camera. D-Link DCS-2103 User Manual...
- Page 26 IP address, specify an optional router and an optional primary DNS. Enable Multicast for stream The DCS-2103 allows you to multicast each of the available streams via group address and specify the TTL value for each stream. Enter the port and TTL settings you wish to use if you do not want to use the defaults.
- Page 27 Section 3: Configuration Enable Bonjour: Enable this to allow other network devices to connect to this camera using Bonjour. Bonjour Name: Enter the name to identify this camera on Bonjour. D-Link DCS-2103 User Manual...
-
Page 28: Dynamic Dns
DDNS account. Password: Enter the password used to connect to your DDNS server account. Timeout: Enter the DNS timeout values you wish to use. Status: Indicates the connection status, which is automatically determined by the system. D-Link DCS-2103 User Manual... -
Page 29: Image Setup
Use the drop-down box to change white balance settings to help balance colors for different environments. You can choose from Auto, Outdoor, Indoor, Fluorescent, and Push Hold. Push Hold will save and lock the currently detected white balance settings when you click Save. D-Link DCS-2103 User Manual... - Page 30 This setting controls the amount of coloration, from grayscale to fully saturated. Sharpness: Specify a value from 0 to 8 to specify how much sharpening to apply to the image. Reset Default: Click this button to reset the image to factory default settings. D-Link DCS-2103 User Manual...
-
Page 31: Audio And Video
This limits the maximum bandwidth, which can be combined with the "Fixed quality" option to optimize the bandwidth utilization and video quality. If fixed bandwidth utilization is desired regardless of the video quality, choose "Constant bit rate" and select the desired bandwidth. D-Link DCS-2103 User Manual... - Page 32 This setting controls the amount of gain applied to incoming audio to increase its volume. Audio out off: Selecting this checkbox will mute outgoing audio. Audio out volume level: This setting controls the amount of gain applied to outgoing audio to increase its volume. D-Link DCS-2103 User Manual...
-
Page 33: Preset
Clicking the Remove button will delete the currently selected preset. Preset Sequence: This section allows you to create a preset sequence, which automatically moves the camera's view between a set of preset views. D-Link DCS-2103 User Manual... - Page 34 Clicking the trash can button will remove the currently selected preset from the sequence. If you want to change the dwell time for a preset, select it from the list, enter a new dwell time, then click the Update button. D-Link DCS-2103 User Manual...
-
Page 35: Motion Detection
Low percentages can be useful when monitoring a large area such as an entire room, and high percentages can be useful when you are only monitoring a specific part of the camera’s view, such as a doorway. D-Link DCS-2103 User Manual... - Page 36 ƒ Select All: Draws a motion detection area over the entire screen. ƒ Clear All: Clears any motion detection areas that have been drawn. ƒ Restore: Restores the previously specified motion detection areas. D-Link DCS-2103 User Manual...
-
Page 37: Sound Detection
Check this box to enable the sound detection feature of your camera. Detection Level: Specifies the measurable level that would indicate sound. Please enter a value between 50 and 90, the higher the number the more sensitive the camera will be to sound. D-Link DCS-2103 User Manual... -
Page 38: Time And Date
Enable this feature to set the time automatically by using an NTP server. NTP Server: Network Time Protocol (NTP) synchronizes the DCS-2103 with an Internet time server. Choose the one that is closest to your location. Set the Date and Time Manually: This option allows you to set the time and date manually. -
Page 39: Event Setup
Event Setup In a typical application, when motion is detected, the DCS-2103 sends images to a FTP server or via e-mail as notifications. As shown in the illustration below, an event can be triggered by many sources, such as motion detection or external digital input devices. When an event is triggered, a specified action will be performed. - Page 40 1. To add a new item - "event, server or media," click Add. A screen will appear and allow you to update the fields accordingly. 2. To delete the selected item from the pull-down menu of event, server or media, click Delete. 3. Click on the item name to pop up a window for modifying. D-Link DCS-2103 User Manual...
-
Page 41: Add Server
Enter the configuration for the target e-mail server account. FTP: Enter the configuration for the target FTP server account. Network Storage: Specify a network storage device. Only one network storage device is supported. SD Card: Use the camera's onboard SD card storage. D-Link DCS-2103 User Manual... -
Page 42: Add Media
You can set up to 7 post-event images to be taken. File name prefix: The prefix name will be added on the file name. Add date and time suffix to file Check it to add timing information as file name suffix. name: D-Link DCS-2103 User Manual... - Page 43 This is the prefix that will be added to the filename of saved video clips. System log: Select this option to set the media type to system logs. This will save the event to the camera system log, but will not record any snapshots or video. D-Link DCS-2103 User Manual...
-
Page 44: Add Event
Triggers an event when the system boots up. Network Lost: Triggers an event when the network connection is lost. Passive Infrared Sensor: Triggers an event when the PIR sensor detects movement. Sound Detection: Triggers an event when sound is detected. D-Link DCS-2103 User Manual... - Page 45 Select which Server you want to send to and which Media you want the camera to send. Trigger D/O: Select to trigger the digital output for a specific number of seconds when an event occurs. D-Link DCS-2103 User Manual...
-
Page 46: Add Recording
Please note that if the free HDD space is not enough, the recording will stop. Before you set up this option please make sure your HDD has enough space, and it is better to not save other files in the same folder as recording files. D-Link DCS-2103 User Manual... - Page 47 Time of each file for recording: If this is selected, files will be separated based on the maximum length you specify. File Name Prefix: The prefix name will be added on the file name of the recording file(s). D-Link DCS-2103 User Manual...
-
Page 48: Sd Card
Playback Recorded Video: If video files are stored on the microSD card, click on the video folder and choose the video file you would like to view. Refresh: Reloads the file and folder information from the microSD card. D-Link DCS-2103 User Manual... -
Page 49: Advanced
Therefore events are triggered when the device status changes to "Open." N.O. stands for Normally Open. This means that the normal state of the circuit is open. Therefore events are triggered when the device status changes to "Closed." D-Link DCS-2103 User Manual... -
Page 50: Icr And Ir
The IR light will always be on. Sync with ICR: The IR light will turn on when the ICR sensor is on. Schedule: The IR light will turn on or off according to the schedule that you specify below. D-Link DCS-2103 User Manual... -
Page 51: Https
ƒ Create a certificate request and install Displays the status of the certificate. Status: Note: The certificate cannot be removed while HTTPS is still enabled. To remove the certificate, you must first uncheck Enable HTTPS secure connection. D-Link DCS-2103 User Manual... -
Page 52: Access List
Section 3: Configuration Access List Here you can set access permissions for users to view your DCS-2103. Allow list: The list of IP addresses that have the access right to the camera. Start IP address: The starting IP Address of the devices (such as a computer) that have permission to access the video of the camera. -
Page 53: Maintenance
Enter a label for the camera, which will be shown on the OSD when it is enabled. Show Time: Select this option to enable the time-stamp display on the video screen. LED: You may specify whether or not to illuminate the status LED on the camera. D-Link DCS-2103 User Manual... -
Page 54: System
Restore Factory Defaults. Reboot Device: This will restart your camera. Enable Schedule Reboot: You can schedule the camera to reboot according to a schedule. Select the days and time you want the camera to automatically reboot. D-Link DCS-2103 User Manual... -
Page 55: Firmware Upgrade
Section 3: Configuration Firmware Upgrade The camera's current firmware version will be displayed on this screen. You may visit the D-Link Support Website to check for the latest available firmware version. To upgrade the firmware on your DCS-2103, please download and save the latest firmware version from the D-Link Support Page to your local hard drive. -
Page 56: Status
Section 3: Configuration Status Device Info This page displays detailed information about your device and network connection. D-Link DCS-2103 User Manual... -
Page 57: Logs
Section 3: Configuration Logs This page displays the log information of your camera. You may download the information by clicking Download. You may also click Clear to delete the saved log information. D-Link DCS-2103 User Manual... -
Page 58: Help
Section 3: Configuration Help This page provides helpful information regarding camera operation. D-Link DCS-2103 User Manual... -
Page 59: Di/Do Specifications
DC 5 V Output / Max. 100 mA Internal 5V Power External 3~12V Power DC Power 5V DC Power 5V DC Power 3V~12V N.C / N.O N.C / N.O Reed switch Reed switch Diode Diode 100 mA 100 mA ALARM ALARM D-Link DCS-2103 User Manual... -
Page 60: Technical Specifications
DHCP client IP filtering NTP client (D-Link) DNS client DDNS client (D-Link) Multicast SMTP client IGMP FTP client ONVIF compliant ƒ Administrator and user group protection Security ƒ HTTP and RTSP digest encryption ƒ Password authentication D-Link DCS-2103 User Manual... - Page 61 Temperature Operating: 0 to 40 °C (32 to 104 °F) Storage: -20 to 70 °C (-4 to 158 °F) Humidity Operating: 20% to 80% non-condensing Storage: 5% to 95% non-condensing Certifications CE LVD C-Tick Dimensions • D-Link DCS-2103 User Manual...
Need help?
Do you have a question about the DCS-2103 and is the answer not in the manual?
Questions and answers