MK Diamond Products MK-370 SERIES Owner's Manual & Operating Instructions
Tile saw
Hide thumbs
Also See for MK-370 SERIES:
- Owner's operating manual (12 pages) ,
- Owner's manual (10 pages) ,
- Owner's manual (36 pages)
Table of Contents
Advertisement
MK-370 SERIES
TILE SAW
OWNER'S MANUAL &
OPERATING INSTRUCTIONS
•
For your own safety read
instructions manual before operating saw
•
Wear eye protection
•
Use splash hood for every operation
for which it can be used
•
Disconnect saw before servicing, when changing
cutting wheels, and cleaning
•
Use tool only with smooth edge
cutting wheels free of openings and grooves
•
Replace damaged cutting wheel before operating
Enter the Serial Number of your new saw in the
space below. The Serial Number is located on the
left side of the blade guard.
SERIAL NUMBER:
NOTE:
For your (1) one year warranty to be effective,
complete the warranty card (including the Serial
Number and mail it in as soon as possible.
Advertisement
Table of Contents
Troubleshooting

Subscribe to Our Youtube Channel
Related Manuals for MK Diamond Products MK-370 SERIES


Summary of Contents for MK Diamond Products MK-370 SERIES
-
Page 1: Operating Instructions
MK-370 SERIES TILE SAW OWNER’S MANUAL & OPERATING INSTRUCTIONS • For your own safety read instructions manual before operating saw • Wear eye protection • Use splash hood for every operation for which it can be used • Disconnect saw before servicing, when changing cutting wheels, and cleaning •... - Page 2 INTRODUCTION We at MK Diamond want to congratulate you on selecting the MK-370 Tile Saw. We are certain that you will be pleased with your purchase. MK Diamond takes pride in producing the finest products in the industry. Operated correctly, your MK-370 should provide you with years of quality service. In order to help you, we have included this manual.
-
Page 3: Table Of Contents
TABLE OF CONTENTS Page SAFETY: Safety Messages Damage Prevention Message General Safety Precautions and Hazard Symbols California Proposition 65 Message Electrical Requirements and Grounding Instructions Safety Label Locations Tile Saw Specific Warnings Product Specifications UNPACKING, TRANSPORT, UNIVERSAL STAND, and ASSEMBLY Unpacking Contents Transport... -
Page 4: Safety
SAFETY Read and follow all safety, operating and maintenance instructions. Failure to read and follow these instructions could result in injury or death to you or others. Failure to read and follow these instructions could also result in damage and/or reduced equipment life. SAFETY MESSAGES: Safety messages inform the user about potential hazards that could lead to injury, death and/or equipment damage. - Page 5 SAFETY USE THE PROPER EXTENSION CORD. If using an extension cord make sure it is in good condition first. When using an extension cord, be sure to use one heavy enough to carry the current your product will draw. An undersized cord will cause a drop in line voltage that will result in a loss of power and overheating.
-
Page 6: California Proposition 65 Message
SAFETY Hazard Symbols: ELECTRICAL SHOCK Never touch electrical wires or components while the motor is running. Exposed, frayed or worn electrical motor wiring can be sources of electrical shock that could cause severe injury or burns. ACCIDENTAL STARTS Before plugging the equipment into an electrical outlet, be sure the ON/OFF switch is in the OFF position to prevent accidental starting. - Page 7 SAFETY In order to prevent potential electrical shock and injury, the following electrical safety precautions and symbols should be followed at all times! In case of a malfunction or breakdown, grounding provides a path of least resistance for electric current to reduce the risk of electric shock. This tool is equipped with an electric cord having an equipment-grounding conductor and a grounding plug.
- Page 8 SAFETY To avoid the possibility of the appliance plug or receptacle getting wet, position the saw to one side of a wall mounted receptacle. This will prevent water from dripping onto the receptacle or plug. A "drip loop," shown in FIGURE 2, should be arranged by the user to properly position the power cord relative to the power source.
-
Page 9: Safety Label Locations
SAFETY SAFETY LABEL LOCATIONS: Safety labels are located according to Figures 1 through 6 below. The labels contain important safety information. Please read the information contained on each safety label. These labels are considered a permanent part of your saw. If a label comes off or becomes hard to read, contact MK Diamond or your dealer for a replacement Item Location... -
Page 10: Product Specifications
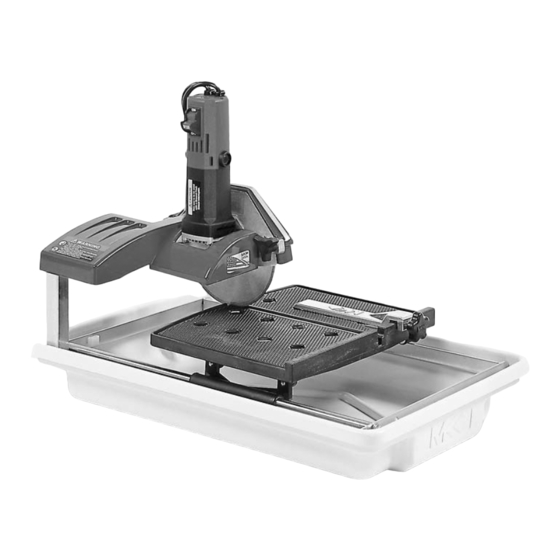
SAFETY PRODUCT SPECIFICATIONS: The MK-370 is a versatile Tile Saw. Operated and used according to this manual, the MK-370 will provide years of dependable service. General Description: The MK-370 Tile Saw is engineered as a tabletop or stand mounted wet tile saw. The saw includes a powerful 115v direct drive AC motor. -
Page 11: Unpacking, Transport, Universal Stand And Assembly Unpacking
UNPACKING, TRANSPORT, UNIVERSAL STAND and ASSEMBLY UNPACKING: Your MK-370 has been shipped from the factory thoroughly inspected. Only minimal assembly is required. Use proper lifting techniques when lifting the MK-370. If not done, remove the MK-370, Cutting Head and accessory box from the carton. CONTENTS: In your container, you will find one (1) MK-370 cutting surface and water pan, one (1) MK-370 cutting head, (1) 7-inch wet cutting continuous rim diamond blade, one (1) splash guard, one (1) splash guard washer, one... -
Page 12: Assembly
UNPACKING, TRANSPORT, UNIVERSAL STAND and ASSEMBLY ASSEMBLY: Follow the assembly instructions to prepare your MK-370 for operation. 1. Stand Setup: The MK-370 weighs approximately thirty (30) pounds; follow the guidelines for transport in the TRANSPORT section, when placing it on the stand. Center Saw over the Seat... - Page 13 UNPACKING, TRANSPORT, UNIVERSAL STAND and ASSEMBLY Retaining Align Turn clockwise Blade to tighten Hole Holes Guard Post Retaining Hole Screws Align the Cutting Head Install the three Cutting Head Install the Blade Guard Retaining Holes to the holes on Retaining Screws using a the Post Phillips Screwdriver Turn clockwise...
- Page 14 UNPACKING, TRANSPORT, UNIVERSAL STAND and ASSEMBLY Diamond Correct Direction Retaining Nut Turn counter- and Outer Blade of Rotation clockwise to Flange loosen Hold Blade Blade steady Shaft Wrench Place the Blade Wrench on the Install Diamond Blade onto Verify the Directional Arrow of Blade Retaining Nut and Blade Shaft the Blade faces outward and...
- Page 15 UNPACKING, TRANSPORT, UNIVERSAL STAND and ASSEMBLY 5. Splash Guard Installation: Retaining Splash Hole Guard Thumbscrew Turn clockwise Splashguard and Washer to tighten installed Install the Thumbscrew through Verify the Splashguard is the Washer and Splashguard installed then align to the hole found on back of the Blade Guard and tighten Page 15...
-
Page 16: Setup, Adjustment And Operation Setup
SETUP, ADJUSTMENT and OPERATION SETUP: 1. Pre-start Inspection: Prior to beginning work, a pre-start inspection of the saw should be preformed. Inspect for Inspect for cracks, Position damage de-bonding, etc. ON/OFF Inspect for Switch cracks or cuts Ensure the ON/OFF Switch is Inspect the Pump Assembly for Inspect the Diamond Blade for in the OFF position... - Page 17 SETUP, ADJUSTMENT and OPERATION Cord Clip Fill with Pump Pump clean water Cord Connection Water Cover Pump Pump Suction Place the Water Pump in the Fill the Water Pan with clean Connect the Water Pump power Water Pan with the Suction water covering the Pump cord to the connection found on down and insert the Pump...
-
Page 18: Adjustment And Operation
SETUP, ADJUSTMENT and OPERATION ADJUSTMENT and OPERATION: 1. Cutting Straight Edges: DO NOT FORCE THE TOOL. It will do the job better and safer at the rate for which it was designed. Turn Counter- Turn clockwise Desired Cut length clockwise to loosen indicated here to tighten Loosen the Adjustable Cutting... - Page 19 SETUP, ADJUSTMENT and OPERATION 2. Diagonal Cutting: NOTE: To cut diagonal, the Dual 45º Flat Angle Guide (MK Diamond Part No. 134557-MK) should be used. DO NOT FORCE THE TOOL. It will do the job better and safer at the rate for which it was designed. Adjustable Turn counter- Turn - clockwise to...
- Page 20 SETUP, ADJUSTMENT and OPERATION 3. 45º Miter Cutting: NOTE: To cut 45º Miters, the 45º Bullnose Miter Guide (MK Diamond Part No. 134585-MK) should be used. DO NOT FORCE THE TOOL. It will do the job better and safer at the rate for which it was designed. Adjustable Turn clockwise Turn counter-...
- Page 21 SETUP, ADJUSTMENT and OPERATION 4. Off-angle Cutting: NOTE: To cut angles other than 45º angles or Miters, a 90º Protractor (MK Diamond Part No. 134569-MK) should be used. DO NOT FORCE THE TOOL. It will do the job better and safer at the rate for which it was designed. Turn counter- Adjustable Turn counter-...
-
Page 22: Cleanup
SETUP, ADJUSTMENT and OPERATION 5. Cleanup: NOTE: Dispose of wastewater in accordance with applicable Federal, State and Local laws. Remove Cutting Table Position Empty ON/OFF Water Pan Switch Ensure the ON/OFF Switch is Remove the Cutting Assembly Dispose the contents of the in the OFF position from the Water Pan Water Pan... - Page 23 SETUP, ADJUSTMENT and OPERATION Empty Clean with Soap Clean the Water Pan and Water Water Pan Clean the MK-370 with soap Clean the Water Pan Dispose the contents of the Water Pan and clean water NOTE: To extend the life of the MK-370, lubricate the Motor Shaft with light oils such as, 3 in 1, WD-40, etc. Guide Rail Roller Wheel Guide Bar...
-
Page 24: Maintenance And Troubleshooting Maintenance
MAINTENANCE AND TROUBLESHOOTING MAINTENANCE: 1. Monthly Maintenance: The following maintenance should be performed monthly. Flange Retaining Motor Shaft Motor Shaft Remove and clean the Inner Clean the Motor Shaft Lubricate the Motor Shaft and Outer Flanges and the Blade Retaining Nut 1/2-inch 1/2-inch Wrench... - Page 25 MAINTENANCE AND TROUBLESHOOTING 3. Blade Dressing: Like most cutting instruments, a diamond blade performs best when it is dressed. Over time and use, diamonds on the outer edge of the blade will become smoothed or “glazed” over. This will reduce grinding efficiency and may cause the blade to “wander”...
- Page 26 MAINTENANCE AND TROUBLESHOOTING 4. Motor Brush Change-out: Disconnect the tool before servicing and when changing accessories, such as blades, bits, cutters, and the like. Housing Disconnect Turn counter- Cover the MK-370 clockwise to loosen Flat Head Screwdriver Remove the Motor Brush Locate and loosen one Motor Disconnect the MK-370 Brush Housing Cover using a...
-
Page 27: Troubleshooting
MAINTENANCE AND TROUBLESHOOTING TROUBLESHOOTING: 1. Blade will not cut properly: If “Glazed”, Dress Blade Correct Direction If Blade Core is bent, or (See Blade Dressing) of Rotation Arbor is out of round, change Blade If rotation correct, If not “Glazed”, If not damaged, go to Step C go to Step B... - Page 28 MAINTENANCE AND TROUBLESHOOTING NOTE: “Rodding” cooling channels is performed by inserting a small wire rod through the cooling inlet on top of the Blade Guard and directing the rod out through each of the cooling flow tubes located on the underside o the Blade Guard.
- Page 29 MAINTENANCE AND TROUBLESHOOTING 4. Blade Stops Turning: If connected Verify all plugs Reset once go to Step C connected Position if tripped If not tripped or If switch is on if re-trip occurs, go to Step B go to Step D Check to see if the Ground Verify all plugs are fully Check the ON/OFF Switch is in...
-
Page 30: Exploded View And Parts List
EXPLODED VIEW AND PARTS LIST EXPLODED VIEW: MK-370 Revision 06/05, Effective Date June 17, 2005 Page 30... -
Page 31: Parts List
EXPLODED VIEW AND PARTS LIST PARTS LIST: Item Description Part # Accessories Wrench, Blade Nut, 15/16 Boxed End 134684 Wrench, Blade Shaft, 11/16 Open End 153450 Blade, 7 Dia X 5/8 arbor 153441 Owner’s Manual, 370 156760 Warranty Card 155037 Tag, Saw Hang, 370 156750 Assembly, Rip Guide... - Page 32 EXPLODED VIEW AND PARTS LIST Item Description Part # Label, 370 Model 156692 Plug, CEE 7/7 16a 240v 153687 Post Cover Casting, Cover, Post, 370 156748 Screw, 10-24 X 3/8 Socket Head Set, Cup Point 156715 Label, Warning, Read Owner’s Manual 155806 Label, 370 Model 156692...
- Page 33 EXPLODED VIEW AND PARTS LIST RYOBI MOTOR EXPLODED VIEW: Page 33 MK-370 Revision 06/05, Effective Date June 17, 2005...
-
Page 34: Parts List - Ryobi
EXPLODED VIEW AND PARTS LIST RYOBI MOTOR PART LIST: Item Description Part # GEAR SHAFT 6110298 PARALLEL KEY 5X5X14 6100224 GEAR CASE COVER 6821489 FLAT TAPPING SCREW (S) M4X12 9150412 WASHER t=1.6 6901213 BALL BEARING #6203LLH 9896203 BEARING PLATE t=1.6 6155821 TAPPING SCREW (S) M4X10 9040410... -
Page 35: Theory
THEORY THEORY OF DIAMOND BLADES: Diamond blades do not really cut; they grind the material through friction. Diamond crystals, often visible at the leading edge and sides of the rim/segment, remove material by scratching out particles of hard, dense materials, or by knocking out larger particles of loosely bonded abrasive material. This process eventually cracks or fractures the diamond particle, breaking it down into smaller pieces. -
Page 36: Accessories
ACCESSORIES ACCESSORIES: ITEM NUMBER DESCRIPTION 139295 MK-200, 7 x 5/8 Arbor 139311 MK-215, 7 x 5/8 Arbor 153293 MK-315, 7 x 5/8 Arbor 134569-MK Dual 45° Flat Angle Guide 134585-MK 45° Bullnose Miter 134569-MK 90° Protractor 152792 Dressing Stone 152610 Ground Fault Circuit Interrupter 155953 Stand... -
Page 37: Ordering Information
ORDERING and RETURN INFORMATION ORDERING INFORMATION: You may order MK Diamond products through your local MK Diamond distributor or, you may order direct from MK Diamond. NOTE: There is a $25.00 minimum order when ordering direct from MK Diamond. All purchases must be made using VISA or MasterCard. - Page 38 To reduce your exposure to these chemicals, work in a well-ventilated area, and work with approved safety equipment, such as those dust masks that are specially designed to filter out microscopic particles. MK DIAMOND PRODUCTS, INC 1315 STORM PARKWAY, TORRANCE, CA 90509-2803 310 539 5158...
Need help?
Do you have a question about the MK-370 SERIES and is the answer not in the manual?
Questions and answers