TerraTrike Rover Assembly Manual
Hide thumbs
Also See for Rover:
- Assembly manual (21 pages) ,
- Quick start manual (8 pages) ,
- Quick start manual (4 pages)
Advertisement
Quick Links
TerraTrike Rover Assembly/Owners Manual
F G
H
E
A
Carefully unpack carton contents and remove protective
packing materials.
1. Straighten the wheels until they are perpendicular to the
front assembly. Insert boom assembly into the "flat" side of
the front assembly as pictured (with the chainring on right
side of trike).
3. After applying grease to the four M8x65mm button head
socket cap screws, install them with eight M8 flat washers
and four M8 Nyloc nuts, but do not tighten at this time. Be
sure that all four bolts engage into the through holes in the
boom. After you have determined the optimal seating/frame
position, tighten them securely (20 N-m/175 in-lbs.).
5. Apply grease to the bolt and attach the tie rod to the
hubmount flange.
The tie rod is mounted above the
hubmount flange using a 13mm spacer, an M8x40mm bolt
and an M8 Nyloc nut on the 8 speed and below the
hubmount flange on the 3 speed. NEVER allow the chain
to ride on the tie rod.
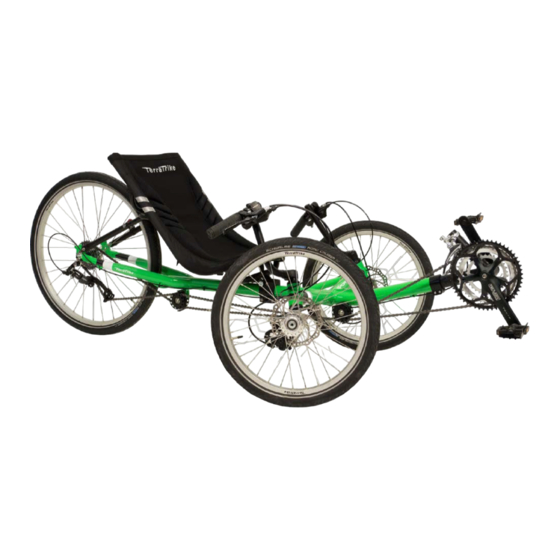
A – Front Assembly
B – Rear Assembly
D
C – Boom Assembly
D – Seat Assembly
E – Chain Tube
C
F – Pedals
G – Frame Bolts and nuts
B
H – Chain with Master Link
PLEASE BE SURE TO GREASE ALL BOLTS
2. Slide rear assembly onto boom with rear cog on right side of trike. The
front and rear assemblies should butt up against each other. The holes in the
boom are used for sizing the trike to your leg length. The average height rider
will have one or two exposed holes in the boom in front of the front assembly
(see chart for recommendations).
4. Loosen the handlebar fixing bolt on the side of the handlebar and rotate
each handlebar so that they extend over the front wheels. You should not
have to loosen the top cap bolt to rotate the handlebars.
6. After aligning the front wheels so that they are parallel to each other
when pointing straight ahead (neutral toe), attach seat assembly to trike:
slide the upper seat stay tubes into the lower seat stay tubes and install ring
pins. Tighten upper and lower seat stay bolts securely. Attach shifter cable
to rear hub (see manual) and affix cable to main frame with a zip tie. Secure
shifter and brake cables halfway up each handlebar using zip ties.
8/12/10
Parts List
BEFORE ASSEMBLY.
Advertisement

Related Manuals for TerraTrike Rover


Summary of Contents for TerraTrike Rover
-
Page 1: Parts List
TerraTrike Rover Assembly/Owners Manual 8/12/10 Parts List A – Front Assembly B – Rear Assembly C – Boom Assembly D – Seat Assembly E – Chain Tube F – Pedals G – Frame Bolts and nuts H – Chain with Master Link... - Page 2 4. When cornering, the laws of physics apply: the faster you go the more you will need to lean into the corner. Failure to do so could result in lifting the inside wheel and, in extreme cases, cause you to lose control and/or roll the trike onto its side. Your Rover is a very stable machine in most instances, but be careful.
Need help?
Do you have a question about the Rover and is the answer not in the manual?
Questions and answers