Table of Contents
Advertisement
Quick Links
Y
H
L
C
OU'RE
EARD,
OUD AND
LEAR.
Installation and Operation Manual for
Compact Tower Top Amplifier System
Model 428B-83H-01-M/-48 and 428B-83H-01-C-110/48
and Model 428B-83H-01-T
Manual Part Number
7-9487
8625 Industrial Parkway, Angola, NY 14006 Tel: 716-549-4700
Fax: 716-549-4772
sales@birdrf.com
www.bird-technologies.com
Advertisement
Table of Contents

Related Manuals for BIRD 428B-83H-01-M


Summary of Contents for BIRD 428B-83H-01-M
- Page 1 OU'RE EARD, OUD AND LEAR. Installation and Operation Manual for Compact Tower Top Amplifier System Model 428B-83H-01-M/-48 and 428B-83H-01-C-110/48 and Model 428B-83H-01-T Manual Part Number 7-9487 8625 Industrial Parkway, Angola, NY 14006 Tel: 716-549-4700 Fax: 716-549-4772 sales@birdrf.com www.bird-technologies.com...
- Page 2 Product part numbering in photographs and drawings is accurate at time of printing. Part number labels on TX RX products supersede part numbers given within this manual. Information is subject to change without notice. Bird Technologies Group TX RX Systems Inc.
- Page 3 First Printing: April 2010 Version Number Version Date 04/06/10 09/22/10 05/05/11 Symbols Commonly Used WARNING ESD Electrostatic Discharge CAUTION or ATTENTION Hot Surface High Voltage Electrical Shock Hazard NOTE Heavy Lifting Important Information Bird Technologies Group TX RX Systems Inc.
- Page 4 Contact Information Sales Support at 716-217-3113 Customer Service at 716-217-3144 Technical Publications at 716-549-4700 extension 5019 Bird Technologies Group TX RX Systems Inc.
-
Page 5: Table Of Contents
Table of Contents General Description .................... 1 Tower Top Box ....................2 Base Control Unit ....................3 Base Control Unit Styles..................3 MCU ........................3 Functional Block Diagram.................. 3 CMU ........................9 Functional Block Diagram.................. 9 Unpacking ......................10 Pre-Installation Checkout ................. 10 Mechanical Inspection .................. - Page 6 Alarms ........................ 32 The Test Mode ....................33 Set LNA X Active ....................33 Terminate LNA X ....................33 Un-Terminate LNA X ..................33 System Troubleshooting .................. 34 Performance Degradation ................34 Hardware Problems ..................35 Lightning and Lightning Arresters ..............35 Vandalism .......................
- Page 7 Figure 29: Using the test port to measure MCU sensitivity ........ 29 Figure 30: Using the test port to measure CMU sensitivity ........ 29 Figure 31: Schematic representation of Form-C contacts ........32 Figure 32: Optional expansion deck (75-83H-428B) .......... 36 Figure 33: Optional expansion deck (75-83H-428B-32) ........
- Page 8 Table of Contents Manual 7-9487 - 3 05/05/11...
-
Page 9: General Description
GENERAL DESCRIPTION Parameter Specification Your Bird Technologies Group, TXRX Systems Bandwidth 792 - 824 MHz brand Tower Top Amplifier System provides the highest degree of reliability available in a Tower Noise Figure 3.5 dB max Top Amplifier (TTA). The system uses quadrature- 3rd order IIP >... -
Page 10: Tower Top Box
circuitry continuously monitors the DC power oper- the line loss from degrading the signal-to-noise ation of the primary quad-amplifier and automati- ratio. The quadrature amplifiers have a separate cally switches to the identical secondary quad- power circuit for each half of the amplifier which amplifier if conditions indicate a primary malfunc- provides component redundancy as well as unsur- tion. -
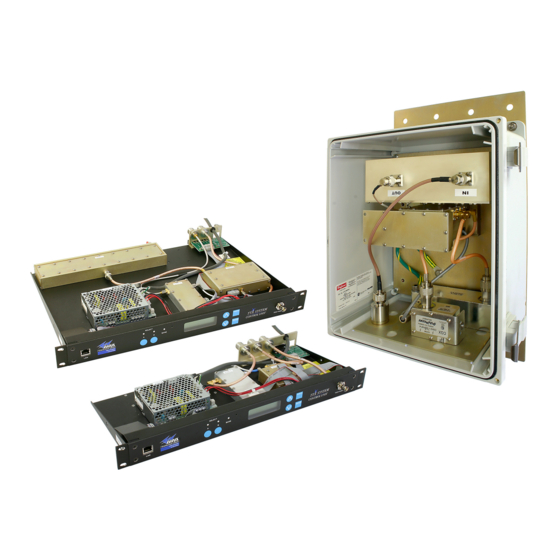
Page 11: Base Control Unit
Contrast Cancel Status LED’s Adjust Button Button Down Enter Test Amplifier Display Port Button Button Port Select Buttons Figure 2: Front view of the Base Control Unit. Note: Both the MCU and CMU style base control units use the same front panel. arresters (see Figure 1). -
Page 12: Table 3: Mcu Specifications
the ability via software interface to switch the tower TRANS input connector. After passing onto the top LNA’s input, between either the antenna or an deck they are applied to a modem assembly which internal 50 Ohm load. This feature gives field engi- is used to couple and de-couple the 2.176 MHz neers the ability to perform system sensitivity tests modem subcarrier communications between the... -
Page 13: Figure 3: Top View Of The Mcu
8-21515 3-21476 3-21450 3-22951 Power Ethernet Amplifier Front Panel Board Supply Board Assembly (under shroud) 3-23416 3-22914 3-23339 Rear Panel Modem 16-Way Divider Board Assembly w/ Expansion Port Figure 3: Top view of the MCU. Main Test Cable Ground Cable here here Alarm... -
Page 14: Figure 5: Functional Block Diagram Of The Mcu
428B TTA Assembly Antenna 792-824 Surge Filter Select A Term Switch B Term Switch Switch 3 dB Control Board +12VDC +12VDC Select RS-485 +12VDC Switch Surge RS-485 Tap DC Tap Main Test 428B MCU Assembly Test Main +12VDC RS-485 Modem Power +12VDC DC Inject... -
Page 15: Figure 6: Top View Of The Cmu
3-21532 3-22951 3-21476 Filter Front Panel Board Ethernet Attenuator (under shroud) Board 3-23070 8-21515 Power Supply 3-22914 (model 428B-83H-01-C-110) 3-21516 DC-DC Converter Rear Panel (model 428B-83H-01-C-48) Modem Board Assembly Figure 6: Top view of the CMU. Alarm Main RF Out to Cable Interface GTR-8000... -
Page 16: Figure 8: Functional Block Diagram Of The Cmu
428B TTA Assembly Antenna 792-824 Surge Filter Select A Term Switch B Term Switch Switch 3 dB Control Board +12VDC +12VDC Select RS-485 +12VDC Switch Surge RS-485 Tap DC Tap Main Test 428B CMU Assembly Test Main +12VDC RS-485 Modem Power +12VDC DC Inject... -
Page 17: Cmu
the channels Reserve Gain attenuation. The next lector tuned to pass 792 to 824 MHz. After filtering stage is a distribution amplifier which is used to the signals are amplified by the active tower top overcome splitter losses in the base control unit. LNA (either amp A or B depending on user selec- Following the amplifier is a variable attenuator that tion) before passing through the main transmission... -
Page 18: Unpacking
base and tower top CPU’s. The modem assembly CAUTION: The wide band filter in is also used to inject the +12 VDC onto the main the tower top box is factory tuned transmission line that is required to power the and must not be field adjusted. -
Page 19: Bench Testing
(models 428B-83H-01-M-110 and 428B-83H-01-C- tions is shown in Figure 13. 110) or by connecting the DC power cable to a suit- able -48 VDC supply (model 428B-83H-01-M-48 Bench Testing and 428B-83H-01-C-48). The following start-up The purpose of the bench test is to verify that all of sequence occurs. -
Page 20: Figure 13: Menu Selections
428B-83H-01-X Menu System 428B-83H-01-X DEFAULT KEY TO BUTTONS KEY TO BUTTONS SET LNA A ACTIVE DISPLAY TX RX SYSTEMS INC CANCEL UP-ARROW ENTER TO CONFIRM ENTER DOWN-ARROW LNA X ACTIVE SET LNA B ACTIVE ENTER TO CONFIRM AS AN EASY REFERENCE RECORD VALUES HERE A CURRENT XXXmA RESERVE GAIN... -
Page 21: Installation
Tower Top Box Minimum length cables Best possible sensitivity Default "Reserve Gain" Attenuation (3.0 dB) Default Distribution Attenuation (1.0 dB) Signal Generator Diagnostic Cable Test Main Front Panel Test 12 dB SINAD Port Receiver Figure 14: Test equipment interconnection for “bench testing” of MCU system components. for reserve gain attenuation (3.0 dB) and in the INSTALLATION case of the MCU style systems a distribution... -
Page 22: Installing The System
Tower Top Box Minimum length cables Best possible sensitivity Default Reserve Attenuation (3.0 dB) Laptop GTR 8000 Test Main RF Out Trans Test Diagnostic Cable Signal Generator Front Panel Test Port Figure 15: Test equipment interconnection for “bench testing” of CMU system components. Installing the System 2) Run the main transmission cable as well as the Installation of the TTA system should follow the... -
Page 23: Figure 16: Mcu System Installation Guidelines
WARNING Failure to ground the TTA System properly can result in equipment failure caused by electrical surges. GROUNDING REQUIREMENTS GROUNDING REQUIREMENTS Tower Top Amplifier Surge protectors 6, 7, and 11 must be grounded to the Master Ground Buss. MCU ground stud must be connected to the Equipment Rack Master Ground Bar. -
Page 24: Figure 17: Cmu System Installation Guidelines
WARNING Failure to ground the TTA System properly can result in equipment failure caused by electrical surges. GROUNDING REQUIREMENTS GROUNDING REQUIREMENTS Tower Top Amplifier Surge protectors 6, 7, and 11 must be grounded to the Master Ground Buss. CMU ground stud must be connected to the Equipment Rack Master Ground Bar. -
Page 25: Figure 18: System Installation Guideline Notes
Motorola part number DS1090501WB (Female/Female). SYSTEM ENGINEER RESPONSIBLE FOR All mounting hardware Wall feed-through hardware TX RX Systems Inc. 8625 Industrial Parkway, Angola, NY 14006 716-549-4700 bird-technologies.com sales@birdrf.com Figure 18: System installation guideline notes. TX RX Systems Inc. Manual 7-9487-3 05/05/11... -
Page 26: In-Building Lightning Arresters
the wraps of tape. Cover the connectors com- 2.667 2.667 2.667 .453 thru pletely with tape. 8 places 5) If the tower box door is opened during the installation it is important to re-tighten the door- clamps correctly so that the door gasket seal is maintained. -
Page 27: Figure 21: Cmu Alarm Terminals
-48 VDC supply volt- age is required. Black to (+) and Red to (-). Alarm Terminals Figure 22: Alarm terminals. Normally open or normally closed screw terminals are available. Model 428B-83H-01-M shown. TX RX Systems Inc. Manual 7-9487-3 05/05/11 Page 19... -
Page 28: Interference And Im Considerations
with high-quality 50-ohm coaxial cable such as 1) From the default display press the DOWN 1/4-inch superflexible transmission line. Some ARROW button on the front panel to scroll flexibility in the jumper cables will prevent strain through the menu choices until you reach the and possible damage to the connections. -
Page 29: Attenuation Settings
Attenuation Settings When automatic has been selected the message Spectrum Analysis “AUTO MODE” will be shown on the control unit Operational Tests front panel display when you scroll down the menu Sensitivity with Load Connected choices to the reserve gain value, refer to the Sensitivity with Antenna Connected menu selections chart shown in figure 13. -
Page 30: Setting The Cmu Reserve Gain Attenuation
Total of 14 dB Reserve Gain between LNA Inputs desired Programmable Ceramic Filter Attenuator ** Filter Main 0.8 dB Distribution 1.7 dB 24 dB * 2.3 dB Fixed Dividers Fixed Loss Line Gain Fixed Loss (In Minimum Loss Attenuation State) Tower Top Box (23 dB of Gain) Base Unit * LNA Gain Rounded... -
Page 31: Gtr8000 Attenuator Adjustment
GTR8000 ATTENUATOR ADJUSTMENT realized if all of the switches were in the ON posi- tion at the same time. There are two configurations of the GTR8000, those with a site RMC (systems expandable past 6 When the MCU style is connected to stations) and those without the site RMC (systems the GTR8000 Six-Pack you will need NOTE... -
Page 32: Setting Distribution Attenuation (Mcu Only)
1) Press the DOWN ARROW button on the front settings that is programmed into your system when panel to scroll through the menu choices until you first turn it on. You will need to adjust this value you reach the ATTENUATORS menu. to optimize your system. -
Page 33: Procedure For Spectral Analysis
Front Panel Tower Top Box Test Port Antenna Test Trans Test Main Spectrum Analyzer Bird SignalHawk Figure 25: Testing the output spectrum of the TTA. Model 428B-83H-01-M shown. TX RX Systems Inc. Manual 7-9487-3 05/05/11 Page 25... -
Page 34: Figure 26: Testing The Cmu Output Spectrum
Antenna Test Trans RF Out Test Main Spectrum Analyzer Bird SignalHawk Figure 26: Testing the output spectrum of the TTA. Model 428B-83H-01-C-110 shown. Maximum Signal Level Mask Receive Band Less than -35 dBm Transmit Band Less than -55 dBm Remaining Spectrum... -
Page 35: Operational Tests (Sensitivity And Degradation)
2) For an MCU style system connect the spectrum amplifier can also be switched to an internal 50 analyzer to one of the output ports of the multi- Ohm load for testing purposes. The front panel test coupler, see figure 25. For the CMU style sys- port remains connected (through its isolated 33.5 tem connect the spectrum analyzer to the RF dB input) to the tower top amplifiers regardless of... -
Page 36: Figure 28: Calculating Actual Sensitivity
Actual Sensitivity is calculated using the following formula: Actual Sensitivity (dBm) = IS (dBm) + TC (dB) + TP (dB) Where: is the Injected Signal Level is the Test Cable Loss is the Test Port Loss Example: If the Test Cable for the system is 200 ft. long with a loss of 3.6 dB per 100 ft., then the Test Cable Loss will be 7.2 dB. - Page 37 Main Test Front Trans 12 dB SINAD Panel Test Port Receiver Figure 29: Using the test port to measure sensitivity of the TTA system. Model 428B-83H-01-M shown. Tower Top Box Antenna Laptop GTR 8000 Test Main RF Out Trans Test...
-
Page 38: Effective System Sensitivity
Effective System Sensitivity 6) Use the ARROW buttons to dial in the effective The Effective System Sensitivity is the sensitivity sensitivity value and press the ENTER button to as seen by the subscriber. This represents the save the information in memory. By storing the Talk-in coverage component of the infrastructure. -
Page 39: Amplifier Monitoring
Amplifier Monitoring The system continuously monitors the current Amplifier Displayed Value being drawn by the amplifiers and reveals the sta- TTA Amp A ~ 600 ma tus of the amplifiers in three ways: LCD Display, TTA Amp B ~ 600 ma front panel LED’s and Form-C contacts (“screw ter- Base Amp minals”). -
Page 40: Front Panel Leds
BASE and TOWER software version can be read will then be connected to the normally closed termi- from the display by using the ARROW buttons to nals. This is the normal mode of operation. When scroll down from the default display to the SOFT- an alarm condition occurs the CPU will de-energize WARE VERSION sub-menu. -
Page 41: The Test Mode
amplifier and automatically switches to the identical 3) Pressing the CANCEL button returns you to the secondary quad-amplifier if conditions indicate a default display. Whichever amplifier you had primary malfunction. selected to be active in the TEST sub-menu will now be the active amplifier back in the normal A loss of communications (along the main trans- mode and on-air signals will again pass through mission line) between the microprocessors in the... -
Page 42: System Troubleshooting
1) From the TEST sub-menu display use the 1) Performance problems characterized by poor ARROW button to scroll over to the UNTERM receiver sensitivity and possibly accompanied LNA “A (or) B” menu choice and press the by activation of the alarm system. RF interfer- ENTER button. -
Page 43: Hardware Problems
The multicoupler AC Line Fuse (Model 428B-83H-01-M/C-110) expansion deck will increase the total multicoupler A failure of the power supply will obviously shut the outputs to 32 or 48. -
Page 44: 16 To 48 Channel Expansion
TTA system we VSWR) or greater return loss will recommend that all unused RF out- work. Bird Technologies Group has puts on all 16-way dividers must be an inexpensive 50 Ohm load for this terminated with a 50 ohm load. Labo- purpose, part number 83-01-05. -
Page 45: Narrowband Filter
Remove Existing Cable 3-14056 Figure 33: Optional multicoupler expansion deck, part # 75-83H-428B-32. Narrowband Filter fier in the MCU style control unit and just after the RF output port in the CMU style system. The addi- There are a total of nine different narrowband filters tional filter will provide a narrower pass window for available for use with your TTA system. -
Page 46: Installing Narrowband Filter (Mcu Systems)
Model # Operating Band- Range width Filter (MHz) (MHz) 89-83F-02-03 792 to 806 RF IN 89-83F-02-06 792 to 806 Dist 16-Way From Tower 89-83F-02-09 792 to 806 89-83F-02-14 792 to 806 89-86A-02-03 806 to 824 89-86A-02-05 806 to 824 89-86A-02-10 806 to 824 Figure 34: Optional filter interconnect diagram for MCU style systems. - Page 47 Remove Existing Cable 3-14056 Figure 35: Connecting the narrowband optional filter to the TTA. 2) Connect the RF output port at the rear of the 3) Connect the output port of the filter to the input control deck to the input port of the filter. This of the GTR8000 radio system.
-
Page 48: Appendix A: Front Panel Ethernet Connectivity
APPENDIX A Front Panel Ethernet Connectivity ETHERNET CONNECTIVITY 1) Insure the JAVA runtime environment software is installed on your laptop. The front panel LAN connector on the control unit provides for 10/100 BASE-T Ethernet connection 2) Connect your laptop network port to the LAN using the TCP-IP protocol. -
Page 49: Networked Connection
Brown Brown Pins 4, 5, 7 and 8 are not used TX RX Systems member Bird Technologies Group CAT-5 Cross-Over Cable Figure A1: Direct connection to the TTA using crossover cable. 6) In your web browsers address box type-in the Networked Connection address of the TTA “http://192.168.1.1”... - Page 50 4 Port Ethernet Hub 4 Port Ethernet Hub Internet CAT-5 Straight-Through Modem/Router Modem/Router Cable TX RX Systems member Bird Technologies Group Remote PC System Figure A2: WAN connection to the TTA using straight-through cable. TX RX Systems Inc. Manual 7-9487-3 05/05/11 Page 42...
-
Page 51: Required Equipment
connection as well as the pinout for a straight-thru CAT-5e cable. REQUIRED EQUIPMENT Cat-5e Straight-thru Cable Laptop Computer with a network interface card installed. In addition, the JAVA run-time environ- ment version 1.6.0, and a web browser such as Internet Explorer must also be installed on the lap- top. - Page 52 6) Type in the host IP address. This is the current 7) The HyperTerm window will now display a address (factory default flashing cursor, see Figure A6. Type in “bird” Figure A7: Entering the Setup Mode. TX RX Systems Inc. Manual 7-9487-3 05/05/11...
-
Page 53: Tta Network Port Security
(“bird” is the factory default password). A any network connected device. prompt to enter the setup mode will now appear as shown in Figure A7. -
Page 54: Snmp Support Disabled
SNMP SUPPORT DISABLED and you will be prompted to enter the new pass- word. Refer to Figure A9. This will prevent unauthorized SNMP access. If SNMP is required to be used for network manage- The password is factory limited to ment, this will need to be re-enabled and setup as four characters. -
Page 55: Appendix B: Changing Your Service Computers Ip Address
APPENDIX B Changing Your Service Computers IP Address When you initially direct connect your service com- 5) The “Local Area Connection Status” box will puter to the TTA it will be necessary to change the open. Single click the “Properties” tab as shown computers IP address. - Page 56 Figure B2: Select the “Network Connections” icon. Figure B3: Select the “Local Area Connection” icon. TX RX Systems Inc. Manual 7-9487-3 05/05/11 Page 48...
- Page 57 Figure B4: Select the “Properties” tab. Figure B5: Make sure the “Internet Protocol (TCP/IP)” choice is highlighted. Then select “OK”. TX RX Systems Inc. Manual 7-9487-3 05/05/11 Page 49...
- Page 58 Figure B6: Select “Use the Following IP Address”. Figure B7: Enter the new IP address and Subnet mask values. TX RX Systems Inc. Manual 7-9487-3 05/05/11 Page 50...
- Page 59 Return Loss vs. VSWR Watts to dBm Return Loss VSWR Watts 1.06 54.8 1.11 54.0 1.20 53.0 1.25 51.8 1.28 50.0 1.33 48.8 1.37 47.0 1.43 44.0 1.50 43.0 1.57 41.8 1.67 40.0 1.78 37.0 1.92 36.0 2.10 34.8 33.0 30.0 dBm = 10log P/1mW Where P = power (Watt)
- Page 60 TX RX Systems Inc. Manual 7-9487-3 05/05/11 Page 52 8625 Industrial Parkway, Angola, NY 14006 Tel: 716-549-4700 Fax: 716-549-4772 sales@birdrf.com www.bird-technologies.com...
Need help?
Do you have a question about the 428B-83H-01-M and is the answer not in the manual?
Questions and answers