Table of Contents
Advertisement
Quick Links
Advertisement
Table of Contents

Related Manuals for RIM 950

Summary of Contents for RIM 950
- Page 1 Installation & Getting Started Guide BlackBerry Handheld...
- Page 2 Desktop 2.1. © 2001 Research In Motion Limited. All rights reserved. The BlackBerry and RIM families of related marks, images and symbols are the exclusive properties of, and trademarks of Research In Motion Limited. RIM, Research In Motion - Registered in the Canadian Intellectual Property Office and U.S.
-
Page 3: Fcc Compliance Statement (Usa)
FCC compliance statement (USA) FCC Class B Part 15 This device complies with Part 15 of the FCC Rules. Operation is subject to the following two conditions: • This device may not cause harmful interference, and • This device must accept any interference received, including interference that may cause undesired operation. -
Page 4: Industry Canada Certification
• Consult the dealer or an experienced radio/TV technician for help. Industry Canada Certification The RIM 950 Wireless Handheld complies with Industry Canada RSS 119, under certification number 2503 195 366A. IC Class B compliance This device complies with the —... -
Page 5: Table Of Contents
Contents FCC compliance statement (USA) ..........3 Industry Canada Certification ..........4 Important safety information ............7 RIM 950 Wireless Handheld..........10 RIM 957 Wireless Handheld..........11 Welcome to your wireless solution ..........13 About this guide..............14 Other documentation available ..........16 About version 2.1 ..............17 Contents of your package ............18 System requirements ..............19... - Page 6 Frequently asked questions ............79 Alarm ..................79 Battery..................79 Storage ..................81 Home screen ................83 LCD screen................84 Messages...................84 Punctuation................88 Resetting the handheld ............89 Specifications..................91 RIM 950 Wireless Handheld..........91 RIM 957 Wireless Handheld..........93 Research In Motion Limited Software License Agreement...97 Terms and Conditions............97 Limited Warranty.................101 Index ....................107...
-
Page 7: Important Safety Information
Important safety information Please read these safety instructions and the operation instructions provided in this manual before operating the handheld or its cradle. Retain these instructions for future use. Remember to follow any special regulations governing the use of the handheld and always switch it off in areas where radio devices are forbidden, or when it may cause interference or danger. - Page 8 WARNING Do not use any cradle or any other accessory or attachment that is not manufactured by RIM or supplied by RIM or an authorized RIM accessories supplier. Use of any accessory or attachment that is not supplied or approved for use by RIM in conjunction with the handheld is not permitted as it may cause hazards.
- Page 9 Similarly, dispose of AA batteries in a responsible manner. Contact RIM if you have any questions concerning disposal of the handheld, the lithium ion cell, or the AA battery.
-
Page 10: Rim 950 Wireless Handheld
Important safety information — RIM 950 Wireless Handheld WARNING To reduce the risk of fire or electric shock, do not expose the handheld or cradle to rain or moisture. RIM 950 Wireless Handheld Unplug the cradle from the wall and refer the handheld and cradle for service to qualified service personnel if: •... -
Page 11: Rim 957 Wireless Handheld
Important safety information — RIM 957 Wireless Handheld RIM 957 Wireless Handheld Read these instructions. Keep these instructions. Heed all warnings. Follow all instructions. Do not use this apparatus near water. Clean only with a dry cloth. Do not install near any heat sources, such as radiators, heat registers, stoves, or other apparatus (including amplifiers) that produce heat. - Page 12 Important safety information — RIM 957 Wireless Handheld Refer all servicing to qualified service personnel. Servicing is required when the apparatus has been damaged in any way, such as when the power-supply cord or plug has been damaged, liquid has been spilled or objects have fallen into the apparatus, it has been exposed to rain or moisture, does not operate normally, or has been dropped.
-
Page 13: Welcome To Your Wireless Solution
Welcome to your wireless solution BlackBerry Enterprise Edition is a mobile email solution that includes either the RIM 950 Wireless Handheld (pager-sized) and cradle or the RIM 957 Wireless Handheld (palm-sized) and cradle. Your email solution also contains desktop software and flat-rate airtime on a nationwide wireless data network. -
Page 14: About This Guide
Welcome to your wireless solution — About this guide • Tasks: Add, edit, and delete tasks and mark tasks as complete. • Alarm: Set the alarm on the handheld to sound every day or on weekdays only. • MemoPad: Compose, edit, and delete notes, memos and lists. •... - Page 15 Welcome to your wireless solution — About this guide Microsoft Information appearing in this format, prefaced by Microsoft Exchange, pertains only to BlackBerry Enterprise Edition Exchange for Microsoft Exchange. You have a Microsoft Exchange email account if you are running Microsoft Outlook as your email client.
-
Page 16: Other Documentation Available
Welcome to your wireless solution — Other documentation available procedures between the two handhelds differ, you will see the following icons: This icon indicates that the associated information or procedures pertain only to the pager-sized handheld. This icon indicates that the associated information or procedures pertain only to the palm-sized handheld. -
Page 17: About Version 2.1
Welcome to your wireless solution — About version 2.1 • “README.txt” This file, installed with the desktop software, — contains information about the new features of the version 2.1 release. About version 2.1 This release of the BlackBerry Wireless Handheld is the first for users on Lotus Domino and it is an update for existing BlackBerry users on Microsoft Exchange. -
Page 18: Contents Of Your Package
Welcome to your wireless solution — Contents of your package BlackBerry Microsoft Lotus Feature Exchange Domino Additional fields in Address Book — Four added fields are provided in the list of contact information. These fields are user- defined. (You can change the label of the fields and include any relevant information about the contact.) Time zone support —... -
Page 19: System Requirements
Welcome to your wireless solution — System requirements • Installation CD containing desktop software and online “Handheld User’s Guide” If something from this package is missing or not working properly, contact the point of purchase. System requirements The following components are required to install the desktop software: •... -
Page 21: Getting Started
Getting started To start sending and receiving email, you will need to perform some brief setup tasks on the handheld, namely, installing a new battery (for the pager-sized handheld) or charging the internal battery (for the palm-sized handheld), turning on the radio, and ensuring that the handheld is registered with the wireless network. -
Page 22: About Battery Use And Charging
Getting started — About battery use and charging displays the date and time, the current signal strength, the battery level of the handheld, and the function icons. The Home screen also displays notification of any new messages or alarms. The handheld is battery powered and you should familiarize yourself with proper battery use and care. - Page 23 Getting started — About battery use and charging Insert a new battery. Make sure the polarities (- and + signs) are aligned correctly. The handheld will vibrate and beep if the battery has not been inserted properly. Click (press down) on the trackwheel to turn on the handheld.
- Page 24 Connecting the RIM 950 (pager-sized) cradle to a PC Connecting the RIM 957 (palm-sized) cradle to a PC Installation and Getting Started Guide...
- Page 25 Getting started — About battery use and charging To charge the internal battery for the first time When you receive your palm-sized handheld you must charge the internal battery for the first time. Connect the AC adapter to the cradle’s serial port connector.
-
Page 26: Beginning To Use The Handheld
Getting started — Beginning to use the handheld Allow the handheld to charge to full battery power before using it. When the handheld is charging, the battery icon (in the top right corner of the Home screen) will change to a charging icon. Once the handheld is fully charged, the battery icon will replace the charging icon. -
Page 27: Turning The Radio On And Off
Getting started — Turning the radio on and off You can also select a function by pressing the underlined character in the function’s name. For example, press M for Messages. To turn on the handheld To turn on your pager-sized handheld, click (press down) the trackwheel. -
Page 28: Registering With The Network
Getting started — Registering with the network You will notice that the TURN WIRELESS ON icon was an antenna, but when you select the icon, the function name changes to TURN WIRELESS OFF and the icon changes to an airplane. The airplane icon is a reminder to turn off your handheld’s radio when on an airplane, in a hospital, or in any place where it may interfere with other radio transmissions and frequencies. - Page 29 Getting started — Registering with the network in the top right corner of the Home screen.) Register your handheld using the following procedure. In the Home screen, scroll to the OPTIONS icon and click. The Device Options screen appears. Scroll to Network Settings and click. The Network Settings screen appears.
-
Page 30: Installing The Desktop Software
Getting started — Installing the desktop software If you are in coverage, a confirmation message should arrive within a few seconds. Note If the Status field in the Network Settings screen is not set to Active, contact your point of purchase for customer support. - Page 31 Getting started — Installing the desktop software Ensure that you have properly installed the desktop software. If it is not already open, launch the Desktop Manager by selecting it from the Start>Programs menu. The Desktop Manager window appears. Note If the password function on your handheld is enabled, you must enter the password before you can connect to your Select Options>Serial Settings.
-
Page 32: Sending A Test Message
Getting started — Sending a test message Redirecting email Microsoft If you will be using the Desktop Redirector on your PC to redirect email messages to your handheld, open it from your Exchange Start>Programs menu. In the Redirector Status window, the Status field indicates Running and the PIN field shows your handheld’s personal identification number. - Page 33 Getting started — Sending a test message Click the trackwheel to view the menu; scroll to New Address and click. The New Address screen appears. Type your own name and email address using the trackwheel to scroll from field to field. In the Email field, press the SPACE key where the ‘@’...
-
Page 34: Reading Your Test Message
Getting started — Reading your test message If you are in coverage (as indicated by the number of bars beside the antenna icon in the Home screen), a check mark will appear beside the message within a couple of seconds or minutes. The checkmark icon indicates that your message was transmitted successfully. -
Page 35: Configuring Handheld Options
Getting started — Configuring handheld options Scroll to the test message and click to view the menu. Select Open Message by clicking again. To open messages quickly scroll to and highlight the message in the Messages screen and double-click the trackwheel. - Page 36 Getting started — Configuring handheld options Click the trackwheel to view the menu. Scroll to Save Options and click. You return to the Device Options screen. To set message notification In the Home screen, scroll to the OPTIONS icon and click. The Device options screen appears.
- Page 37 Getting started — Configuring handheld options Click the trackwheel to view the menu. Scroll to Save Options and click. You return to the Device Options screen. To set message delete You can configure the Message List Options screen so that each time you reconcile email, those messages that have been deleted from your handheld are also deleted from your desktop (and vice versa) .
-
Page 38: Using Password Protection
Getting started — Configuring handheld options To test this feature, delete a message on your handheld which you no longer need. Reconcile your email using the desktop software. (See Chapter 3 of this guide, “Using the desktop software” or the Reconciling email topic of the “Intellisync online help”... - Page 39 Getting started — Configuring handheld options If you do not want the password security screen to appear, you must disable your password in the Security screen. Password security screen If you have entered information in the Owner screen of the Options function, it will appear on the password security screen.
- Page 40 Getting started — Configuring handheld options Scroll to Security and click. The Security screen appears. In the Password field, press the key to enable the password. A SPACE dialog box appears, prompting you to enter a password of at least four characters. Press when you are finished.
-
Page 41: To Change Your Password
Getting started — Configuring handheld options You return to the Device Options screen. Note The password security screen will show your contact information (if you have entered it in the Owner screen) or it will prompt you to Press any key. Type the first letter of your password to gain access to the Enter Password dialog box. - Page 42 Getting started — Configuring handheld options Scroll to Security and click. A dialog box appears, asking you to type your password. Once you’ve typed your password, press to open the Security screen. ENTER Click to view the menu. Scroll to Change Password and click. A dialog box appears.
- Page 43 Getting started — Configuring handheld options In the Home screen, scroll to the OPTIONS icon and click. The Device Options screen appears. Scroll to Security and click. A dialog box appears, asking you to type your password. Once you do so, press to open the ENTER Security screen.
-
Page 44: Summary
Getting started — Summary You return to the Device Options screen. Summary In this chapter, you learned the steps that are required for email redirection to occur. You can install a battery or charge the internal one, turn on the radio, register with the network, install the desktop software on your PC, connect the handheld to your PC, enable email redirection, and configure some basic handheld options. -
Page 45: Using The Desktop Software
Using the desktop software The “Getting started” chapter provided instructions to install the desktop software and connect the cradle to your PC. This chapter shows you how to use the software to get the most from your handheld. The desktop software can synchronize messages, contacts, appointments, memos, and tasks between your handheld and PC. - Page 46 Using the desktop software — Backing up files from handheld to PC the entries on your PC. You can also import your PC’s Address Book entries onto your handheld. Note Before updating your handheld with new software using the Application Loader, use the Backup and Restore tool to save any important information from the handheld to your See the online help topic “Advanced backup and restore”...
-
Page 47: Loading Handheld Applications
Using the desktop software — Loading handheld applications To restore files back to the handheld Place your handheld in the cradle and connect it to your PC. In the Desktop Manager, double-click Backup and Restore. The Backup and Restore window appears. To restore the previously saved files back to your handheld, click Restore. - Page 48 Using the desktop software — Loading handheld applications To add new software Place your handheld in the cradle and connect it to your PC. In the Desktop Manager, double-click Application Loader. The Welcome to Application Loader window appears. (The handheld must be connected before you can load new software.) Click Next to start the process of loading new software onto your handheld.
-
Page 49: Synchronizing Email And Pim
Using the desktop software — Synchronizing email and PIM The Summary window appears, displaying the applications that will be downloaded to your handheld. Verify that the information is correct and click Finish. The Load Progress dialog box appears and the new files are added to your handheld. - Page 50 Using the desktop software — Synchronizing email and PIM To configure email reconciliation Note Unless you want to specify any personal folders from which email should be reconciled, the default settings in the Email Configuration window should be suitable for email reconciliation.
- Page 51 Using the desktop software — Synchronizing email and PIM Once you have configured email reconciliation, ensure that the check box next to Reconcile email is selected in the Intellisync window. Click Synchronize now to perform the operation. Ensuring email reconciliation performs as intended To ensure that email reconciliation performs as intended, check for the following conditions and/or settings.
- Page 52 Using the desktop software — Synchronizing email and PIM To configure PIM synchronization Place your handheld in the cradle and connect it to your PC. In the Desktop Manager, double-click Intellisync. The Intellisync window appears. In the Intellisync window, click Configure PIM to customize your synchronization settings.
-
Page 53: Redirecting Email
Using the desktop software — Redirecting email Redirecting email Lotus The BlackBerry Enterprise Server integrates with the Lotus Domino Server to redirect email from your PC to your Domino handheld, based on how you configure the settings in the Redirector Settings tool. Microsoft If you are running the Desktop Redirector, it will deliver email from your PC to the handheld, based on how you... - Page 54 Using the desktop software — Redirecting email In the General tab, you can select options for handheld behavior when in the cradle, set your auto signature, and turn off email redirection. In the Filters tab, you can view the default filters that have been set for redirecting email to your handheld.
- Page 55 Using the desktop software — Redirecting email To add a redirection filter Filters help you manage your email by automatically performing actions on received messages using filter settings (rules). Rules are the sets of conditions and actions that make up a filter. Use the following procedure to create a new redirection filter: In the Filters tab of the Redirector Settings window, click New.
-
Page 56: Summary
Using the desktop software — Summary To rearrange the order of your filters, select the filter you would like to move and click the up or down arrow buttons. Note As each email message arrives at your PC, the first filter listed is applied. -
Page 57: Getting To Know Your Handheld
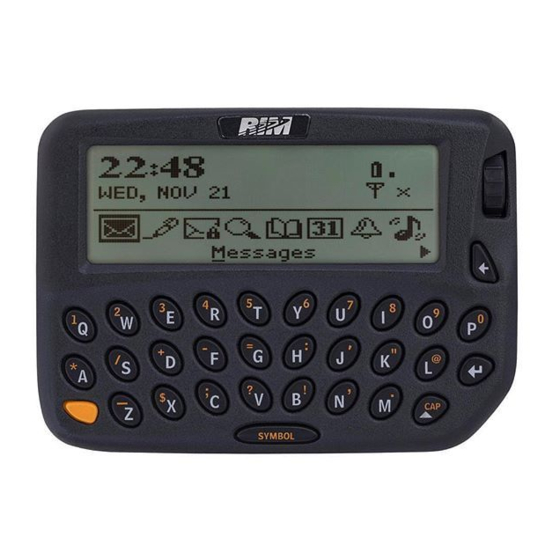
Getting to know your handheld This chapter will help you get acquainted with your pager-sized handheld or your palm-sized handheld. The RIM 950 (pager-sized) handheld... -
Page 58: Handheld Components
Getting to know your handheld — Handheld components The RIM 957 (palm-sized) handheld Handheld components Here are some details on the handheld’s main components: Keyboard and trackwheel The handheld’s QWERTY keyboard provides access to all of the regular alphabetic characters. Numeric characters, a symbols... - Page 59 Getting to know your handheld — Handheld components A trackwheel that clicks! The trackwheel on the handheld has a unique feature for greater usability and performance: it clicks! Pressing down on the trackwheel with your thumb is comparable to the clicking function of your PC mouse.
- Page 60 Getting to know your handheld — Handheld components Function Activating backlighting • When the handheld is on, press the silver once activate backlighting. Press again to turn off SILVER backlighting. (Backlighting will turn off automatically if you do not press any keys for 20 seconds.) •...
- Page 61 Getting to know your handheld — Handheld components Function Scrolling through special characters • When composing a message or entering text, press and hold a letter key while rolling the trackwheel to scroll through international characters (characters with accents), equation symbols and other marks.
- Page 62 Getting to know your handheld — Handheld components Function Scrolling horizontally and changing options • Hold the key while you roll the ROLL trackwheel to move the cursor the trackwheel horizontally across screen lines. • Hold the key while you roll the trackwheel to scroll through field options.
- Page 63 Getting to know your handheld — Handheld components Function Selecting multiple items in a list such as messages in the Messages screen and appointments in the Calendar screen SHIFT SCROLL • Hold a key while rolling the SHIFT trackwheel in a screen that contains a list Activating CAPs lock •...
- Page 64 Getting to know your handheld — Handheld components Function Typing the orange alt characters (activating NUM lock mode) • For the pager-sized handheld, press to activate num lock SHIFT mode. • For the palm-sized handheld, press ) to activate LEFT SHIFT num lock mode.
- Page 65 Getting to know your handheld — Handheld components Function Deleting previous characters • Press the key to move BACKSPACE BACKSPACE the cursor backwards and delete characters to the left of the cursor position. • For the pager-sized handheld, press key to hide (close) a BACKSPACE menu or cancel an action.
- Page 66 Getting to know your handheld — Handheld components Function Deleting characters ahead of cursor; deleting messages • Press erase characters to the right of the cursor position. • Press the key with one or more characters highlighted to delete those characters only. •...
- Page 67 Getting to know your handheld — Handheld components Function Inserting a space; scrolling through field options SPACE • Press the key to insert a SPACE space between characters while you type. • Press the key to insert the ‘@’ SPACE and ‘.’...
- Page 68 Getting to know your handheld — Handheld components To select a symbol, either scroll to a symbol and click, or press the associated alphabetic key under the desired symbol. You will return to your message with the symbol inserted. LCD screen The LCD screen is your interface with functions such as composing and reading messages, setting tasks and appointments, viewing and editing contact information, customizing device options, and...
- Page 69 Getting to know your handheld — Handheld components Activate the backlighting by pressing the silver key once. It will shut off automatically if you do not press any keys or use the trackwheel for 20 seconds. Turn off the backlighting manually by pressing the silver key again.
-
Page 70: Function Menus
Getting to know your handheld — Handheld components Function menus Menus provide a list of options for the current function. You can open a function screen’s menu by clicking the trackwheel; the menu appears on top and covers approximately half of the screen’s width. Address Book function menu Address Book function menu Installation and Getting Started Guide... - Page 71 Getting to know your handheld — Handheld components Function icons The following chart shows each function icon and describes the corresponding function. Icon Description 950 Wireless 957 Wireless Handheld Handheld Messages Receive, read, reply compose, forward, save, file, and delete messages.
- Page 72 Getting to know your handheld — Handheld components Icon Description 950 Wireless 957 Wireless Handheld Handheld Tasks Add, edit, delete tasks and mark tasks as complete. Alarm Set the alarm on the handheld to sound weekdays only every (including Saturday and Sunday).
- Page 73 Getting to know your handheld — Handheld components Icon Description 950 Wireless 957 Wireless Handheld Handheld Turn Wireless On/Turn Wireless Off Turn off the handheld’s radio when it interfere with other radio communications, such as during flight, or whenever you prefer not to receive email messages.
-
Page 74: Message Status Icons
Getting to know your handheld — Handheld components Icon Description Data is being sent Data is being received key mode is active key mode is active SHIFT lock mode is active Unread messages waiting Message status icons These icons appear on the handheld’s LCD screen to indicate the status of pending, sent, and received messages. - Page 75 Getting to know your handheld — Handheld components Icon Description Composed message has been saved (not sent yet) Unread message transmission error Message returned, message transmission error New, unread message has been received Message has been read Message has been filed Importance level of message is high Navigational icons These icons appear on the handheld’s LCD screen to indicate...
-
Page 76: Serial Port
Getting to know your handheld — Handheld components Icon Description You are at the top of a menu or screen; scroll the trackwheel down to view more items. You can scroll the trackwheel up or down to view more screen or menu items. You can scroll the trackwheel left or right to continue viewing icons on the functions list. -
Page 77: Scrolling Through Settings
Getting to know your handheld — Scrolling through settings Battery compartment The pager-sized handheld operates on one AA alkaline battery housed in the battery compartment at the back of the handheld. Charger The palm-sized handheld is designed to operate for one week or more on a full charge;... -
Page 78: Summary And Tips
Getting to know your handheld — Summary and tips • Use the keyboard. You can press the letter or number which represents your choice. For example, if you are in a time field, press the first number of the hour you want to specify. •... -
Page 79: Frequently Asked Questions
Frequently asked questions This chapter includes answers to some common questions about the handheld. See the desktop software’s online help for detailed lists of answers to FAQs about the handheld and the desktop software. Alarm Why is my alarm not sounding when I’ve set the time? Ensure that you have enabled the alarm by setting the Alarm On/Off field to On. - Page 80 Frequently asked questions — Battery Recharge the handheld’s battery. See page 25 for information on using and charging the battery. The handheld can be kept at a full charge by simply “topping up” the battery every day for 10-15 minutes. From an empty battery, a full charge can be achieved in approximately 3 hours.
-
Page 81: Storage
Frequently asked questions — Storage What should I do if my handheld does not turn on? Make sure the AA battery is properly installed or try inserting a new battery. You may have to leave the handheld turned off for 6-8 hours for the AA battery to charge the internal lithium cell. - Page 82 Frequently asked questions — Storage What should I do if I won’t be using my handheld for an extended period of time? Before storing your handheld for an extended period of time, you should save information on the handheld to your PC using the desktop software’s Backup and Restore tool.
-
Page 83: Home Screen
Frequently asked questions — Home screen All of your stored addresses and messages will be preserved while the handheld is turned off. However, the handheld will no longer have the correct date and time or encryption key. To reset the date and time, follow the instructions on page 35 of this guide, or to update this information automatically, synchronize the handheld with the desktop software’s Intellisync tool. -
Page 84: Lcd Screen
Frequently asked questions — LCD screen LCD screen What can I do if my LCD screen seems faint? Check the Screen/Keyboard option in the Device Options screen. In Options>Screen/Keyboard, scroll to the Screen Contrast field. Press and hold the key while rolling the trackwheel to select a different contrast. - Page 85 Frequently asked questions — Messages indicator in the Home screen). • Check the Network Settings screen to ensure that your handheld has been activated on the network. • You can try resending your message. As long as there is a clock icon beside the message when you resend it, another attempt is made to transmit the original message.
- Page 86 Frequently asked questions — Messages messages you want to receive are being forwarded. See the “Redirector Settings online help” for information on these filters. • The order that the Have you set the filter order correctly? filters appear in your list reflects the order that they will be applied to new messages.
- Page 87 Frequently asked questions — Messages With the volume set to Mute, the tone will not sound when new messages arrive. • Ensure that the Level 1 Only setting in your notification options is set to No. When this field is set to Yes, you will only be notified of level 1 messages, rather than all messages.
-
Page 88: Punctuation
Frequently asked questions — Punctuation How do I respond to a message which contains a list of responses? When you receive a message containing a list of responses, you can choose one of the responses as your reply message. In the Home screen, scroll to the MESSAGES icon and click. -
Page 89: Resetting The Handheld
Frequently asked questions — Resetting the handheld • Other punctuation marks are included in the symbols library which you can open by pressing . See page 67 for SPACE information on how to insert a symbol. • You can also insert international and accented characters into your messages. - Page 90 Frequently asked questions — Resetting the handheld Messages and other information stored on the handheld will not be lost. If you were in the process of composing a message, however, the message will be lost. If you reset your handheld, you will not lose connection with your PC.
-
Page 91: Specifications
Specifications RIM 950 Wireless Handheld Mechanical Properties Weight: 4.1oz (115g) (without battery) Size (LXWXH): 3.5”X2.5”X0.89” landscape, (0.94 at battery compartment) Memory: R950-4 - 4 MB Flash memory, 512 kB Display and control features Display: Full graphic LCD and backlighting; 132... - Page 92 Specifications — RIM 950 Wireless Handheld Other features: Real-time clock; audible alarm; AutoText and Address Book updates Ports: RS-232 compatible serial port operating speeds up to 115 200 baud • Input voltage from 5V p-p to +/- 30 • Maximum data rate 115 200 baud •...
-
Page 93: Rim 957 Wireless Handheld
Specifications — RIM 957 Wireless Handheld Radio specifications Network Support 900 MHz Mobitex networks Interface Protocols: MASC (Mobitex Asynchronous Communications) Protocol; RAP (RIM’s Radio Access Protocol). Frequency Transmitting: 896 to 902 MHz, 12.5 kHz Channels Receiving: 935 to 941 MHz, 12.5 kHz Channels... -
Page 94: Display And Control Features
Specifications — RIM 957 Wireless Handheld Display and control features Display: Full graphic LCD with backlighting, 160 x 160 pixel viewing area Controls: Thumb-operated trackwheel; PC-style keyboard Message Red LED indicator; audible beeper; Notification: mechanical vibrator, on-screen notification; configurable by user Other features: Real-time clock;... -
Page 95: Radio Specifications
Specifications — RIM 957 Wireless Handheld Radio specifications Network 900 MHz Mobitex networks Support Interface MASC (Mobitex Asynchronous Protocols: Communications) Protocol; RAP (RIM’s Radio Access Protocol). Frequency Transmitting: 896 to 902 MHz, 12.5 kHz Channels Receiving: 935 to 941 MHz, 12.5 kHz Channels... -
Page 97: Research In Motion Limited Software License Agreement
Terms and Conditions This is a legal agreement between you, the Customer ("You"), and Research In Motion Limited ("RIM"). BY INSTALLING, USING OR MAKING ONE OR MORE COPIES OF THIS SOFTWARE (OR ANY COMBINATION OF THE FOREGOING), YOU ARE AGREEING TO BE BOUND BY THE TERMS OF THIS AGREEMENT. - Page 98 3.0 Intellectual Property; Export Restrictions 3.5 The SOFTWARE contains cryptographic modules that 3.1 The SOFTWARE is owned may be controlled for export by RIM and is protected by purposes by the governments of Canadian, U.S. and international United States and/or copyright laws.
- Page 99 You return to RIM You do not breach the terms and the defective disk and any conditions of this Agreement or copies You have made of it. Any...
- Page 100 ACTION. EVENT limitations or exclusions may SHALL RIM’S LIABILITY TO not apply to You. YOU EXCEED THE COST OF REPLACING MEDIA 5.5 IN NO EVENT SHALL RIM UPON WHICH BE LIABLE FOR ANY OTHER SOFTWARE IS RECORDED. DAMAGES WHATSOEVER (INCLUDING, WITHOUT 5.6 This SOFTWARE is provided...
-
Page 101: Limited Warranty
Rental Warranty Period exceed three (3) years. Continued repair or replacement after the expiration of a Rental Warranty Period shall be at the sole discretion of RIM, and the continuance of a program of repair and replacement after the expiration of the Rental Warranty Period shall not constitute a waiver of RIM’s right to terminate this... - Page 102 BlackBerry Hardware in conjunction with accessories, products, services or ancillary or peripheral equipment not approved or provided by RIM, and where it is determined by RIM that such malfunction is not the fault of the BlackBerry Hardware itself.
- Page 103 Solution should not be relied upon for the transmission of data relating to emergency or life-threatening or mission critical situations, and RIM disclaims any liability on its behalf and on behalf of its Wireless Solution Providers for events or damages...
- Page 104 DAMAGES) ARISING FROM OR IN CONNECTION WITH THE USE OR PERFORMANCE OF THE BLACKBERRY HARDWARE, EVEN IF RIM OR A RIM WIRELESS SOLUTION PROVIDER ARE AWARE OF THE POSSIBILITY OF SUCH DAMAGES. THIS LIMITATION IS INTENDED TO APPLY AND DOES APPLY...
- Page 105 Limited Warranty the warranty to be voided. Thus, the above limitations or exclusions may not apply to YOU. This Limited Warranty is to be construed in Canada under the laws of the Province of Ontario and in the United States under the laws of the State of Texas, except for any body of law governing conflicts of law.
-
Page 107: Index
Index importing address book entries from PC, 46 about restoring files to this guide, 14 handheld, 47 version 2.1, 17 using, 45 wireless email solution, 13 battery AC adapter, 25 charging, 22 connect to cradle, 25 description of, 77 activating your handheld, 23 FAQs, 79 for pager-sized, 22 adding... - Page 108 Index contents of package, 18 trackwheel, 58 turn radio on/off cradle function, 14, 73 connect to PC, 22 connected to PC, 30 desktop software connecting AC adapter, 25 application loader, 45 description of, 76 backup and restore, 45 removing handheld installing, 30 from, 32 online help, 16...
- Page 109 Index frequently asked questions setting options, 35 alarm, 79 status icons, 71 battery, 79 trackwheel, 58 home screen, 83 turning on, 23 LCD screen, 84 turning on/off, 27 messages, 84 holster, description of, 76 punctuation, 88 home screen storage, 81 FAQs, 83 function icons, 71 hot keys, 59...
- Page 110 Index backlighting, 68 description of, 68 online help FAQs, 84 desktop software, 16 function menus, 69, 71 online user guide, 16 function screens, 69 graphics, 75 options date and time, 35 license agreement, 97 notify, 36 limited warranty, 101 options function locking the handheld, 14, 41, 72 description of, 14, 72 memopad function...
- Page 111 87 replying to, 87 settings scrolling through, 77 specifications,950, 91 compliance, 93 safety information display and control, 91 RIM 950 Wireless frequency, 93 Handheld, 10 mechanical properties, 91 RIM 957 Wireless power, 92 Handheld, 11 radio, 93 saved messages function...
- Page 112 Index messages, 34 tasks function description of, 14, 72 tips welcome, 13 handheld, 78 trackwheel description of, 58 how to use, 60 use with alt key, 62 troubleshooting, 79 turn radio on/off function description of, 14, 73 turning on/off handheld, 27 radio, 27 users on Lotus Domino...
Need help?
Do you have a question about the 950 and is the answer not in the manual?
Questions and answers