Table of Contents
Advertisement
Quick Links
Advertisement
Table of Contents

Subscribe to Our Youtube Channel
Related Manuals for Medion Life S41001 MD 86293


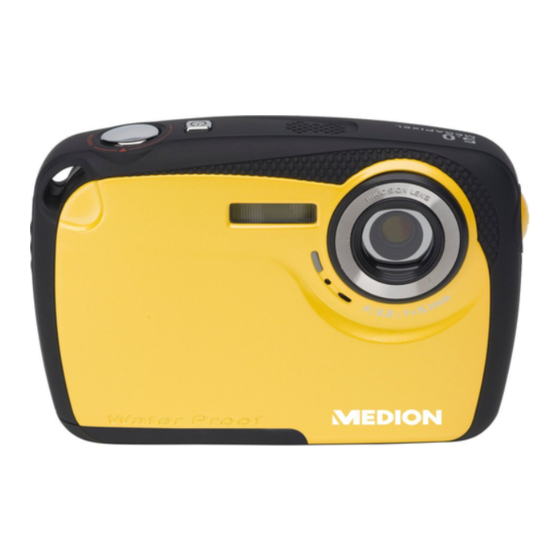
Summary of Contents for Medion Life S41001 MD 86293
- Page 1 Waterproof digital camera MEDION LIFE ® ® S41001 (MD 86293) Instruction Manual...
- Page 2 Overview of the appliance Front Flash Lens Microphone Rear Operating LED Zoom button Mode button LC display 4-way navigation Playback button button Menu button...
- Page 3 On/off button Shutter release Loudspeaker Bottom Tripod socket USB connection SD card slot Battery compartment Page Loop for carrying strap Macro button...
-
Page 4: Table Of Contents
Contents Contents ..................3 Safety instructions ................. 5 Water resistance ................. 8 Start of operation ................. 10 Included in the box ..............10 Inserting batteries..............11 Inserting and removing SD cards ..........12 Attaching the carry strap ............13 First Steps ..................14 Switching on the camera ............ - Page 5 Recording audio clips ............... 30 The video menu ............... 31 The photo menu ..............35 Watching and listening to recordings ........40 Deleting photos ............... 42 The photo playback menu ............43 The video playback menu ............46 Connection to TV and PC ............. 48 Displaying captures on a television set ........
-
Page 6: Safety Instructions
Safety instructions About these instructions Read the safety instructions carefully before use. Note the warnings on the appliance and in the operating instructions Always keep the operating instructions close to hand. If you sell the equipment or give it away, make sure you also hand over these instructions and the guarantee card. - Page 7 Battery instructions Please note the following general instructions for handling batteries: Keep batteries away from children. Seek medical attention immediately if a battery is swallowed. CAUTION! Never try to recharge non-rechargeable batteries. Danger of explosion! ATTENTION!There is a risk of explosion if batteries are incorrectly replaced.
- Page 8 Precautionary measures Please note the following precautionary measures to avoid damage to your camera and to keep it in good condition. Keep away from salt and dust If you have been using the camera on the beach or at the seaside, wipe off salt and dust with a light, damp cloth.
-
Page 9: Water Resistance
Treat lens and all moving parts carefully Do not touch the lens or the lens barrel. Take care when handling the memory card and the battery. These parts are not designed for high levels of stress. Batteries At low temperatures, there can be a sharp drop in battery capacity. - Page 10 Ensure that the camera does not have any cracks. At low temperatures the capacity of the battery can be drastically reduced due to the slowing down of the chemical reactions. When recording in cold weather keep a second battery pack in reserve in a warm place (e.g.
-
Page 11: Start Of Operation
Start of operation Included in the box Please check your purchase to ensure all items are included and contact us within 14 days of purchase if any of the following components are missing: The following items are supplied with the product: ... -
Page 12: Inserting Batteries
Inserting batteries 2 AAA 1.5 V batteries are required to operate the camera. ► Slide the catch of the battery compartment in the direction indicated by the arrow and open the battery compartment cover. ► Slide the battery compartment in the direction indicated by the arrow and open the battery compartment. -
Page 13: Inserting And Removing Sd Cards
Inserting and removing SD cards If no memory card is inserted, photos will be stored in the internal memory. Please note that the capacity of the internal memory is limited. Use an SD memory card to increase the memory capacity. If a memory card is inserted, your photos will be stored on the card. -
Page 14: Attaching The Carry Strap
Attaching the carry strap For ease of handling and increased security attach the carrying strap to the camera. ► Feed the strap through the loop. ► Pull the other end of the carrying strap through the thin loop of the strap and pull tight. If you carry the camera by the carrying strap ensure that the camera does not bang into anything. -
Page 15: First Steps
First Steps Switching on the camera ► Press the ON/OFF button for 1 to 2 seconds to turn on the camera. The indicator lights up green and the display switches on. The camera is in shooting mode. If the camera does not switch on, check whether the batteries has been inserted properly and whether they are charged. -
Page 16: Setting The Language, Date And Time
Setting the language, date and time Before using the camera for the first time, you should select your preferred language from the menu and set the current date and time. Both settings are performed in the “SETTINGS” menu. ► With the camera switched on, press the button to open the menus. - Page 17 Language ► Select the entry “LANGUAGE” in the “SETTINGS” menu using thebuttons and press the button. The language selection menu opens. ► Select your desired language using the buttons press the button. Energy saving ► Select the entry “ENERGY SAVING” in the “SETTINGS” menu using the buttons and press the button.
- Page 18 Frequency ► Select the entry “FREQUENCY” in the “SETTINGS” menu using the buttons and press the button. The frequency menu opens. ► Select a frequency of 60 Hz or 50 Hz (corresponding to your TV’s freqency) using the buttons and confirm the selection by pressing the button.
-
Page 19: Shooting And Playback Mode
The time setting is saved by the internal battery. It is lost, however, if the batteries are removed from the camera for more than 48 hours. Shooting and playback mode The shooting mode is enabled after the camera has been switched on: you may take photos immediately. -
Page 20: Display Options
Display options Display options during video recording The following display options are possible during video recording mode: Number Symbol Description Shows the number of saved files Memory status : Shows that an SD card is being used : Shows that no SD card has been installed and the internal memory is being used Resolution... - Page 21 Date/time display Shows the remaining recording time Image histogram Battery status Macro mode Shows the current white balance Video mode Shows the current exposure correction Zoom bar...
-
Page 22: Display Options During Video Playback
Display options during video playback The following display options are possible during video playback mode: Number Symbol Description Shows the number of the current video and the total number of video files Shows the time elapsed and the total length of the clip Shows the current battery status Shows that the file is protected Shows that the camera is in... -
Page 23: Display Options For Photo Shooting
Display options for photo shooting The following display options are possible during photo shooting mode: Number Symbol Explanation Shows the number of saved pictures and the number of pictures remaining Memory status : Shows that an SD card is being used : Shows that no SD card has been installed and the internal memory is... - Page 24 Self-timer Face recognition Shows the current date and time Image histogram Sequence mode Battery status Macro mode Date stamp Night Mode White balance Flash mode Photo mode Shows the current exposure correction Zoom bar...
-
Page 25: Display Options During Photo Playback
Display options during photo playback The following display options are possible during photo playback mode: Number Symbol Description Shows the number of the current photo and the total number of saved photos. Shows the current battery status Shows that the file is protected Shows that the camera is in playback mode... -
Page 26: Switching The Display Options On And Off
Switching the display options on and off In shooting mode By pressing the button , you can change the display options. The following display characteristics are available: With all display options With the most important display options No display options Display deactivated The screen displays may vary with the shooting mode. -
Page 27: Taking Your First Shots
Taking your first shots Setting shooting mode When the camera is switched on, it automatically switches to shooting mode. If playback mode is enabled instead of shooting mode, press the playback button to select shooting mode. Tips for taking good shots ... -
Page 28: Taking Photos
Taking photos ► Press the shutter release all the way down to take the picture. A tone signalises that the photo has been taken. ► The photos are saved as JPEG files. Using the flash If the light is insufficient for taking a photo, the integrated flash will provide the required extra light. -
Page 29: Setting The Focus Mode
Zoom function – enlarging or reducing The camera has an 8x digital zoom. ► Press the – button. The bar appears which indicates the zoom level: : The image is zoomed out (wide angle); you can capture a larger area. : The image is zoomed in (“telephoto”);... -
Page 30: Recording Videos
Recording videos ► Press the MODE button until the symbol appears in the top left of the display. ► Press the shutter release to start recording. The recording time is displayed. ► You can change the image area by zooming in and out using the T –... -
Page 31: Recording Audio Clips
Recording audio clips The microphone is on the front left of the camera beneath the lens. Take care not to touch the microphone during the recording. ► In the “VIDEO MENU”, select the entry “SPEECH RECORDING” under the setting “RECORDING MODE” (See page for recording modes). -
Page 32: The Video Menu
The video menu The video menu allows you to make the essential settings for recording videos. There is a separate menu for each recording mode (video, photo, audio recording). In this menu you can select the specific settings for recording videos. ►... - Page 33 Resolution The resolution basically determines the quality of the video. The higher the resolution, the more memory a shot requires. Setting Size in pixels QVGA 320x240 640x480 The VGA setting is recommended for sending images by e-mail, for example.
-
Page 34: White Balance
White balance The white balance can correct certain light conditions. Setting Explanation Automatic White balance is adjusted white balance automatically. Suitable for shots in bright Daylight daylight. Suitable for shots under Cloudy cloudy skies, at dusk or in the shade. For shots taken in electric Light bulb (tungsten) light. -
Page 35: Exposure Correction
Exposure correction By correcting the exposure values (EV, exposure value) you can adjust pictures that are too dark or too light. You can set the value in nine stages between +2.0 EV and -2.0 EV. The following bar chart appears on the display: Use a positive value when light conditions are poor and a negative value in strong light. -
Page 36: The Photo Menu
The photo menu The video menu allows you to easily make the basic settings for making captures. There is a separate menu for each recording mode (film, photo, audio recording). In this menu you can select the settings for shooting specific photos. ►... - Page 37 Resolution The resolution basically determines the quality of the photos taken. The higher the resolution, the more memory a shot requires. The highest resolutions are generally recommended for large prints (larger than A4). Setting Size in pixels 1280x960 2048x1536 2592x1944 Quality The quality determines the compression required for the recorded data.
- Page 38 White balance The white balance can correct certain light conditions. Setting Explanation Automatic White balance is adjusted white balance automatically. Suitable for shots in bright Daylight daylight. Suitable for shots under Cloudy cloudy skies, at dusk or in the shade. For shots taken in electric Light bulb (tungsten) light.
-
Page 39: Night Mode
Effect You can use the photo effects in the shooting and playback modes in order to lend various tones or aesthetic effects to images. Setting Explanation Standard No photo effect set. Sepia The image is produced in nostalgic sepia tones. Black/white The image is produced in black &... -
Page 40: Face Recognition
Sequence The sequence mode allows you to shoot a series of three photos by pressing the capture button. Setting Explanation Single photos will be shot When the shutter release button is pressed a sequence of 3 photos will be shot Face recognition Face recognition allows you to automatically recognise and follow faces. -
Page 41: Watching And Listening To Recordings
Watching and listening to recordings Individual playback of recordings You can play back your most recent recordings in sequence in display mode. ► Press the playback button in the desired mode (video/photo mode) to activate the relevant playback mode. The last recording will be shown on the display. ►... - Page 42 Playing back video/audio clips ► Select the desired recording in the relevant playback mode. ► Press the button to start the playback. During video clip playback, press the buttons to fast forward or rewind. ► Press the T button to increase the volume. ►...
-
Page 43: Deleting Photos
Deleting photos You may delete shots in playback mode or via the playback menu. The quickest way to delete an individual shot is with the button in playback mode. ► Select the shot in playback mode and press the button. ►... -
Page 44: The Photo Playback Menu
The photo playback menu In the photo playback menu, you can make a variety of settings for the files: e.g. delete or protect files. Make sure that you are in photo playback mode. ► Press the button. The photo playback menu opens up. ►... -
Page 45: Automatic Playback
Protection ► Select in the submenu to protect individual photos. ► Use the buttons to select a photo. ► Select using the buttons to protect the current photo. ► Select using the buttons to cancel the protection process. ► Select in the submenu to protect all saved photos. - Page 46 DPOF DPOF stands for “Digital Print Order Format”. Here you can specify print settings if you wish to have pictures published by a photo studio or a DPOF-compatible printer. With a DPOF-compatible printer you can print the pictures directly without transferring them to the computer beforehand. ►...
-
Page 47: The Video Playback Menu
The video playback menu In the video playback menu you can make a variety of settings for the files: e.g. delete or protect some files. Make sure that you are in video playback mode. ► Press the button. The video playback menu opens up. ►... - Page 48 Protection ► Select in the submenu to protect individual videos. ► Use the buttons to select a video. ► Select using the buttons to protect the current video. ► Select using the buttons to cancel the process. ► Select in the submenu to protect all saved videos. Copying on to a memory card In this menu, you can copy all of the pictures saved on the camera’s internal memory onto the SD card...
-
Page 49: Connection To Tv And Pc
Connection to TV and PC Displaying captures on a television set You can play back the captures from your camera on a television set. ► Switch off the camera and television set. ► Connect the TV cable supplied to the USB socket on the camera and to the yellow video socket and white audio socket on the television set. -
Page 50: Transferring Data To A Computer
Transferring data to a computer You can copy your captures to a computer. Supported operating systems: Windows XP Windows Vista Windows 7 Using a USB cable ► Connect the supplied USB cable to the USB output on the camera and to the USB port on the computer. ►... -
Page 51: Dcf Memory Standard
DCF memory standard The recordings on your camera are managed (saved, named, etc.) as specified by the DCF standard (DCF = Design Rule for Camera File System). Captures on memory cards for other DCF cameras can be played back on your camera. Card drive If your PC has a card drive or is connected to a card reader and you have saved the shots on the memory card, you can use this to copy... -
Page 52: Directory Structure In The Memory
Directory structure in the memory The camera saves the pictures, videos and audio files in three different directories in the internal memory or on the memory card. The following directories are created automatically: DCIM : All pictures, videos and audio files are saved to this folder, with the exception of files which are recorded in 100FSCAM... -
Page 53: Installing The Software
Installing the software On the CD supplied, you will find the programs “Videoworks” and “Mr. Photo” for editing your pictures. ► Insert the CD-ROM into the computer’s CD-ROM drive. ► Usually, the CD is automatically recognised and displayed. If not, select the CD drive in Windows Explorer > My Computer and double-click on the drive name to start the CD. -
Page 54: Troubleshooting
Troubleshooting Use the following checklist if the camera does not function correctly. If the problem persists, consult MEDION Service. The camera will not switch on. The batteries were not inserted correctly. The batteries are dead. The battery compartment door is not closed properly. -
Page 55: Usb Cable
The image is not shown on the display. An SD card has been inserted which took pictures in non-DCF mode on another camera. The camera cannot display that type of image. The period of time between shots is longer when taking pictures in the dark ... -
Page 56: Maintenance And Care
When the camera is connected to the computer for the first time, no new hardware is found The USB connection of the computer is deactivated in the BIOS. Enable the port in the computer’s BIOS. Refer to the PC manual if necessary. -
Page 57: Disposal
Disposal Packaging Your camera is packaged to protect it from transportation damage. Packaging is raw material and can be reused or added to the recycling system Appliance At the end of its service life, the device should not be disposed of with the household rubbish. Dispose of it in an environmentally friendly manner at a local collection point for old appliances. -
Page 58: Technical Specifications
Technical specifications Pixels: 5.0 megapixels CMOS Aperture: F = 3.2 Focal distance: f = 5.1 Digital Zoom: 8 times LCD monitor: 2.5" LC display File formats: JPEG (EXIF 2.2), DPOF, AVI, WAV Max. resolution: Camera mode: 2592 x 1944 Video mode: 640 x 480 pixels Picture memory: Internal: 32 MB flash memory for the... - Page 60 MEDION must be in accordance with the following terms in order to be considered eligible: Is effective from the date of purchase or receipt of the MEDION product from an authorised seller of MEDION products; and ...
- Page 61 otherwise than in accordance with the terms of this warranty; This warranty shall be void and you may be required by MEDION to reimburse MEDION for the reasonable costs of postage and packaging before MEDION will return the product to you. If so and you would still like MEDION to repair or replace the product, MEDION may do so but you will be charged MEDION’s standard...
- Page 62 2. Scope Subject to any exclusions set out within this warranty, where there is a defect in your MEDION product covered by this warranty, MEDION will repair or replace the MEDION product. The decision whether to repair or replace the product will be made solely at the discretion of MEDION.
- Page 63 To the extent which is permitted under law, MEDION will accept no liability for burnt-in images on plasma or LCD products as a result of normal wear and tear during the operation of the product.
- Page 64 MEDION will not be responsible for any costs incurred in relation to software configuration; economic loss; loss of opportunity; loss of income; or loss of data or software arising out of its repair or replacement of a MEDION product under this warranty 4. Service Hotline Before returning the product to MEDION you must contact us using the service hotline or via the internet (www.MEDION.co.uk).
- Page 65 You are entitled to seek independent advice or consultation relating to your product or any of MEDION’s findings. MEDION will not be liable for any costs incurred to you when doing so. This warranty is restricted in relation to any pre-installed operating system as well as to application programme software that is included with the MEDION product in question.
- Page 66 RETURNING THE PRODUCT TO MEDION. To the extent permitted by law, MEDION excludes all liability for loss of data and MEDION recommends in all cases that you back up all data on your MEDION product before returning the product to MEDION.
- Page 67 MEDION or its authorised personnel. You must take all other necessary steps to enable MEDION or its authorised personnel to carry out your order properly. You are responsible yourself for connecting and configuring any existing external peripheral products after MEDION or its authorised personnel have carried out their repairs.
Need help?
Do you have a question about the Life S41001 MD 86293 and is the answer not in the manual?
Questions and answers