Table of Contents
Advertisement
Advertisement
Table of Contents

Related Manuals for SERVIS WL712HDW


Summary of Contents for SERVIS WL712HDW
-
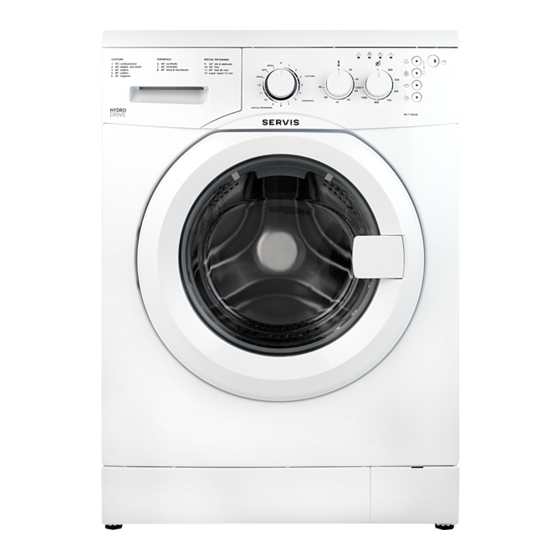
Page 1: Washing Machine
WASHING MACHINE WL712HDW User Manual... -
Page 2: Table Of Contents
2 YEAR Welcome Safety Instructions GUARANTEE NOW Your Washing Machine Technical Specifi cation SERVIS.CO.UK 0800 0124382 Installation Parts & Labour for 2 years. Go to www.servis.co.uk for more information Usage Maintenance Clothing Care Troubleshooting Guarantee Index T: 0800 0124 382... -
Page 3: Year
WELCOME ITEMS INCLUDED Thank you for choosing this Servis WL712HDW Washing Machine, which has been designed and manufactured to give you many years of trouble-free service. You may already be familiar with using a similar product but please take time to read these WL712HDW Washing Machine instructions, which have been written to ensure you get the very best from your purchase. -
Page 4: Safety Instructions
Old hoses must not be reused. qualified electrician. Do not make any alterations to your Washing Machine, unless authorised to do so by Servis. Do not connect your Washing Machine to the mains electricity supply using an extension lead. -
Page 5: Your Washing Machine
YOUR WASHING MACHINE FRONT VIEW REAR VIEW Detergent drawer Drain hose Control panel Cold water inlet Door handle Pump filter cover Detergent drawer; Allows you to insert detergent, fabric conditioner and starch. Drain hose; Provides an outlet for the dirty water from your Washing Machine. Control panel;... -
Page 6: Detergent Drawer
YOUR WASHING MACHINE TECHNICAL SPECIFICATION DETERGENT DRAWER TECHNICAL SPECIFICATION Compartment Compartment II Voltage V/Frequency (Hz) 220-240V/50Hz Electrical Current (A) Power Rating (W) 2200 Water Consumption (l/Cycle) Energy Consumption (kWh/Cycle) 0.76 Compartment I Unpacked Dimensions (H x W x D) (cm) 84.5 x 59.7 x 52.7 Gross Weight (kg) 71.5... -
Page 7: Installation Requirements
INSTALLATION Pull out the remaining plastic section of each transit bolt by hand. This will require a INSTALLATION REQUIREMENTS reasonable amount of force (fig 5c). Insert the blanking caps (4 off): Push the cap into the hole until the four connectors click into place. -
Page 8: Adjusting The Feet
INSTALLATION ADJUSTING THE FEET WATER SUPPLY CONNECTION For safe operation, it is important that your Washing Machine is level and securely positioned on Your Washing Machine uses an energy efficient cold fill system, which means that only the all four feet. Incorrect installation may cause the Washing Machine to vibrate and increase your water required to wash the laundry is heated. -
Page 9: Drain Hose Connection
INSTALLATION WATER SUPPLY CONNECTION Screw the straight end of the hose clockwise to a 19mm (3/4’’) cold water tap until hand tight (fig 8). Take care not to trap or kink the hose. a: The drain hose can be connected Max height 100cm to a standpipe, as shown. -
Page 10: Electrical Connection
INSTALLATION ELECTRICAL CONNECTION The cold water pressure for a normal household system ranges from between 0.1 to 1 Mpa. Your Washing Machine will run at optimum efficiency in this range. Your Washing Machine requires a 220-240V, 50Hz mains supply. Do not use any other supply. -
Page 11: Usage
USAGE CONTROL PANEL OVERVIEW RUNNING YOUR FIRST WASH Before using your Washing Machine for the first time; check that: The transit bolts have been removed. Your Washing Machine has been correctly connected to your water supply and your water drainage system. Your Washing Machine has been connected to an appropriate mains power supply and is switched on at the socket. - Page 12 USAGE Close zips and fasten any hooks and eyes. Gently push the door until it clicks shut. Check that no items of clothing are trapped Items such as trousers, t-shirts, sweat shirts and knitted garments should be turned inside between the rubber seal and the door. out.
- Page 13 USAGE Selecting a Programme: To select the desired programme, turn the programme dial either clockwise or anti-clockwise until the marker on the dial points to the chosen programme. To cancel a programme, refer to the information on page 30. Temperature Adjustment Dial: To adjust the temperature of the water, turn the temperature adjustment dial clockwise from its start position until the desired temperature is selected.
- Page 14 USAGE Indicator Lamps: The indicator lamps show the wash stages of the selected programme: Programme 12 (Super Rapid 12 Min): The fast wash speed of this programme is made possible by the use of HydroDrive technology, Indicates that a programme with pre-wash has been selected. which pumps water and detergent into the drum through two nozzles instead of one.
- Page 15 USAGE Programme Modes: Programme Settings and Wash Cycles Programme Name Max Dry Wash Type Wash Type Programme Laundry Type Pre-Wash Temp Rinse Usable Load (kg) Detergent Cotton 95 C (Anti-Bacterial) Day to Day Cotton and Linen Textiles Soiled 60 C (Pre-Wash) Heavy Soiled Cotton and Linen Textiles Cotton 60...
- Page 16 You will be pleased to learn that your Servis Washing Machine has an in-built sensor that This is the hottest temperature available on prevents your Washing Machine operating with an out-of-balance load; it will make several your Washing Machine and is suitable for attempts to balance the load prior to the spin cycle.
- Page 17 USAGE Additional Functions: Choosing an additional function once a programme has begun: To allow you to get the best washing results possible, your Washing Machine offers a selection To start the selected programme, press the button. The light on the button will of additional functions to complement the selected programme.
- Page 18 USAGE Removing Your Laundry: Power Supply Failure: If a power cut should occur while a programme is running, the programme will continue from the Turn the programme selection dial to the off (0) position. Your Washing Machine door lock same point once power is restored. This will not cause any harm to your Washing Machine or will automatically be released approximately 2 minutes after the programme has finished.
-
Page 19: Maintenance
MAINTENANCE GENERAL MAINTENANCE Filters: From time to time it may be necessary to carry out some routine maintenance of your Washing Water Inlet Filters: Machine to ensure that it operates as intended. Before cleaning your Washing Machine: Water inlet filters prevent dirt and foreign materials from entering your machine. It is Turn your mains power supply off and remove the plug from the socket. -
Page 20: General Maintenance
MAINTENANCE GENERAL MAINTENANCE Cleaning the Pump Filter: Clean the filter thoroughly with a soft brush, wash with soapy water and rinse thoroughly. Before opening the filter cover, place a container under the filter cover to collect any water left in the machine. Pull the top of the cover forwards using the finger groove, until the Re-insert the filter by gently pushing it back into place. - Page 21 MAINTENANCE Remove any foreign materials from the filter with a soft brush. Move the pump by hand to check that it rotates freely. Clean the pump with a soft brush. After Cleaning: Re-fit the filter by inserting it and turning clockwise. Close the filter cover.
-
Page 22: Clothing Care
CLOTHING CARE SIPHON PLUG The siphon plug is located in the compartment of the detergent drawer. Remove the detergent drawer fully and pull the plug upwards. Clean the plug with a soft brush and replace, checking that it is firmly in position. GENERAL WASHING INSTRUCTIONS Drip Dry Dry Flat... - Page 23 CLOTHING CARE STAIN REMOVAL INFORMATION If can often be hard to know the best way to treat a stubborn stain. To help with this we’ve Mustard: provided you with a few tips on dealing with the most common types before running your wash Apply glycerine to the stained area, rub with detergent and hand wash.
-
Page 24: Troubleshooting
See page 34 for detailed will provide you will more information. instructions If your machine has developed a fault not covered in this manual, please contact the Servis Your Washing Machine is not The drain hose is bent, Check the drain hose and helpdesk. - Page 25 The most common failure codes are shown the detergent drawer been used for automatic Washing below. If your machine displays a code not shown, consult the Servis helpdesk. Machines The washing result is not as Your laundry is too dirty...
-
Page 26: Guarantee
The Servis guarantee is not transferable. break the door hinges or lock. For your Servis guarantee to be valid, you will need to retain your original purchase receipt and be able to provide it when you make a claim. The above summary does not include all of the terms and conditions and exclusions which can Please refer to the rear cover for disposal instructions. -
Page 27: Index
INDEX Adding detergent ..........20 Fabric conditioner ..........21 Power supply failure ........32 Technical specification .........08 Additional functions ........29 Feet, adjustment ...........11 Preparing your laundry ........18 Temperature adjustment dial .......22 A djusting the feet...........11 Filters ............34 Programme end ..........30 Temperature selection ........27 First wash ............18 Programme modes ........25 Transit bolt, re-fitting ........10... - Page 28 T: 0800 0124 382 E: info@servis.co.uk The symbol on the product or on its packaging indicates that this product may not be treated as household waste. Instead it shall be handed over to the applicable collection point for the recycling of electrical and electronic equipment. By ensuring this product is disposed of correctly, you will help prevent potential negative consequences for the environment and human health, which could otherwise be caused by inappropriate waste handling of this product.
Need help?
Do you have a question about the WL712HDW and is the answer not in the manual?
Questions and answers