Table of Contents
Advertisement
Quick Links
Advertisement
Table of Contents

Related Manuals for Boxis RS700


Summary of Contents for Boxis RS700
- Page 1 Model# RS700 www.boxisautoshred.com...
- Page 2 Just place up to 700 sheets of letter size loose leaf paper into the lockable paper tray, press start and walk away…and let the Boxis™ AutoShred™ do the work! The Boxis™ AutoShred™ reduces a letter size sheet into over 1000 unreadable particles.
-
Page 3: Table Of Contents
Table of Contents Warnings .............................2 Specifications ..........................3 Installation ...........................4 Safety Instructions ........................4 Shredder Diagram ........................5 General Operation Instructions ................... 6 - 8 Secure Shredding Instructions....................9 LCD Panel Guide ......................10 - 11 Maintenance ..........................12 Warranty, Registration & Contact Info ................... 13 See product demo video at: www.boxisautoshred.com... -
Page 4: Warnings
WARNINGS CAUTION: KEEP THIS DEVICE AWAY FROM CHILDREN AND PETS! Place the paper shredder in an area less accessible to children. DO NOT PLACE FINGERS TOO CLOSE TO THE FEED SLOT AS SERIOUS INJURY MAY OCCUR. Paper shredders can pull children’s fingers into the shredder mechanism. -
Page 5: Technical Specifications
The Boxis AutoShred RS700 ™ ™ Technical Specifications Model ...........................RS700 Cutting Style ........................Micro-Cut Shred Size ....................0.1” x 0.7” (3 x 20mm) DIN Security Level......................Level 3 Sheet Capacity .................... 700 sheet Autofeed 6-Sheet Manual Feed Shred Speed ....................22.6 ft/min (6.9 m/min) Intake Throat Width .................... -
Page 6: Installation
Installation • Refer to set-up instructions printed on carton box for proper assembly. • Only operate this product from the type of power source indicated on the marking label. If you are not sure of the type of power available, consult an electrician. • Make sure the electrical outlet is easily accessible from the shredder. • Shredder must be operated only in upright position. • To make sure the shredder has proper ventilation, place it a minimum distance of 5cm (2 inches) from the wall or furniture. Safety Instructions 1. Read and follow all instructions before use. Save these instructions for later use. 2. Always turn off and unplug the machine before moving, servicing, cleaning, or anything other than normal operation. Serious injury may result. Clean shredder with a damp cloth, using a mild soap and water solution. 3. Do not use abrasives or petroleum-based cleaners. 4. Place this product as close as possible to power source for quick and easy unplugging. 5. Turn off the power switch before removing waste bin. It is advisable to disconnect the power cord before opening the shredder. 6. This product should never be placed near a radiator or other heat source. 7. Do not allow anything to rest on the power cord. Do not place the power cord where people may walk on the it. 8. If an extension cord is used with this product, make sure the total of the ampere (amps) ratings on the products plugged into the extension cord do not exceed the extension cord’ s ampere rating. 9. Do not attempt to service this product yourself, as in opening or removing covers may expose you to risks of getting injured. Also, doing this will void the warranty of the shredder. -
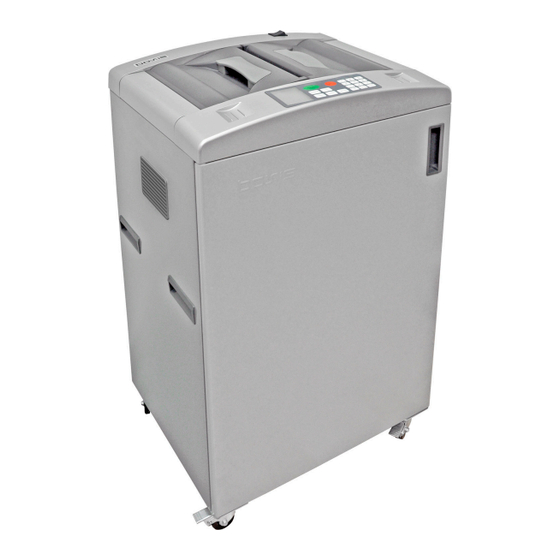
Page 7: Shredder Diagram
Diagram Start Manual Stop Button Button LCD Panel Manual Manual Lubricate Keypad Forward & Lock & Reset (For security code) Reverse Unlock Button Buttons Buttons Paper Tray Power Manual Feed Doors Switch Slot Control Panel Handles for Paper Tray Doors Cabinet Access Ventilation Door Handles Manual Unlock (on right side of shredder) Contents inside cabinet: • Waste Bin • Key for Manual Unlock • User Quick Guides • User Manual Heavy-Duty... -
Page 8: General Operation Instructions
Operation Read instructions completely before operating shredder. Connect power cord to the power socket at the backside of the machine. Connect the power cord to any standard 120V AC, 60Hz outlet. Install waste bin • Open cabinet door and remove remove waste bin from the cabinet. •... - Page 9 Operation (cont’d) To manually feed paper (max. 6 sheets) or lubricant sheets. • The shredding process is initiated by photo sensors in the paper feed opening. Insert a maximum of 6 sheets of paper into the paper feed opening; shredding begins automatically. When shredding is complete, the cutting system automatically stops after approximately 3 seconds.
- Page 10 Operation (cont’d) AUTO Mode • The master power switch is located on the top right side of the cabinet. When switch is toggled ON, the LCD shows AUTO and the machine enters into AUTO mode. • In the AUTO mode, the shredder is ready to shred paper either by auto or manual feed.
-
Page 11: Secure Shredding Instructions
To power OFF the shredder. • Toggle OFF the power switch. Power switch is on the top of the machine. NOTE: Energy-Saving Technology — The RS700 will automatically toggle OFF if idle for 30 minutes. To resume power just toggle switch back ON. -
Page 12: Lcd Panel Guide
InfoCenter LCD Panel ™ FORWARD Mode • Pressing the “Forward” button during STOP mode will initiate the manual Forward function. Press and hold the “Forward” button in order to keep the motor running in forward. When the “Forward” button is released, the machine returns to STOP mode and the LCD displays flashing STOP. - Page 13 InfoCenter LCD Panel ™ (cont’d) OVERHEAT Mode • If the shredder overheats, the LCD will show a flashing OVERHEAT icon. All functions will stop. When the shredder overheats, user may press Stop button to place the shredder in Standby mode. The shredder will not resume normal functioning until the temperature of the motor cools down to a safe temperature and LCD shows AUTO.
-
Page 14: Maintenance
• Manually rotate the rollers and continue to clean until no contaminants appear on the cloth. • After rollers are clean, let the rollers dry for approximately 5 minutes. • The Boxis™ AutoShred™ is now ready. Reconnect power to the machine and operate. -
Page 15: Warranty, Registration & Contact Info
Warranty and Product Registration The manufacturer warrants the machine for a limited time to be free from defects in material and workmanship, does NOT include normal wear and tear. If any part is found to be defective during the warranty period, your sole and exclusive remedy will be repair or replacement, at the manufacturer’s option and expense, of the defective part except for the postage.
Need help?
Do you have a question about the RS700 and is the answer not in the manual?
Questions and answers