GoPro Smart Remote User Manual
Long-range remote control
Hide thumbs
Also See for Smart Remote:
- User manual (20 pages) ,
- User manual (18 pages) ,
- User manual (16 pages)
Table of Contents
Advertisement
Quick Links
Advertisement
Table of Contents

Related Manuals for GoPro Smart Remote


Summary of Contents for GoPro Smart Remote
- Page 1 USER GUIDE Smart Remote LONG-RANGE REMOTE CONTROL FOR YOUR GOPRO.
- Page 2 To download this user guide in a different language, visit gopro.com/support. Pour télécharger ce manuel de l’utilisateur dans une autre langue, rendez-vous sur gopro.com/support. Wenn Sie dieses Benutzerhandbuch in einer anderen Sprache herunterladen möchten, besuchen Sie gopro.com/support. Per scaricare questo manuale utente in un’altra lingua, visita gopro.com/support.
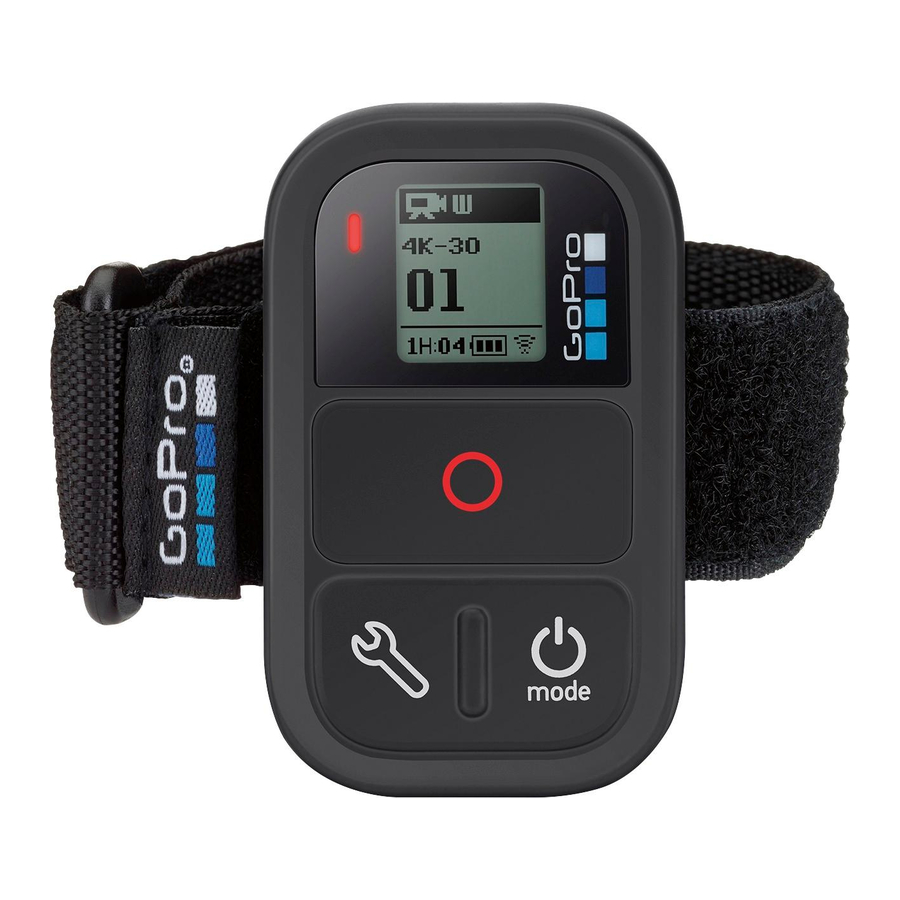
- Page 3 / The Basics Remote Status Display Status Light Shutter/Select Button Settings/Tag Button Power/Mode Button Charging Port/ Attachment Key Slot Attachment Key Attachment Ring Wrist Strap Charging Cable...
- Page 4 / Wearing the Smart Remote ATTACHING THE REMOTE TO THE STRAP The attachment strap secures the remote to your wrist, backpack straps, ski poles, bike frames and more. To Attach the Remote to the Strap: Step 1 Step 2 Thread the strap through the slots Position the remote along the strap on the back of the remote.
- Page 5 ATTACHING THE REMOTE USING THE KEY + RING The attachment key and ring secure the remote to your lanyards, straps, car keys, zippers and more. To Attach the Remote Using the Key and Ring: Step 1 Slide and hold the latch lever in the direction of the arrow (A), then pull the key out of the remote (B).
-
Page 6: Getting Started
/ Getting Started The Smart Remote lets you power your GoPro on/off, start/stop recording and change camera settings. The display, status light, Power/Mode button ], Shutter/Select button [ ] and Settings/Tag button* [ ] behave in the same way as those on your camera. - Page 7 CHARGING THE SMART REMOTE We recommend charging your Smart Remote for one hour before using it the first time. No damage occurs if it is used before being fully charged. You can use the remote while it is charging. The status display shows the remote’s battery level while the remote is powering on or charging.
- Page 8 To Charge the Remote: Step 1 Step 2 Slide and hold the latch lever in Plug the charging cable into the direction of the arrow (A), then the charging slot until it clicks. pull the key out of the remote (B).
- Page 9 Step 3 Connect the other end of the cable The charging icon on the remote to a computer or other USB status display shows a full battery power source. when charging is complete. Note: Be sure that the computer is connected to a power source.
- Page 10 PRO TIP: You can power off the remote and leave the camera powered on. This option is useful if you want to switch from the remote to the GoPro App to control your camera. To use this option, press and hold the Power/Mode...
-
Page 11: Remote Status Display
REMOTE STATUS DISPLAY The information that appears on your Smart Remote status display depends on whether you are connected to multiple cameras. Smart Remote Connected to One Camera: Remote screen displays the same information as the GoPro camera status screen. Available modes are the same as those on the camera. - Page 12 Sets all cameras to Burst mode Time Lapse Sets all cameras to Time Lapse mode SMART REMOTE SOFTWARE UPDATE When software updates are available for the remote, you are automatically notified when you connect the remote to a camera. Follow the on-screen...
- Page 13 / Pairing the Remote and Your GoPro You can pair the Smart Remote with any wireless-enabled GoPro camera. The remote can control your camera from up to 600’ (180m) away in optimal conditions. You can control up to 50 GoPros at a time with the remote. Your camera recognizes only one remote at a time.
- Page 14 App), and then press the Shutter/Select button [ ] to select it. If the camera was never paired with a remote or the GoPro App, it automatically begins pairing. Otherwise, cycle to New (or New RC) and select it to begin pairing.
- Page 15 This method conserves your camera’s battery power and is useful if you want to control your HERO4 with the remote or the GoPro App. The Settings/Tag button [ ] opens the Wireless option (RC, App, Network) that you used most recently.
- Page 16 To Pair Your Remote and Your HERO3+ or HERO3: 1. Ensure that both camera and remote are powered off. 2. On your camera, complete these steps: a. Press the Power/Mode button [ ] to power on your camera. b. Press the Wi-Fi On/Off button [ ] twice to turn on Wi-Fi and access the Wi-Fi menu.
- Page 17 3. On the remote, complete these steps: a. Power on the remote. If the remote was never paired with a camera, it automatically begins pairing. Otherwise, press and hold the Settings/Tag button for four seconds to begin pairing. A checked box [ ] appears on both screens once the devices are paired.
- Page 18 / Connecting the Remote and Your GoPro After your remote and camera are paired, follow the steps below to connect them in the future. With this procedure, your camera connects to the remote that it connected to most recently. To Connect the Remote and Your HERO4: 1.
- Page 19 d. Press the Power/Mode button [ ] to cycle to Existing, and then press the Shutter/Select button [ ] to select it. To Connect the Remote and Your HERO3+ or HERO3: 1. Power on the remote and your camera. 2. On your camera, complete these steps: a.
-
Page 20: Capturing Video And Photos
/ Capturing Video and Photos Use the remote to capture video and photos with one camera or multiple cameras. To Start/Stop Recording: Press the Shutter/Select [ ] button. PRO TIP: When you connect your remote to your HERO4, you can add HiLight Tags to your video. - Page 21 The following features are not available when using the remote with HERO4: • QuikCapture • Continuous photo with multiple cameras • Manually capturing photos while recording video with multiple cameras The following features are not available when using the remote with HERO3+ or HERO3: •...
-
Page 22: Changing Camera Settings
/ Changing Camera Settings You can use the Smart Remote to change your camera settings as long as your camera is not capturing video or photo. Note: To change camera settings, the remote must be connected to only one camera. - Page 23 6. To go back or exit the settings menu, press the Settings/Tag button [ To Change Camera Settings for HERO3+ and HERO3: 1. Be sure your camera and remote are powered on and connected. 2. Press the Power/Mode button [ ] to cycle to Settings.
-
Page 24: Safety Information
Smart Remote if it has been damaged—for example, if the product is cracked, punctured or damaged by water. WATER RESISTANCE Do not submerge the Smart Remote in more than 33’ (10m) of water. Damage to the Smart Remote caused by excessive water pressure is not covered under warranty. -
Page 25: Using Connectors And Ports
KEEPING THE SMART REMOTE’S STATUS DISPLAY CLEAN Clean your Smart Remote status display immediately if it comes into contact with any contaminants that may cause stains, such as ink, dyes, makeup, dirt, food, oils and lotions. To clean the status display, use a soft, slightly damp, lint-free cloth. - Page 26 Smart Remote, as condensation may form on or within the product. When you are using the Smart Remote or charging the battery, it is normal for the product to get warm. The exterior of the product functions as a cooling surface that transfers heat from inside the unit to the cooler air outside.
-
Page 27: Regulatory Information
/ Regulatory Information To see the complete list of country certifications, refer to the Important Product + Safety Information Guide document included with your product. - Page 28 Learn more about GoPro products at gopro.com Please Recycle 130-07356-000 REVB...
Need help?
Do you have a question about the Smart Remote and is the answer not in the manual?
Questions and answers