Table of Contents
Advertisement
Available languages
Available languages
Advertisement
Table of Contents

Related Manuals for Steren RM-090

Summary of Contents for Steren RM-090
- Page 2 Control remoto universal 14 en 1 con auto-learning. Por favor, revíselo completamente para estar seguro de cómo utilizar apropiadamente el producto. Para apoyo, compras y todo lo nuevo que tiene Steren, visite nuestro sitio web: www.steren.com La información que se muestra en este manual sirve únicamente como referencia sobre el producto.
- Page 3 • No intente abrir el equipo, puede ocasionar un mal funcionamiento y anular la garantía. • En caso de que requiera revisión acuda con su distribuidor autorizado Steren. • No use ni almacene este equipo en lugares donde existan goteras o salpicaduras de agua.
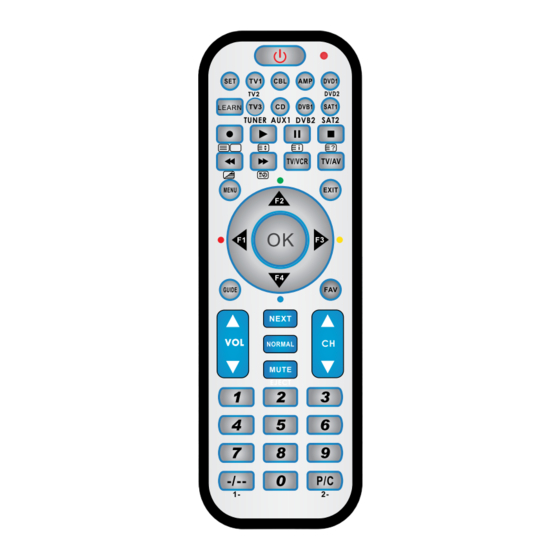
- Page 4 CONTROLES 1. Encendido 2. Botón de establecer 3. Botón función aprender 4. Grabar 5. Reproducir 6. Retroceder 7. Adelantar 8. Menú 9. Guía 10. Volumen + 11. Volumen – 12. Selección de canal 13. LED indicador 14. Botón de selección para equipos 15.
- Page 5 INSTALACIÓN DE BATERÍAS Retire el compartimento e inserte una pila tipo botón. PRECAUCIONES PARA BATERÍAS • Nunca mezcle distintos tipos de baterías o baterías usadas con nuevas. • En caso de que exista un derrame en el líquido de la batería, debe retirar la batería y limpiar el compartimento donde éstas se almacenan antes de colocar la batería nueva.
-
Page 6: Cambio A Los Botones Compuestos
PROGRAMACIÓN Cambio a los botones compuestos Dispositivo compuesto: tecla que contiene dos modos de uso (2 equipos). En total su control tiene 6 teclas con esta función doble: A continuación se presenta la manera de hacer el cambio entre ellas: Presione una vez el dispositivo compuesto que desee cambiar para seleccionar la primera opción que correspondería a aquellas del listado superior que se encuentran fuera del paréntesis, la luz indicadora encenderá... - Page 7 2. Presione y mantenga presionado el botón “SET” y después presione dentro de los equipos a seleccionar el equipo que desee. Por ejemplo: Presione los botones “SET” y “TV1” para seleccionar en ese botón su televisión. 3. Cuando el LED indicador se encienda, suelte el botón “SET”...
-
Page 8: Buscar Códigos Manualmente
B. Buscar códigos manualmente 1. Encienda el equipo que desea controlar (televisión, DVD, grabadora) manualmente. Dirija el control remoto hacia el receptor de señal del equipo. 2. Presione y mantenga presionado el botón “SET” y luego presione el botón correspondiente al equipo que desea controlar. - Page 9 C. Buscar códigos automáticamente 1. Encienda manualmente el equipo que desea controlar y dirija el control remoto hacia el receptor de señal del equipo. 2. Presione el botón correspondiente al equipo que desea controlar (Ej.: “TV1”), el LED indicador parpadeará una vez. 3.
-
Page 10: Método De Configuración
LED indicador parpadeará de nuevo y la información transferida se guardará en la tecla que eligió en su RM-090. De acuerdo con sus necesidades puede repetir los pasos del 3 al 4 para configurar los botones restantes de su control. Cuando termine presione el botón “SET”... - Page 11 Solicitar el código de su equipo Si después de realizar la búsqueda automática de código aún no encuentra el código de su equipo, siga los siguientes pasos para encontrar su código: 1. Presione el botón del equipo que desea buscar (ya sea TV1, VCR etc.) y el LED indicador parpadeará...
- Page 12 Compartir el “VOLUMEN” con otros equipos Al configurar esta función, usted puede utilizar el control de volumen dentro de la televisión aún cuando este equipo no se encuentre controlado por este control. Metodo de configuración: - Presione y mantenga presionado el botón “SET” y presione el botón del dispositivo que desea controlar;...
- Page 13 Desbloqueo de códigos Primero presione el botón “SET” y finalmente presione el botón del equipo que desee desbloquear (TV, DVD, etc.) y el LED indicador se encenderá; ahora ingrese el código 9912 y el código almacenado bajo ese botón se desbloqueará...
- Page 14 Notas particulares 1. Por favor asegúrese de dirigir correctamente la luz infrarroja a la misma luz infrarroja del control remoto del otro equipo que desea controlar, además de mantener una distancia de trabajo como la que se menciona en este instructivo.
- Page 15 1.- Para hacer efectiva la garantía, presente esta póliza y el producto, en donde fue adquirido o en Electrónica Steren S.A. de C.V. 2.- Electrónica Steren S.A de C.V. se compromete a reparar el producto en caso de estar defectuoso sin ningún cargo al consumidor. Los gastos de transportación serán cubiertos por el proveedor.
- Page 18 Steren, visit our website: www.steren.com The instructions of this manual are for reference about the product. There may be differences due to updates. Please check our web site (www.steren.com) to obtain the latest version of the instruction manual.
- Page 19 • Do not open the equipment, may cause malfunction and void the warranty. • If you require a revision consult with an authorized Steren. • Do not use or store the equipment in places where there is water dripping or splashing.
-
Page 20: Remote Control
REMOTE CONTROL 1. On 2. Set button 3. Learning function button 4. Record 5. Play 6. Back 7. Advance 8. Menu 9. Guide 10. Volume + 11. Volume - 12. Channel selection 13. LED indicator 14. Device selection button 15. High 16. -
Page 21: Battery Installation
BATTERY INSTALLATION Remove the compartment and insert a button type battery. CAUTIONS ON BATTERY USE • Do not use old and new battery or battery of different models at the same time. • In the event of battery leakage, take out the battery, wipe the battery compartment clean, and exchange new battery. - Page 22 PROGRAMMING Change to composite buttons Composite device: key which contains two modes (2 devices). The control has 6 keys with this double function: How to make the change between them is as follows: Press once the composite device that you want to change to select the first option which would correspond to those of top listing outside the parentheses, the indicator light will come on once for confirmation;...
- Page 23 2. Press and hold the “SET” button and then press the button corresponding to the device that you want to control. For example: press the “SET” button and “TV1” to select that button for your television. 3. When the LED turns on, release the “SET” and the “TV1”...
- Page 24 B. Search codes manually 1. Turn on the device that you want to control (TV, DVD, recorder) manually. Point the remote control at the device’s receiver. 2. Press and hold the “SET” button and then press the button corresponding to the equipment to be controlled.
- Page 25 C. Search for codes automatically 1. Manually turn on the device that you want to control and direct the remote control at the device’s receiver. 2. Press the button corresponding to the equipment to be controlled (e.g.: “TV1”), the LED indicator will blink once.
- Page 26 LED will flash again and the transferred information will be saved in the key chosen in your RM-090. According to your needs you can repeat steps 3-4 to set up the remaining buttons on his control. When finished press the “SET” button to terminate the learning function.
- Page 27 Get the code from your device If after performing the automatic code search the remote still cannot find the code from your device, follow these steps to find your code: 1. Press the button of the device that you want to search (whether TV1, VCR etc.), the LED indicator will Flash once.
- Page 28 Share the ‘volume’ with other equipment When you configure this feature, you can use the volume within the television control even when this equipment is not controlled by this control. Configuration method: - Press and hold the “SET” button and press the button of the device to be controlled;...
- Page 29 Unlock codes First press the “SET” button, and then press the button of the device that you want to unlock (TV, DVD, etc.) and the LED indicator will light; now enter the code 9912 and the stored code under that button will be unlocked instantly. You can re-enter another code normally.
-
Page 30: Specifications
Notes 1. Please be sure to properly direct infrared window to the one on the remote control of the equipment that you want to control, also maintain a work distance as it is mentioned in this instruction manual. 2. This remote cannot add any new function to any equipment; therefore this remote may not work if your device does not have a receiving and sending IR window. - Page 31 Part number: RM-090 Brand: Steren WARRANTY This Steren product is warranted under normal usage against defects in workmanship and materials to the original purchaser for one year from the date of purchase. CONDITIONS 1. This warranty card with all the required information, invoice, product box or package, and product, must be presented when warranty service is required.
- Page 32 Códigos / Codes...
- Page 33 Códigos / Codes...
- Page 34 Códigos / Codes...
- Page 35 Códigos / Codes...
- Page 36 Códigos / Codes...
- Page 37 Códigos / Codes...
- Page 38 Códigos / Codes...
- Page 39 Códigos / Codes...
- Page 40 Códigos / Codes...
- Page 41 Códigos / Codes...
- Page 42 Códigos / Codes...
- Page 43 Códigos / Codes...
- Page 44 Códigos / Codes...
Need help?
Do you have a question about the RM-090 and is the answer not in the manual?
Questions and answers