
Related Manuals for Toshiba SD-63HK


Summary of Contents for Toshiba SD-63HK
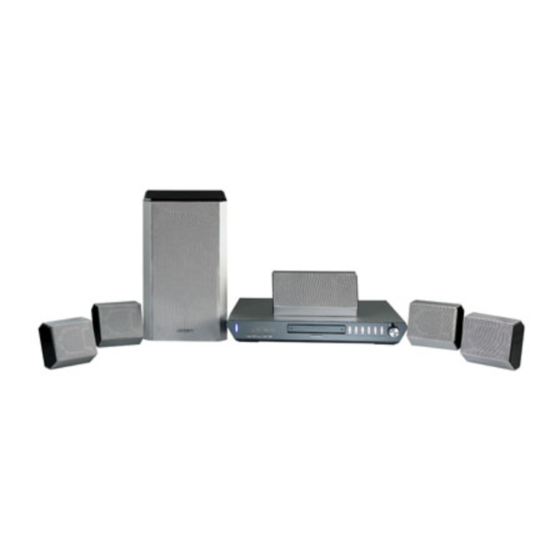
- Page 1 DIGITAL VIDEO DVD HOME CINEMA KIT SD-63HK OWNER’S MANUAL ©2003 Toshiba Corporation 2D20401A Cover 26/9/03, 6:01 PM...
-
Page 2: Safety Precautions
SAFETY PRECAUTIONS WARNING: TO REDUCE THE RISK OF FIRE OR ELECTRIC SHOCK, DO NOT EXPOSE THIS APPLIANCE TO RAIN OR MOISTURE. DANGEROUS HIGH VOLTAGES ARE PRESENT INSIDE THE ENCLOSURE. DO NOT OPEN THE CABINET. REFER SERVICING TO QUALIFIED PERSONNEL ONLY. CAUTION: This Digital Video Disc Player employs a Laser System. - Page 3 SOME DOS AND DON TS ON THE SAFE USE OF EQUIPMENT This equipment has been designed and manufactured to meet international safety standards but, like any electrical equipment, care must be taken if you are to obtain the best results and safety is to be assured. DO read the operating instructions before you attempt to use the equipment.
-
Page 4: Precautions
Precautions Notes on handling When shipping the unit, the original shipping carton and packing materials come in handy. For maximum protection, repack the unit as it was originally packed at the factory. Do not use volatile liquids, such as insect spray, near the unit. -
Page 5: Notes On Discs
Notes on discs On handling discs Do not touch the playback side of the disc. Do not attach paper or tape to discs. On cleaning discs Fingerprints and dust on the disc cause picture and sound deterioration. Wipe the disc from the centre outwards with a soft cloth. -
Page 6: Playable Discs
DVD-R discs of DVD video format CD-R/CD-RW discs of CD-DA, VIDEO CD, SVCD, MP3, WMA or JPEG format KODAK Picture CD and FUJICOLUR CD format Some of these discs may be incompatible. • You cannot play discs other than those listed above. -
Page 7: Table Of Contents
Table of contents SAFETY PRECAUTIONS ... 2 Precautions ... 4 Notes on discs ... 5 Table of contents ... 7 Identification of controls ... 8 Front panel ... 8 Rear panel ... 8 Display window ... 9 Remote control ... 10 Loading batteries ... -
Page 8: Identification Of Controls
Identification of controls See the page in for details. Front panel ON/STANDBY ( ) button Remote sensor Display window Rear panel AUDIO (L/R)/VIDEO INPUT (LINE IN1) sockets SUBWOOFER socket AUDIO OUTPUT socket (for Subwoofer) AUDIO (L/R)/VIDEO FM-IN ANTENNA INPUT (LINE IN2) sockets OPTICAL IN socket COAXIAL IN socket... -
Page 9: Display Window
Display window Play indicator Dolby Pro Logic II indicator Dolby Digital indicator dts indicator TRK(TRACK) indicator The display may vary depending on the types of discs you play. DVD video disc • During playback: Example Some discs may not display elapsed time. -
Page 10: Remote Control
Identification of controls The instructions in this manual describe the functions on the remote control. See the page in for details. Remote control *TV ON/STANDBY button SETUP button DVD/FM/AM button SPKR SETUP button *TV INPUT SELECT button ANGLE button ZOOM button ENTER buttons TOP MENU button SKIP buttons... -
Page 11: Loading Batteries
Loading batteries Slide the battery compartment cover in the direction of the arrow. Install two “R03” batteries (supplied), paying attention to the polarity diagram in the battery compartment. Replace the compartment cover. Notes on batteries Improper use of batteries may cause battery leakage and corrosion. -
Page 12: Connections
Connections When you connect the unit to other equipment, be sure to turn off the power and unplug all of the equipment from the wall outlet before making any connections. Connecting to a TV Connect the unit directly to your TV. If you connect the unit to a VCR, TV/VCR combination or video selector, the DVD playback picture may be distorted as DVD video discs are copy protected. -
Page 13: Fm/Am Aerial Connection
If you connect the DVD player using a Optical lead or Coaxial lead, the Video lead must be connected to LINE IN1 VIDEO INPUT socket. • If you connect your VCR or DVD player to LINE IN 1 sockets, you must set “LINE 1 select” setting to the appropriate position. (See page 22.) Notes: •... -
Page 14: Speaker System Connection
Speaker system connection Turn off the mains first and set the volume knob to low initially before connecting. Connect the speakers using the supplied speaker leads by matching the colors of the terminals and those and those of the leads. To obtain the best possible surround sound, adjust the speaker parameters (distance, level etc.). -
Page 15: Audio Setup
Audio setup Tone control You can change the sound quality by adjusting the bass and treble. Press TONE in DVD mode. The “Tone” screen appears. Tone Bass Boost Bass Treble BACD/Enter/Return Press C or D to select “Bass” or “Treble”, then press B or A to adjust the sound level. -
Page 16: Selecting Surround Mode
Selecting surround mode You can enjoy surround sound by selecting surround mode. Press SURROUND in DVD mode. The “Surround” screen appears. Tone Bass Boost Surround BACD/Enter/Return Press A or ENTER, and press C or D to select “Auto”, “PLII” or “2 Channel”, then press ENTER. -
Page 17: Speaker Setup
Speaker setup You may adjust speaker volume balance and delay time according to your listening position. Press SPKR SETUP in DVD mode. The “SPKR Setup” screen appears. Press C C C C C or D D D D D to select “Volume”, “Test Tone”, “Centre Delay”... -
Page 18: Dvd Setup
DVD setup When each setup function (page 18 ~ 24) has been completed, the unit can always be operated under the same conditions (especially with DVD discs). Each setup command will be retained in the memory even if you turn the power off. Setting OSD language The setup language can be selected. -
Page 19: Setting Subtitle Language
Setting Subtitle language The same subtitle language can always be selected even if you replace the disc or turn the power off. Press SETUP in the stop mode. Press 5 5 5 5 5 or ENTER, then press 4 4 4 4 4 or 5 5 5 5 5 to select “Subtitle”. -
Page 20: Setting The Aspect Ratio Of Tv Screen
Setting the aspect ratio of TV screen You can select an aspect ratio appropriate to your TV. Press SETUP in the stop mode. Press b b b b b or a a a a a to select “Picture”, then press 5 5 5 5 5 or ENTER. -
Page 21: Setting Jpeg Interval
Setting JPEG Interval You can continuously play back all JPEG files automati- cally. After the setting below, start playing the disc on which JPEG files have been recorded. Press SETUP in the stop mode. Press b b b b b or a a a a a to select “Picture”, then press 5 5 5 5 5 or ENTER. -
Page 22: Dynamic Range Control (Drc)
Dynamic Range Control (DRC) DRC (Dynamic Range Control) enables you to control the dynamic range so as to achieve a suitable sound for your equipment. Press SETUP in the stop mode. Press b b b b b or a a a a a to select “Audio”, then press 5 5 5 5 5 or ENTER. -
Page 23: Parental Control Setting
Parental control setting Some discs are specified as not suitable for children. Playback of such discs can be restricted with this unit. Press SETUP in the stop mode. Press b b b b b or a a a a a to select “Parental”, then press 5 5 5 5 5 or ENTER. -
Page 24: Language Code List
Language code list Enter the appropriate code number for the initial settings “Menu”, “Subtitle” and “Audio” language on page 18 and 19. Language Name Code Language Name Code Abkhazian 1112 Fiji Afar 1111 Finnish Afrikaans 1116 French Albanian 2927 Frisian Amharic 1123 Galician... -
Page 25: Playback Procedure
Playback procedure Basic playback Preparation: • Turn ON the TV and select to the corresponding video input. Press (ON/STANDBY). (If the unit is in FM/AM mode, press DVD/FM/ AM to select DVD mode.) “Reading” display will change to “No Disc”. (If DVD disc has already loaded, playback will start automatically.) No Disc... -
Page 26: Special Playback
Special playback Note: There may be a slight delay between you pressing the button and the function activating. Fast forward playback Press SEARCH + during normal playback. Each press of SEARCH + will increase the speed of the search Review playback Press SEARCH –... -
Page 27: Marking The Scenes
Marking the scenes The unit stores the points that you want to watch again up to 3 points. You can resume playback from each scene. Press MARKER during playback. Marker Marker Marker /Enter/Cancel/Marker Select the blank Marker using Then press ENTER at the desired scene. Marker Marker Marker... -
Page 28: Title, Chapter And Track Repeat Playback
Title, Chapter and Track Repeat playback Press PLAYMODE during playback or stop mode. Press or ENTER once or twice to select “Chapter” or “Title”. Repeat /Enter/Play Mode Audio CD, Video CD, MP3/WMA CD Press to select “Repeat”. Press or ENTER once or twice to select “Track”... -
Page 29: Programme Playback
Programme playback You can arrange the playback order of tracks on the disc. Press PLAYMODE in the stop mode. Press to select “Play Mode”, then press or ENTER to select “Program”. Play Mode Repeat Clear Press to select the program- ming position. -
Page 30: Title Selection
Title selection Two or more titles may be recorded on some discs. If a title menu is recorded on the disc, you can select the desired title. Press TOP MENU during playback. Title menu appears on the screen. Press to select the desired title. Press ENTER or PLAY. -
Page 31: Disc Status
Disc Status With each press of DISPLAY, the status of the disc will appear on the screen and change as follows. 00:34:56 01:12:33 Title 1/32 To make status display disappear, press DISPLAY again. VIDEO CD 00:12 04:32 Track –/– To make status display disappear, press DISPLAY again. -
Page 32: Mp3/Wma/Jpeg Cd Operation
MP3/WMA/JPEG CD OPERATION This player can play back the MP3/WMA/JPEG-data which has been recorded on CD-R or CD-RW. To produce the MP3/ WMA/JPEG-data, you need a Windows-PC with CD-ROM drive and a MP3/WMA/JPEG-encoding Software (not supplied). The Apple-HFS-System can not be played. MP3/WMA/JPEG CD information Limitations on MP3/WMA/JPEG CD playback •... -
Page 33: Mp3/Wma Cd Playback
• In the case of a CD containing a mixture of MP3, WMA and JPEG files, the files are played back by selecting them from the file menu. • MP3 or WMA file on the KODAK Picture CD is not -/72 --:-- recognized on this unit. -
Page 34: Jpeg Cd Playback
JPEG CD playback Place a disc on which JPEG files have been recorded onto the tray. A file menu screen will appear on the screen. Press to select folder. Press or number buttons (0–9) to select the desired file. To display a picture menu, press MENU. (To return to a file menu, press TOP MENU.) Press to select the desired... -
Page 35: Progressive Scan
Progressive scan The progressive scan capability provides the highest resolution pictures with less flicker and line structure. If you are using the Component video sockets, but are connecting the unit to a standard (analog) television, set PROGRESSIVE to Off. If you are using the Component video sockets for connection to a TV or monitor that is compatible with a progressive scan signal, set PROGRESSIVE to On. -
Page 36: Radio Operation
Radio operation Tuning the radio stations Press DVD/FM/AM to select FM or AM. “TUNER ” or “TUNER ” appears on the win- dow display for 3 seconds and changes to radio operation mode. Automatic tuning Press and hold TUNE + or – for 1 second to start the automatic tunning. -
Page 37: Listening To The Radio
Listening to the radio Preset the radio stations first as described on page 36. Press DVD/FM/AM to select FM or AM. Press PRESET + or – to select the desired position number. You can also select the desired position num- ber using the number buttons (0–9), then press ENTER. -
Page 38: Other Functions
Other functions Sleep timer You can set the DVD receiver to turn off automati- cally at a specified time. Press SLEEP to set the desired sleep time. The SLEEP indicator and sleep time appears on the display window. Each time you press SLEEP, the setting changes in the following order. -
Page 39: Before Calling Service Personnel
Before calling service personnel Check the following guide for the possible cause of a problem before contacting service. Symptom Cause No power. The mains lead is disconnected. No picture. The TV is not set to receive DVD signal output. The scart or video lead is not connected securely. -
Page 40: Specifications
Specifications General Power supply Power consumption Weight Dimensions Tuner RF channel output Colour system Applicable disc Frequency range S/N ratio Harmonic distortion Wow and flutter Operating conditions Input/Output Video input Video output Audio input Audio output S-video output Component video output Audio input (BITSTREAM/PCM COAXIAL) Audio input...
Need help?
Do you have a question about the SD-63HK and is the answer not in the manual?
Questions and answers