
Related Manuals for Kodak EASYSHARE C142


Summary of Contents for Kodak EASYSHARE C142
-
Page 1: Digital Camera
KODAK EASYSHARE C142 Digital Camera Extended user guide www.kodak.com For interactive tutorials: www.kodak.com/go/howto For help with your camera: www.kodak.com/go/c142support... - Page 2 Eastman Kodak Company Rochester, New York 14650 © Eastman Kodak Company, 2009 All screen images are simulated. Kodak and EasyShare are trademarks of Eastman Kodak Company. 4H6813_en...
-
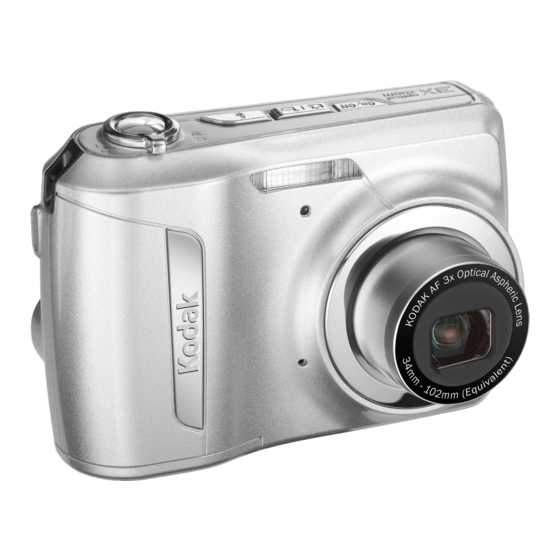
Page 3: Front View
Front view Shutter button Zoom (Wide Angle/Telephoto) lever Flash Self-timer/ Video light Microphone IMPORTANT: Your camera offers a built-in Help system. www.kodak.com/go/support Product features Flash button Mode button Power button Lens See page... -
Page 4: Back View
Product features Back view Tripod socket IMPORTANT: Your camera offers a built-in Help system. Delete, Menu, Info, Review buttons Share button Battery compartment, SD/SDHC Card slot See page www.kodak.com/go/support Strap post USB port... -
Page 5: Table Of Contents
4 Reviewing and editing ...17 Reviewing pictures/videos ... 17 Deleting pictures/videos ... 18 Viewing pictures/videos in different ways... 19 A smarter way to find and enjoy your pictures... 20 Understanding the review icons... 21 Creating a slide show... 22 www.kodak.com/go/support... - Page 6 8 Appendix ...44 Camera specifications ... 44 Care and maintenance ... 46 Upgrading your software and firmware... 46 Storage capacities ... 47 Important safety instructions ... 47 Battery replacement, battery life ... 48 Limited warranty ... 49 Regulatory compliance ... 50 www.kodak.com/go/support...
-
Page 7: Setting Up Your Camera
Setting up your camera Attaching the strap Loading the AA batteries Purchase extra batteries for your special event www.kodak.com/go/c142accessories www.kodak.com/go/support... -
Page 8: Turning On The Camera
Setting the language and date/time NOTE: To change language in the future, use the Setup Menu Language: to change. OK to accept. Date/Time: At the prompt, press OK. to change current field. for previous/next field. OK to accept. (see page 32). www.kodak.com/go/support... -
Page 9: Storing Pictures On An Optional Sd Or Sdhc Card
Inserting or removing a card while the camera is on may damage the pictures, the card, or the camera. 1 Turn off the camera. Insert the card. Push it until it clicks. 3 Turn on the camera. Purchase accessories www.kodak.com/go/support Setting up your camera www.kodak.com/go/c142accessories... -
Page 10: Taking Pictures/Videos
If the camera is not focusing on the desired subject, release the Shutter button and recompose the scene. 2 Press the Shutter button completely down to take the picture. NOTE: Multiple framing marks may appear when faces are detected. See page www.kodak.com/go/support... -
Page 11: Taking A Video
NOTE: Audio is captured during video recording. Audio can be heard when the video is played on a computer or when the camera is connected to a TV To review pictures/videos anytime, www.kodak.com/go/support 1 Press the Mode button, then displays Video 2 Press the Shutter button completely down, then release it. -
Page 12: Understanding The Picture-Taking Icons
The battery level icon works like the gas gauge in your car, but appears only when the battery requires your attention. (If you’re viewing shortcuts, the battery level is always displayed. See page 11.) Purchase extra batteries for your special event Pictures/time remaining Zoom indicator Battery level www.kodak.com/go/c142accessories www.kodak.com/go/support... -
Page 13: Using The Optical Zoom
Release Telephoto (T), then press it again. NOTE: You may notice decreased image quality when using digital zoom. www.kodak.com/go/support 1 Use the LCD to frame your subject. 2 To zoom in, turn the Zoom lever toward Telephoto (T). -
Page 14: Using The Flash
The flash fires before the picture is taken to reduce the chance of red-eye. The camera digitally corrects red-eye after a picture is taken. (Processing time after taking a picture may increase.) NOTE: When using digital correction, image processing takes longer than when using preflash. Never www.kodak.com/go/support... -
Page 15: Using Different Modes
OK . Use this mode Smart Capture Program Scene Video www.kodak.com/go/support until the LCD displays the mode that best suits General picture taking—it offers excellent image quality and ease of use. ■ Faces get focus and exposure priority. ■... -
Page 16: Using Scene (Scn) Modes
Documents. For best results, place the camera on a steady surface or tripod. Beach Bright beach scenes. Snow Bright snow scenes. Fireworks Fireworks. For best results, place the camera on a steady surface or tripod. until the LCD displays SCN, then press OK . www.kodak.com/go/support... -
Page 17: Using Shortcuts
The shortcuts appear. To hide the shortcuts again, press 2 Press to access functions like Exposure Compensation, Self-timer, and Auto focus. (You’ll see different functions in different modes.) 3 Press to choose a setting. Shortcuts www.kodak.com/go/support Taking pictures/videos Press to show/hide shortcuts. -
Page 18: Using The Self-Timer
Self-timer, then press OK. A picture is taken after a 10-second delay (so you have time The first picture is taken after a 10-second delay. A 11) or these steps: 11) or these steps: to choose Burst On. www.kodak.com/go/support... -
Page 19: Sharing And Tagging Pictures
Sharing through social networks It’s never been easier to share pictures on your favorite social networking sites. IMPORTANT: To use the camera’s social networking features, you need to download KODAK Software. 1 Press the Review 2 Press the Share button. -
Page 20: Manage Email Addresses And Kodak Pulse Digital Frames
Review and press the Share button, only chosen sites are shown. Manage email addresses and KODAK PULSE Digital Frames You can add, edit, or delete email addresses and KODAK PULSE Digital Frames on your camera. 1 In Review, press the Share button. Press Addresses (or Manage Frames), then press OK. -
Page 21: Tagging Pictures
The keyboard appears when you need to add keywords and email addresses. 1 Press to choose a letter, then press OK. 2 When finished, press www.kodak.com/go/support button, then to find a picture to tag. to choose Keyword Tag, then press OK. -
Page 22: Marking Pictures/Videos For Emailing
When you transfer the marked pictures/videos to your computer, the software prompts you to send the pictures/videos. IMPORTANT: Your camera offers a built-in Help system. button. Press to find a picture. Using the keyboard, page , then press OK. See page www.kodak.com/go/support 15.) -
Page 23: Reviewing And Editing
Reviewing pictures/videos Find your pictures like a pro... See “A smarter way to find and enjoy your pictures” on page 20. Playing a video Playback speed www.kodak.com/go/support 1 Press the Review 2 Press for previous/next picture/video. ■ To exit, press the Review button or press the Shutter button halfway down. -
Page 24: Deleting Pictures/Videos
Formatting internal memory or an SD or SDHC Card deletes all (including protected) pictures/videos. (Formatting internal memory also deletes email addresses and keyword tags.) button. button. to protect other pictures/videos, or press button to exit the menu. Protecting to choose www.kodak.com/go/support... -
Page 25: Viewing Pictures/Videos In Different Ways
Viewing pictures/videos in different ways Magnifying a picture Viewing as thumbnails (multi-up) www.kodak.com/go/support 1 Press the Zoom lever toward Telephoto (T) to magnify 1X–8X. 2 Press to view other parts of a picture. ■ Press OK to return to 1X. -
Page 26: A Smarter Way To Find And Enjoy Your Pictures
Press Telephoto (T) see pictures in a stack or to see an individual picture. Press Wide Angle (W) to see thumbnails or picture stacks. To return to picture-taking mode, press the Shutter button halfway down. Date Tip: For best results, make sure the camera’s date/time is current button. Favorites Keywords (see page www.kodak.com/go/support 32). -
Page 27: Understanding The Review Icons
The battery level icon works like the gas gauge in your car, but appears only when the battery requires your attention. (If you’re viewing shortcuts, the battery level is always displayed. See page 11.) Purchase extra batteries for your special event www.kodak.com/go/support page www.kodak.com/go/c142accessories Reviewing and editing Print/number of prints Protected... -
Page 28: Creating A Slide Show
Preview Slide Show, then press OK. The slide show repeats until you press OK or until the batteries are exhausted. button. Select pictures (see to choose Loop, then press OK. page 27). If you don’t select any, See page www.kodak.com/go/support... -
Page 29: Displaying Pictures/Videos On A Television
Video Out setting (NTSC or PAL) is correct connect or disconnect the cable while the slide show is running. (Image quality on a television screen may not be as good as on a computer monitor or when printed.) www.kodak.com/go/support Reviewing and editing www.kodak.com/go/c142accessories (see page 32). -
Page 30: Using The Menu Button In Review
2 Press the Menu Edit tab. Choose Crop, then press OK. to move the crop box. When satisfied with the crop button. See page button, then to find a button, then to choose the See page www.kodak.com/go/support... -
Page 31: Rotating Pictures
5 Press OK. Follow the screen prompts to replace the original picture or to save the rotated picture as a new one. Press the Shutter button halfway down to return to Capture mode. IMPORTANT: Your camera offers a built-in Help system. www.kodak.com/go/support button, then to find the previous/next picture. to highlight the Edit tab. -
Page 32: Editing Videos
3 Follow the screen prompts. The video is trimmed. (You can save it as a new video or replace the original.) Press the Shutter button halfway down to return to Capture mode. www.kodak.com/go/support button, then to find a to choose the... -
Page 33: Selecting Multiple Pictures/Videos
NOTE: Pictures/videos are copied, not moved. To remove pictures/videos from the original location after copying, delete them (see IMPORTANT: Your camera offers a built-in Help system. www.kodak.com/go/support 1 Press the Review if you’re in multi-up mode) to find a picture/video. -
Page 34: Doing More With Your Camera
Setup for other camera settings 3 Press to choose a setting, then press OK. 4 Choose an option, then press OK. Using the capture tab Press Menu, and OK to access settings Picture Size Choose a picture resolution. Picture-taking Options Camera specifications, page www.kodak.com/go/support... - Page 35 Choose how long the shutter stays open (normally in low-light conditions). For best results, place the camera on a tripod or steady surface. www.kodak.com/go/support Picture-taking Options 10 Seconds 2 Seconds 2 Picture Timer Burst On—Press the Shutter button halfway to focus and set exposure.
- Page 36 (If faces are not detected, the camera switches to Multi-Zone.) Multi-Zone—Evaluates 5 zones to give an even picture focus. Ideal for general picture taking. Center-Zone—Evaluates the small area centered in the lens. Ideal for focusing on a precise area. www.kodak.com/go/support...
-
Page 37: Video Settings
IMPORTANT: Your camera offers a built-in Help system. Press Menu, and OK to access settings Self-timer Choose Self-timer feature. www.kodak.com/go/support Picture-taking Options Continuous AF—Because the camera is always focusing, there is no need to press the Shutter button halfway down to focus. -
Page 38: Using The Setup Menu
Individual social networking sites ■ E-mail addresses (all or none) ■ KODAK Digital Frames (all or none) Preflash—The flash fires before the picture is taken to reduce the chance of red-eye. Digital correction—The camera digitally corrects red-eye after a picture is taken. - Page 39 Choose your language. Reset All Camera Settings—Settings revert to their factory defaults. Reset Startup Application—Resets camera to startup mode to allow KODAK Software download. Memory Card—Deletes everything on the card; formats the card. Cancel—Exits without making a change. Internal Memory—Deletes everything in internal memory including email addresses and keyword tags;...
-
Page 40: Transferring, Printing Pictures
Transferring, printing pictures Download software, transferring pictures Download KODAK Software—so it’s easy to transfer and share pictures and videos. Make sure the computer is connected to the Internet. When you connect the camera to the computer, the KODAK Software Downloader automatically runs. Follow the prompts to download and install KODAK Software.*... -
Page 41: Printing Pictures
PICTBRIDGE enabled Printers. You need a camera, a PICTBRIDGE enabled Printer, and a USB cable. Connecting the camera to a KODAK All-in-One Printer 1 Turn off the camera and printer. 2 Connect the USB cable from the camera to the printer. -
Page 42: Ordering Prints Online
Automatically print tagged pictures when you insert your card into a printer with ■ an SD/SDHC Card slot. See your printer user’s guide for details. ■ Make prints at an SD/SDHC Card-capable KODAK Picture Kiosk. Go to www.kodak.com/go/picturemaker. Take the card to your local photo retailer for professional printing. ■... -
Page 43: Marking Your Pictures For Printing
Repeat this step until the desired print quantity is applied to each picture. 5 Press OK. Press the Shutter button halfway down to return to Capture mode. IMPORTANT: Your camera offers a built-in Help system. www.kodak.com/go/support button. Press to find a picture. Transferring, printing pictures See page... -
Page 44: Troubleshooting
Your camera offers a built-in Help system. It describes every setting for every menu choice. If you learn nothing else about your camera, learn how to use on-camera Help. Turning on camera Help Press the Menu choose a menu choice. Press the Info Scroll through a Help topic. www.kodak.com/go/support button, button. -
Page 45: Troubleshooting
■ ■ Battery life is short ■ ■ www.kodak.com/go/support Make sure the batteries are installed correctly Make sure batteries are new. If batteries are rechargeable, make sure they are fully charged (see charger documentation). Transfer all pictures to the computer Take another picture. -
Page 46: Computer/Connectivity Problems
Turn off the camera, then turn it back on. Make sure the battery is charged and installed correctly page Make sure the KODAK Camera USB Cable, Micro B / 5-Pin is connected to the camera and the computer turn on the camera. -
Page 47: Picture Quality Problems
To automatically set exposure and focus, press the Shutter button halfway. When the framing marks turn green, press the Shutter button completely down to take the picture. ■ In Program mode, adjust the Exposure Compensation www.kodak.com/go/support (see page 46). (see page (see page 8) or change your position so light is not 44.) -
Page 48: Direct Printing (Pictbridge Enabled Printer) Problems
Press any camera button to redisplay the menu. Make sure there is a connection between the camera and the printer (see page 35). Make sure the printer and the camera have power. Follow the prompts to resolve the issue. www.kodak.com/go/support... -
Page 49: Getting Help On The Web
Register your camera Chat, email, write, or phone Kodak (Chat not available in all languages) Software Download and get Help with other KODAK Software Download KODAK EASYSHARE Software Get help with the WINDOWS OS and working with digital pictures Other... -
Page 50: Appendix
Auto focus control—Continuous and Single AF Face detection—Yes Shutter speed—8–1/1600 seconds Long time exposure—0.5–8 seconds ISO speed—Smart Capture mode: Auto 80–400 Program mode: Auto 80-400; manual 80, 100, 200, 400, 800, 1600 (The SD logo is a trademark of the www.kodak.com/go/support... -
Page 51: Image File Format
Color modes—High Color, Natural Color, Low Color, Black & White, Sepia Sharpness modes—High, Normal, Low Video capture—4 GB maximum; VGA (640 x 480 @ 30 fps) Communication with computer—USB 2.0 full speed (PIMA 15740 protocol); via KODAK Camera USB Cable, Micro B / 5-Pin Video output—NTSC or PAL Microphone—Yes Beeper—Yes PICTBRIDGE support—Yes... -
Page 52: Care And Maintenance
Do not allow chemicals, such as suntan lotion, to contact painted surfaces. ■ Service agreements may be available in your country. Contact a dealer of KODAK Products for more information. ■ For digital camera disposal or recycling information, contact your local authorities. -
Page 53: Storage Capacities
LCD breaks, do not touch the glass or liquid. Contact Kodak customer support. ■ The use of an accessory that is not recommended by Kodak may cause fire, electric shock, or injury. For approved accessories, go to www.kodak/go/accessories. ■... -
Page 54: Battery Replacement, Battery Life
For more information on batteries, go to www.kodak.com/go/batterychart. Battery replacement, battery life KODAK MAX Alkaline Batteries AA: 200 pictures per charge. Battery life per CIPA testing method. (Approx. number of pictures in Smart Capture mode, using an SD Card.) Actual life may vary based on usage. For other compatible batteries, see the... -
Page 55: Limited Warranty
If Kodak is unable to repair or replace a Product, Kodak will, at its option, refund the purchase price paid for the Product provided the Product has been returned to Kodak along with proof of the purchase price paid. -
Page 56: Regulatory Compliance
Unless a specific Kodak warranty is communicated to the purchaser in writing by a Kodak company, no warranty or liability exists beyond any minimum requirements imposed by law, even though defect, damage, or loss may be by negligence or other act. -
Page 57: Canadian Doc Statement
FCC regulation. The KODAK High Performance USB AC Adapter K20-AM complies with part 15 of the FCC Rules. Operation is subject to the following... -
Page 58: Australian C-Tick
Appendix Hereby, Eastman Kodak Company declares that this KODAK Product is in compliance with the essential requirements and other relevant provisions of Directive 1999/5/EC. Australian C-Tick N137 VCCI Class B ITE Russian GOST-R Eastman Kodak Company Rochester, NY 14650 China RoHS... - Page 59 Appendix Korean Class B ITE www.kodak.com/go/support...
- Page 60 32 date setting, 2 deleting during quickview, 5 from internal memory, 18 from SD/SDHC Card, 18 protecting pictures, videos, 18 digital zoom, 7 displaying slide show, 22 disposal, recycling, 46 download KODAK Software, 34 download pictures, 34 www.kodak.com/go/support...
- Page 61 1 SD/SDHC Card, 3 ISO speed, 29 keyboard, 15 KODAK Software upgrading, 46 KODAK Software, download, 34 Kodak Web sites, 38 language, 33 brightness, 32 reviewing pictures, 17 reviewing videos, 17 LCD brightness, 32 lens cleaning lens, 46...
- Page 62 PICTBRIDGE, 35 tagged pictures, 36 protecting pictures, videos, 18 quickview, using, 5 recycling, disposal, 46 regulatory information, 50 repair, 43 reset camera, 33 reviewing pictures/video as you take them, 5 deleting, 18 LCD, 17 protecting, 18 slide show, 22 www.kodak.com/go/support...
- Page 63 31 video out, 32 white balance, 30 setting up the camera, 1 setup menu, 32 Share button, 32 sharpness, 31 shutter www.kodak.com/go/support problems, 40 self-timer delay, 12 slide show continuous loop, 22 running, 22 smart capture, 9 smart display, 32...
- Page 64 Index upgrading software, firmware, 46 URLs, Kodak Web sites, 38 transfer pictures, 34 VCCI compliance, 52 video copying, 27 edit, 26 emailing marked, 16 out, 32 playback, 17 protecting, 18 review icons, 21 transfer to computer, 34 viewing, 17 video out, 32...
Need help?
Do you have a question about the EASYSHARE C142 and is the answer not in the manual?
Questions and answers
How do you take camera off protected mode
To disable protected mode on the Kodak EASYSHARE C142 camera:
1. Press the Review button.
2. Press the Menu button.
3. Press to choose Protect, then press OK.
4. Press to choose the protected picture/video (indicated by a check mark).
5. Press OK to remove the check mark and disable protection.
This answer is automatically generated