Table of Contents
Advertisement
Register now!!
This product is eligible for the
P2HD 5 Year Warranty
Repair Program.
For details, see page 8.
http://panasonic.biz/sav/pass_e/
1
Volume
Note that Operation Instructions Vol. 1 describes basic operations
of the Memory Card Camera-Recorder.
For instructions on advanced operations of the Memory Card
Camera-Recorder, refer to Operating Instructions Vol. 2 (pdf file)
contained in the supplied CD-ROM.
Before operating this product, please read the instructions carefully and save
this manual for future use.
SS0612MO1043 -FJ
Printed in Japan
Operating Instructions
Memory Card Camera-Recorder
AG-HPX255P
Model No.
AG-HPX255EN
Model No.
Vol.1
ENGLISH
VQT4K98-1
Advertisement
Table of Contents

Related Manuals for Panasonic AG-HPX255P


Summary of Contents for Panasonic AG-HPX255P
-
Page 1: Operating Instructions
P2HD 5 Year Warranty Repair Program. For details, see page 8. http://panasonic.biz/sav/pass_e/ Operating Instructions Vol.1 Memory Card Camera-Recorder AG-HPX255P Model No. AG-HPX255EN Model No. Volume Note that Operation Instructions Vol. 1 describes basic operations of the Memory Card Camera-Recorder. For instructions on advanced operations of the Memory Card Camera-Recorder, refer to Operating Instructions Vol. -
Page 2: Read This First! (For Ag-Hpx255P)
Read this first! (For AG-HPX255P) indicates safety information. CAUTION: CAUTION Do not jar, swing, or shake the unit by its handle. RISK OF ELECTRIC SHOCK Any strong jolt to the handle may damage the DO NOT OPEN unit or result in personal injury. -
Page 3: Declaration Of Conformity
120 V are not intended for U.S.A. and Canada. Operation at a voltage other than 120 V AC may require the use of a different AC plug. Please contact either a local or foreign Panasonic authorized service center for assistance in selecting an alternate AC plug. -
Page 4: Important Safety Instructions
Read this first! (For AG-HPX255P) (continued) IMPORTANT SAFETY INSTRUCTIONS 1) Read these instructions. 2) Keep these instructions. 3) Heed all warnings. 4) Follow all instructions. 5) Do not use this apparatus near water. 6) Clean only with dry cloth. 7) Do not block any ventilation openings. Install in accordance with the manufacturer’s instructions. - Page 5 Read this first! (For AG-HPX255P) (continued) Brazil Only Brasil Apenas ■ Manuseio de baterias usadas Cobrir os terminais positivo (+) e negativo (-) com uma fita isolante adesiva, antes de depositar numa caixa destinada para o recolhimento. O contato entre partes metálicas pode causar vazamentos, gerar calor, romper a blindagem e produzir fogo. Não desmonte, não remova o invólucro, nem amasse a bateria. O gás liberado pela bateria pode irritar a garganta, danificar o lacre do invólucro ou o vazamento provocar calor, ruptura da blindagem e produzir...
-
Page 6: Read This First! (For Ag-Hpx255En)
Read this first! (For AG-HPX255EN) indicates safety information. WARNING: CAUTION: This equipment must be earthed. The mains plug of the power supply cord shall To ensure safe operation, the three-pin plug remain readily operable. must be inserted only into a standard three-pin The AC receptacle (mains socket outlet) shall be power point which is effectively earthed through installed near the equipment and shall be easily... -
Page 7: Read This First! (For Ag-Hpx255P/Ag-Hpx255En)
To ensure that safe products are used we would recommend that a genuine Panasonic battery pack is used. • Be aware that many batteries sold at extremely cheap prices or in situations where it is difficult to verify the actual products before purchase have proven to be counterfeit. - Page 8 Details about user registration and the extended warranty: Please note, this is a site that is not maintained by Panasonic Canada Inc. The Panasonic Canada Inc. privacy policy does not apply and is not applicable in relation to any information submitted. This link is provided to you for convenience.
-
Page 9: Outline Of Operations
Outline of operations This unit is a handheld P2 memory card camera-recorder that achieves the high quality images provided by full HD through the incorporation of a cam-type 22x optical zoom and a 1/3-type 2.2-megapixel 3MOS sensor in the camera unit, and including AVC-Intra100 compression as standard in the recording and playback unit. It supports multi-format HD/SD and enables multi-camera operation that can be controlled remotely via the GENLOCK and remote control functions, while revolutionizing the recording and editing work flow with the reliability and the immediacy unique to P2. -
Page 10: Table Of Contents
Contents Volume 1 (This Book) Read this first! (For AG-HPX255P) ..... 2 Read this first! (For AG-HPX255EN) ....6 Read this first! (For AG-HPX255P/ AG-HPX255EN) ..........7 Outline of operations .......... 9 Before use Operating precautions ........12 Precaution for use ..........14 Accessories ............ - Page 11 Volume 2 (CD) Shooting Displays Viewfinder Screen displays Tally lamp Menu Basic shooting operations Using SD/SDHC memory cards Setup menu list Using the zoom function Shooting in progressive mode Reference Recording with Variable Frame Rate (VFR) Before calling for service Shooting in manual mode Updating the firmware incorporated into Adjusting the white balance and black...
-
Page 12: Operating Precautions
Operating precautions Do not allow any water to get into the camera- Battery charger and battery recorder when using it in the rain or snow or at • If the CHARGE lamp continues to blink even when the battery temperature is normal, there the beach. - Page 13 Remove the battery after use. Do not point the lens or viewfinder at the sun. Completely remove the battery. (The battery Doing so may damage the parts inside. continues to be used even if you have turned the Protective caps for the connectors camera-recorder off.) The battery can over discharge if you leave it in the Keep the protective caps fitted over any connectors...
-
Page 14: Precaution For Use
• These settings affect the control and playback sequence of the recorded contents. Before making a recording, set and check the calendar and time zone. (Page 26) Panasonic makes no guarantees for your recordings. • Please understand that Panasonic cannot provide compensation for images and/or sound not recorded because of problems with the camera-recorder or P2 card. -
Page 15: Accessories
• Please consult a retailer when purchasing additional accessories. Optional units • XLR microphone AG-MC200G • Battery CGA-D54 (7.2 V, 5400 mAh: equivalent to accessory battery for the AG-HPX255P) CGA-D54s (7.2 V, 5400 mAh: equivalent to accessory battery for the AG-HPX255EN) -
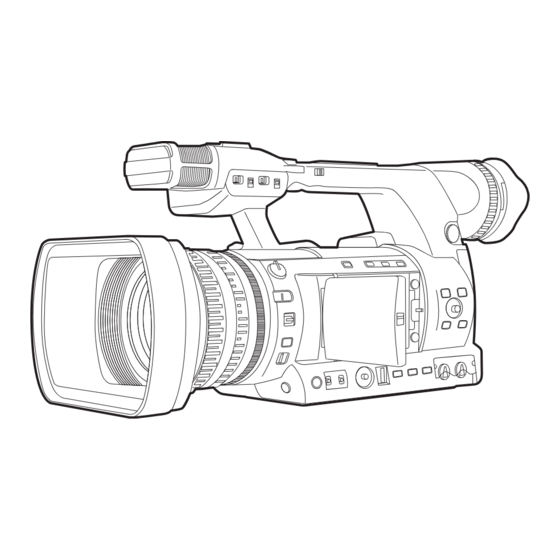
Page 16: Description Of Parts
Description of parts Left side 1 2 3 4 5 67 8 9 10 11 31 32 33 21 23 24 25 27 26 28 INPUT1 LINE/MIC switch (Page 52 of Vol. 2) 21 IRIS button (Page 30 of Vol. 2) INPUT1 switch (MIC POWER +48 V) 22 GAIN switch (Page 32 of Vol. -
Page 17: Top And Right Side
Top and right side 19 20 Built-in microphone (Page 52 of Vol. 2) 20 Lock release button (Page 25) Light shoe 21 Tripod hole (Page 14) Zoom lever (handle side) (Page 18 of Vol. 2) START/STOP button (handle, includes hold mechanism) (Page 10 of Vol. -
Page 18: Front And Rear Side
Description of parts (continued) Front and rear side USB2.0 USB2.0 23 24 25 26 Tally lamp (Front) (Page 9 of Vol. 2) * Do not connect any equipment except the remote controller to the CAM REMOTE jack. Remote control sensor (Front) (Page 24) Connecting any equipment other than White balance sensor (Page 32 of Vol. -
Page 19: Remote Control
Remote control DATE/TIME button (Page 100 of Vol. 2) The following buttons are for functions that OSD button (Page 100 of Vol. 2) cannot be executed on the camera-recorder. • PHOTO SHOT • TITLE • A.DUB COUNTER button (Page 63 of Vol. 2) • MULTI/P-IN-P • SELECT • REC Same function as the COUNTER button on the... -
Page 20: Charging The Battery
(when the the battery charger, place it flat, slide it in LCD monitor the direction shown below and press firmly. is used) CGA-D54 Approx. Approx. (AG-HPX255P) 7.2 V/ 5400 mAh CGA-D54s minutes minutes (AG-HPX255EN) Press firmly. • The times apply when the ambient operating temperature is 20 °C (68 °F) and humidity... -
Page 21: Power Sources
Power sources Using the battery Installation Removal Set the POWER/MODE switch to OFF, and Insert the battery until it clicks into place. check that the mode lamp is off. (Page 25) While pressing the battery release button, raise up the battery to remove it. • Support the battery with your hand to ensure that it will not fall. -
Page 22: Adjusting The Hand Strap
Adjusting the hand strap Adjust the hand strap to suit your hand. Open the cover and adjust the length. Close the cover. • Make sure the cover is fully closed. Attaching the shoulder strap Attach the shoulder strap and use it as a precaution against dropping the camera-recorder. 20 mm or more 20 mm or more Detaching and attaching the lens hood... -
Page 23: Detaching And Attaching The Lens Cap
Detaching and attaching the lens cap Detaching the lens cap • Pinch the lens cap and remove. Attaching the lens cap • Pinch the lens cap and attach. • Be sure to attach the lens cap to protect the lens when not in use. -
Page 24: The Remote Control
The remote control Insert the battery Remote control setup When using two camera-recorders simultaneously, Push the catch in the direction shown by set this camera-recorder and the remote control to arrow 1 to remove the holder. either “operation mode 1” or “operation mode 2” so the remote control does not operate the wrong camera-recorder by mistake. -
Page 25: Turn On/Off The Camera-Recorder
Turn on/off the camera-recorder While holding down the lock release button, turn the POWER/MODE switch to the ON or OFF position. Turn on the camera-recorder: The mode lamp (CAMERA) lights red (CAMERA mode) and the camera-recorder is now in the shooting standby mode. • When turning the POWER/MODE switch to the MODE position, the mode lamp (PB/THUMBNAIL) lights green and is PB/THUMBNAIL mode. (Page 74 of Vol. -
Page 26: Setting The Calendar
Setting the calendar The CLOCK SETTING value is recorded in Push the Operation lever in the ▼ direction the contents (clip), and affects the sequence to move to the MONTH setting. of playback of the thumbnails. Before carrying CLOCK SETTING out recording, be sure to check and set CLOCK YEAR 2012... -
Page 27: Charging The Built-In Battery
Charging the built-in battery The camera-recorder’s internal battery saves the date and time. “ ” appears on the viewfinder or the LCD monitor when the internal battery is running low on charge. Do the following to recharge it. Reset the date and time when fully recharged. Connect the AC adaptor. -
Page 28: Basic Operations Of Setup Menus
Basic operations of setup menus Use the setup menus to change the settings to Press SET on the Operation lever (or push suit the scenes you are shooting or what you are it in the ► direction) to display the items. recording. -
Page 29: Initializing The Menu Settings
Initializing the menu settings The menu settings contain both the user file settings and the scene file settings. You can initialize them separately. To initialize the user file (i.e. all the settings other than the scene file settings) Select INITIAL in USER FILE of the OTHER FUNCTIONS screen. The current menu settings of user file will return to the factory settings. To initialize the scene file From the 6 scene files, select the one you want to initialize with the scene dial. -
Page 30: Setup Menu Structure
Setup menu structure MAIN MENU SCENE FILE LOAD/SAVE/INIT (Page 132 of Vol. 2) FRAME RATE SYNC SCAN TYPE SYSTEM SETUP SYSTEM MODE (SYNCRO SCAN) REC SIGNAL DETAIL LEVEL (Page 135 of Vol. 2) REC FORMAT V DETAIL LEVEL CAMERA MODE DETAIL CORING SCAN REVERSE CHROMA LEVEL... - Page 31 DISPLAY SETUP EVF PEAK LEVEL (Page 147 of Vol. 2) EVF PEAK FREQ EVF SETTING EVF B. LIGHT CARD FUNCTIONS SCENE FILE EVF COLOR (Page 150 of Vol. 2) USER FILE EVF MODE SD CARD FORMAT ZEBRA1 DETECT ZEBRA2 DETECT ZEBRA2 OTHER FUNCTIONS USER FILE...
-
Page 32: Specifications
Specifications [GENERAL] [Camera-recorder] Pickup devices Supply DC 7.2 V 1/3-type progressive, 2.2-megapixel, 3MOS voltage (when the battery is used) sensor DC 7.9 V Effective pixels (when the AC adaptor is used) 1920 (H)×1080 (V) Power 17.5 W Lens consumption (when the LCD monitor and the Optical image stabilizer lens, 22x motorized AG-EC4G are used) zoom, F1.6 –... - Page 33 Shutter opening angle [Memory card recorder Unit] 3 degrees to 359.5 degrees in 0.5-degree Recording media increments P2 card Frame rates Recording Formats • 59.94 Hz mode: AVC-Intra 100/AVC-Intra 50/DVCPRO HD/ 1080p: DVCPRO50/DVCPRO/DV formats switchable 1/2/4/6/9/12/15/18/20/21/22/24/25/26/27/28/ Recording/Playback Time 30 fps (frames per second) 17 step AVC-Intra 100/DVCPRO HD: 720p: 8 GB×1 approx.
- Page 34 Specifications (continued) [Digital video Unit] [Digital audio Unit] Recorded video signals Audio Recording Signal 1080/59.94i, 1080/29.97p, 1080/29.97pN, AVC-Intra 100/AVC-Intra 50/DVCPRO HD: 1080/23.98p, 1080/23.98pA, 1080/23.98pN, 48 kHz/16 bits, 4CH 720/59.94p, 720/29.97p, 720/29.97pN, DVCPRO50: 720/23.98p, 720/23.98pN, 480/59.94i, 48 kHz/16 bits, 4CH 480/29.97p, 480/23.98p, 480/23.98pA, 1080/50i, DVCPRO/DV: 1080/25p, 1080/25pN, 720/50p, 720/25p, 48 kHz/16 bits, 2CH/4CH switchable 720/25pN, 576/50i, 576/25p Sampling Frequency [Input/Output Unit] AVC-Intra 100/DVCPRO HD: GENLOCK IN...
- Page 35 USB2.0 (DEVICE) [AC adaptor] Type-miniB, 4 pin USB compliant with USB ver. Power 100 V - 240 V AC, 50 Hz - 60 Hz Source: 0.55 A USB2.0 (HOST) Power 7.9 V DC, 2.53 A Type-A, 4 pin USB compliant with USB ver. 2.0 Output: LCD monitor: 3.45-type color LCD monitor with approx.
- Page 36 Information on Disposal in other Countries outside the European Union These symbols are only valid in the European Union. If you wish to discard this product, please contact your local authorities or dealer and ask for the correct method of disposal. Web Site: http://panasonic.net © Panasonic Corporation 2012...
Need help?
Do you have a question about the AG-HPX255P and is the answer not in the manual?
Questions and answers