THOMSON DPL930VD User Manual
Hide thumbs
Also See for DPL930VD:
- Owner's manual (4 pages) ,
- Troubleshooting tips (3 pages) ,
- User manual (21 pages)

Related Manuals for THOMSON DPL930VD


Summary of Contents for THOMSON DPL930VD
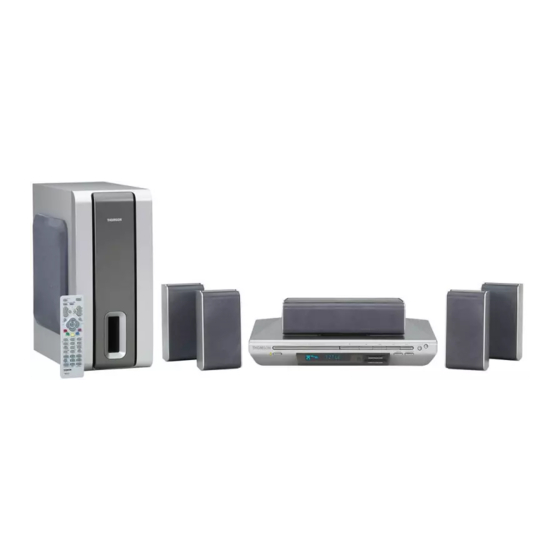
- Page 1 DPL930VD DPL2930 It is important to read this instruction book prior to using your new product for the first time. Downloaded From TheatreSystem-Manual.com Manuals...
-
Page 2: Safety Information
Safety Information Thomson Information ADVARSEL! USYNLIG LASERSTRÅLNING VED ÅBNING NAR SIKKERHEDSAFBRYDERE ER UDE AF FUNKTION. UNGDÅ UDSAETTELSE FOR STRÅLNING. CAUTION! VORSICHT! UNSICHTBARE LASERSTRALUNG WENN ABDECKUNG GEÖFFNET UND SICHERHEITS– Invisible laser radiation when open. Avoid exposure to VERRIEGELUNG ÜBERBRÜCKT. NICHT DEM LASERSTRAHL AUSSETZEN! beam. -
Page 3: Table Of Contents
Table of Content Safety Information CD / mp3 Player mp3 Recommendations ... . .30 Loading and Playing an Audio CD ..30 Getting Started Quick Scan ..... .31 Unpacking the DVD Receiver . -
Page 4: Getting Started
Getting Started Unpacking the DVD Receiver You should receive the following items: PHONES One pair of “AAA” batteries One DVD receiver unit SURROUND SUBWOOFER EQ. LEVEL one video cable (single wire) One Pig-Tail with yellow connectors antenna wire • one instruction book; One Remote Control •... -
Page 5: Inserting Batteries Into Remote Control
Getting Started Inserting Batteries into Remote Control Protect your Components from Overheating Insert two “AAA” batteries according to the + and - signs on the battery compartment. To use the remote control, • Do not block ventilation holes in any component. point it directly at your receiver. -
Page 6: Connecting To Audio-Visual Components
Getting Started Connecting to Audio-Visual Components It is recommended that you should only use one kind of video connection method listed below. VIDEO OUT SCART OPTICAL S-VIDEO Digital output Connect components capable of outputting CD/SAT Dolby Digital (e.g. SAT) or standard PCM (CD) format digital signals. -
Page 7: Connecting The Speakers
Getting Started Subwoofer (Wireless transmitter) Wireless receiver Purple / Grey striped POWER WIRELESS Green / Grey striped Right Left Center Speaker Front Speakers Rear Speakers (Surround) Connecting the Speakers Antenna and Speaker Speakers Wire Connection There are 6 speakers equipped with the unit (2 front, 1 cen- ter, 2 rear, 1 subwoofer). -
Page 8: Wireless Speaker Connection
Getting Started SIGNAL POWER Wireless speaker connection Changing the channel frequency To minimize interference from other 5.8 GHz systems (Cell Wireless signal transmitter phone, wireless LAN), you may select a different transmis- sion channel if you should experience interference. The The subwoofer comes with the unit is, at the same time, channel selector is located on the front panel of the sub- the wireless signal transmitter. -
Page 9: Positioning Your Speaker
Getting Started Positioning your speaker Alignment Align the center speaker evenly with (A), or slightly behind (B), the left and right speakers, but not ahead of them. 1 Left, Right (Front Speakers) They carry primarily music and sound effects. 2 Center In surround mode, the center speaker carries much of the dialogue as well as music and effects. -
Page 10: Preferred Surround Placement
Getting Started Preferred surround placement Advanced Setting Alternative Surround Placement Location If possible, place surround speakers to either side of the lis- Rear wall tening area, not behind it. If rear wall mounting is the only choice, aim the speakers at each other (A), towards the front (B) or even towards the sidewalls (C, D). -
Page 11: Test Tone / Channel Balance
Getting Started Test Tone / Channel balance Factory Setting The unit is preset to the following setting when you first Channel balance turn on the power. Your receiver is equipped with a test signal generator for Function = DVD/CD balancing the channels. As the signal "travels" from chan- Volume setting = 16 nel to channel, adjust the level controls until each channel Bass &... -
Page 12: Operating Your Receiver
Operating Your Receiver STANDBY/ON Receiver Controls 7. PRESET + / NEXT • To go to the next preset memory location in tuner mode. • To skip to the next track in CD mode and the next chapter in 1. ON / ECO DVD mode (only during playback). -
Page 13: Remote Control
• Press to select the television. 1. ON•OFF • To turn on or off the receiver. Functions in TV mode (available when using a THOMSON TV) 2. Source Buttons 3. PR+, PR- • To turn on and select various audio/video sources. (The button functions will •... -
Page 14: Display
Operating Your Receiver Display DVD / VCD / CD / mp3 STEREO • Unit in DVD, VCD, CD or mp3 mode. • Tuner stereo signal detected. D I G I TA L KHz / MHz • Audio output is in Dolby Digital mode. (For DVD only) •... -
Page 15: Switching On/Off
Operating Your Receiver Switching on /off Selection of Audio source • To switch on the receiver, press ON/ECO on the receiver When one of the audio source is selected, the audio input once to wake up from standby mode. Press one of the corresponding to the name will be activated. -
Page 16: Connection Of Audio Source
Operating your Receiver Connection of Audio source Note: 1. Your receiver has a built in tuner. Just You can connect up to 2 audio sources to this connect the appropriate antenna to the amplifier: back of the receiver and you will be able to listen to radio stations. -
Page 17: Advanced Sound Control
Advanced Sound Control Sound Enhancement Systems Dolby Digital The Dolby Digital mode lets you enjoy full digital This receiver is equipped with several built-in sound surround from software processed in the Dolby Digital for- enhancement systems. mat. Dolby Digital provides better sound quality and a Dolby Pro Logic II more powerful presence than conventional Dolby Surround. -
Page 18: Fine Setting Of Components
Advanced Sound Control Stereo Note: The Stereo mode uses the two main channel outputs from AUX 1 and AUX 2 are just generic names. the front speakers and subwoofer channel. You can connect other compatible audio components to these inputs like TAPE, Fine Setting of the Components MINI DISC, CD-RW player, etc. -
Page 19: Fine Setting Of The Speakers
Advanced Sound Control Fine Setting of the Speakers IMPORTANT NOTE All the basic settings have already been presetted for the speakers included in the box. • Always use the subwoofer for optimum sound quality. However, to make the surround sound more effective and suit the acoustic conditions in your listening room, you may Advanced Setting need to delay the signal coming from some of the speak-... -
Page 20: Speaker Icons
Advanced Sound Control Speaker Icons It is important to note, however, that not all Dolby Digital The receiver shows the speakers’ settings on the display sources are encoded with the full complement of five chan- with the following icons: nels plus subwoofer. Speaker icons show how many and which speaker you have enabled (See “Fine Setting of the Speakers”) and the letters inside the speaker icons show Front Speakers... -
Page 21: Dvd Player
DVD Player Basic Playback Features • Press STOP once to stop playback and go into resume mode. 1. To select the DVD/CD input source, press SOURCE on the main unit until "DVD/CD" appears on the display. You may also directly press DVD/CD on the remote. AUX 2 AUX 1 SAT - CABLE... -
Page 22: Slow Motion Playback (Dvd Only)
DVD Player Slow motion playback On-screen banner display 1. Press PLAY/PAUSE on the main unit or PAUSE on the You can access the on-screen banner display during play- remote control to freeze the picture during playback. back to select many playback features. Each feature is illus- trated with an icon. - Page 23 DVD Player 2. Press UP/DOWN to select the audio channel you want. Selecting a title 1. Open the title menu. 2. Enter a title number using the number keys on the remote control. You can also use UP/DOWN to change the title number.
- Page 24 DVD Player Selecting an camera angle Using bookmarks 1. Open the camera angle menu, or press ANGLE on the The bookmark feature allows you to mark a point on the remote. disc for quick access. You can store up to 12 bookmarks. 2.
- Page 25 DVD Player 4. Use the arrow buttons to highlight “Done” and then Play mode press OK. 1. Refer to page 20 “General use” to open the playmode menu, or press PLAYMODE directly. 2. Press UP/DOWN to select among : Standard > Program > Random > Title Repeat > Chapter Repeat >...
- Page 26 DVD Player Insert items to the playlist Delete items on the playlist 1. Select the program menu from the OSD banner to dis- 1. Select the program menu from the OSD banner to dis- play the program edit playlist. play the program edit playlist. 2.
-
Page 27: Setup Menu
DVD Player Set up menu Audio language General use This step will define the default audio language. Choosing an audio language from the on-screen banner display will 1. In STOP and RESUME mode, the set up menu will be dis- only overwrite this setting temporarily. - Page 28 DVD Player 2. Use UP/DOWN to select the language and then press OK Subtitle language to return to the main menu. This step will define the default subtitle language. Choosing a subtitle language from the on-screen banner display will only overwrite this setting temporarily. 1.
- Page 29 DVD Player Rating (Parental control) Unrated Titles This setting prevents the playback of DVDs that may not be When this function is enabled, the unit will require the user suitable for all audiences, by using the rating level that may to input password before viewing unrated DVD.
- Page 30 DVD Player Clear password Important: 1. Open the Parental Control menu Keep the password in a safe place or remember it reliably as access to rated 2. Use the number buttons to enter the password. discs or rating / password menus requires the correct password.
- Page 31 DVD Player TV aspect Dimmer level This step selects the TV aspect, wide-screen (16:9) or You can adjust the brightness level of the front display. conventional (4:3). 1. Open the Front Display menu. 1. Open the TV Image menu. 4 X3 Letterb ox Auto TV Image TV Image...
-
Page 32: Cd / Mp3 Player
CD / mp3 Player Loading and playing an audio CD mp3 recommendations 1. Press OPEN/CLOSE on the front panel to open the disc tray. Place the disc on the disc tray with the label side • Use .mp3 as the extension when converting facing up. -
Page 33: Quick Scan
CD / mp3 Player 4. Press PREV on the main unit or PR- on the remote to Quick scan return to the previous track. Press NEXT on the main unit or PR + on the remote to go to the next track. 1. -
Page 34: On-Screen Banner Display For Cd Playback
CD / mp3 Player On- screen banner display for CD playback Selecting a track 1. Refer to “General use” to open the track menu. Track Bookmark Time indicator Sleep Playmodes 2. Enter a track number. Start any single-digit track num- ber by a 0 (e.g. - Page 35 CD / mp3 Player Clearing bookmarks Bookmarks (Audio CDs Only) 1. Open the bookmark menu. The bookmark feature allows you to mark a point on the disc for quick access. 12 bookmarks can be selected. 2. Use the arrow keys to highlight the “Bookmark” option, then press OK to enter bookmark menu.
- Page 36 CD Player Cancel program Program playback Edit program Program will be cancelled when; 1. the disc tray is opened; 2. power is turned off. 1. In STOP mode, enter the OSD banner to display the edit playlist (program screen) Note: You can select a maximum of items 1 : --...
-
Page 37: On-Screen Display For Mp3 Playback
CD / mp3 Player On- screen display for mp3 playback Playmode selection for mp3 Standard Play 1. You can select your desired playmode in mp3 menu. File mode i. Standard - normal playback ii. Program - play your programmed tracks iii. - Page 38 mp3 Player Cancel program Program playback Program will be cancelled when; Edit program 1. the disc tray is opened; 2. power is turned off. 1. In STOP mode, enter the OSD banner to display the edit playlist (program screen) Note: You can select a maximum of 24 items 1 : -- 2 : --...
-
Page 39: Jpeg Cd
JPEG CD On- screen display for JPEG CD Attention: The unit only supports .JPG as a valid file extension File mode 1. In the JPEG mode window, use UP/DOWN to select a Slide show mode directory, and the OK button on the remote to enter differ- 1. -
Page 40: On-Screen Display For Divx
Div X On- screen display for Div X Selecting an audio language 1. Press INFO to open the audio menu. Your player is an Official DivX Certified™ product that Plays DivX ® 5, DivX ® 4, DivX ® 3, and DivX ® VOD video content, in compliance with DivX Certified™... -
Page 41: To Rent (Purchase) Divx Vod Files
DivX To rent (purchase) DivX VOD files Note: If you cannot play a DivX VOD file DivX VOD files are similar to DVD video rental discs.The dif- recorded on a CD-R disc after down- ference lies in the access to the media. DivX VOD files are loading it, the rental period allocated downloaded after paying a rental from certain commercial during purchasing from the web site may have... -
Page 42: Radio
Radio Operating the Radio Storing radio stations: The receiver has a built-in tuner that allows for FM radio The receiver can store up to 40 radio stations in memory. function. You can enter every single radio station yourself or the receiver can store all available radio stations automatically in an ascending order. - Page 43 Radio Manual preset Retrieving preset stations 1. Tune to a radio station (see "Manual tuning" for details) 1. Press SOURCE on the unit or TUNER on the remote control to enter the tuner mode. 2. Press MENU on the remote control. "PRESET" will appear on the display.
-
Page 44: Troubleshooting Tips
Troubleshooting Tips Power No audio from one channel. • Check the speaker level setting. No power ? • Check the speaker wire or cable connections. • Correctly connect the AC Power Cord to an AC Outlet. Remote control Power is switching off automatically ? •... - Page 45 Supported format - JPEG Dimensions (H x W x D mm) : Unit - 52 x 360 x 35 Front speaker (DPL930VD) - 156 x 80 x90 Front speaker (DPL2930) - 1000 x 220 x220 Rear speaker - 156 x 80 x90...
-
Page 46: Care And Maintenance
To clean the lens Thomson. you will need to purchase a disc lens cleaner which can maintain the output sound and visual quality of your system. - Page 47 Downloaded From TheatreSystem-Manual.com Manuals...
- Page 48 THOMSON 46, quai Alphonse Le Gallo 92648 Boulogne Cedex FRANCE www.thomson.net Downloaded From TheatreSystem-Manual.com Manuals 55938120...
Need help?
Do you have a question about the DPL930VD and is the answer not in the manual?
Questions and answers