Table of Contents
Advertisement
Advertisement
Table of Contents

Related Manuals for Blink HQ Charger

Summary of Contents for Blink HQ Charger
- Page 1 Instruction Manual Blink HQ Charger Charge on. a CarCharging Company...
-
Page 2: Table Of Contents
Disclaimer of Consequential Damages ..................5 correct the interference by one or more of the following Blink Network, LLC is not responsible for the use or appli measures: ................. 7 Installation cation by any person of the materials in this manual. -
Page 3: Important Instructions
Table 3-2. Tools & Parts Required for Installation ..............7 or safety standards. Table 4-1. Charging Status Indictors ..................13 • Blink is not responsible for physical injury, damage to property or equipment caused by the installation of this Table 4-2. Delay Timer Status Indicator ................14 device. -
Page 4: Introduction
The Blink Level 2 EVSE Charger specified in this document is designed for the U.S. market to charge plug-in • Do not use this product if the enclosure or the EV connector is broken, cracked, open, or shows any electric vehicles (PEVs) and battery electric vehicles (BEVs). -
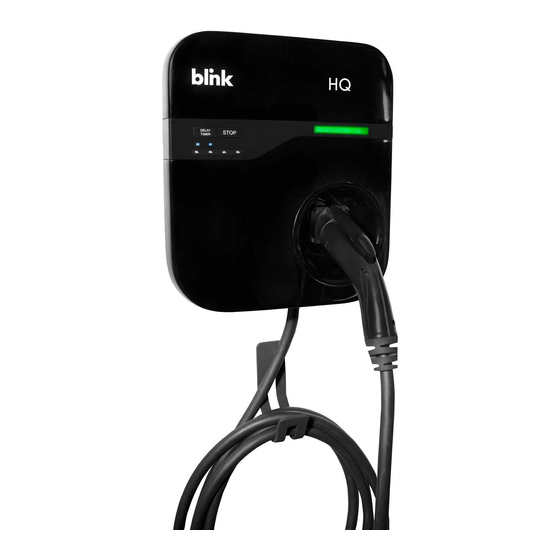
Page 5: Product View
Charge on. Charge on. 2 Specifications 1.1 Product View 2.1 Product Specifications Table 2-1. Product Specifications Model HQ Specification Input Rating 208-240 VAC, single phase, 30 A maximum, 60 Hz Connections & Wiring L1, L2, and Ground, hardwired w/ terminal block Power Input Standby Power <... -
Page 6: Installation
Dimension (W x H x D) The Blink Charger should be installed only by a licensed contractor, and/or a licensed electrician in accordance with all applicable state, local and national electrical codes and standards. -
Page 7: Install The Charger
Sheet Rock and Wood Stud Walls Figure 3-2. Prepare for Wiring Figure 3-1. Mounting Bracket 1. Connect the electrical wiring to the Blink Charger. 2. Secure the main body mounting bracket and the cable hanger bracket to the wall with appropriate bolts, as follows: a. -
Page 8: Figure 3-3. Wiring
Charge on. PE L2 L1 Figure 3-3. Wiring 4. Align the screw holes of the mounting bracket with the Blink charger holes. Figure 3-5. Mounting Bracket Screws Figure 3-4. Blink Charger and Mounting Bracket 5. Install and secure with three screws to the mounting bracket. -
Page 9: Operations
4.1.1 Power ON/OFF Switch There is an ON/OFF switch located on the side of the Blink Charger. If the Blink Charger is expected not to be used for a long period of time, turn OFF the Blink Charger. Turn ON the Blink Charger before use. -
Page 10: Delay Timer Indicator Flow
Charge on. 4.2 Delay Timer Indicator Flow 4.3 Charging an Electric Vehicle (EV) 1. Turn ON the Blink Charger power switch. Table 4-2. Delay Timer Status Indicator 2. Release the charging plug from the charger holster. FRONT PANEL DELAY TIMER... -
Page 11: Figure 4-3. Set The Delay Timer
Charge on. Charge on. Note: Refer to Table 4-2 for more information about the Delay Timer functionality. 5. Disconnect the charging plug from the EV or press the “STOP” button to stop charging before the charge is complete. 6. Reconnect the charging plug to start charging again. Refer to Step 2 of this Section. Figure 4-3. -
Page 12: Interrupt Charging
6. If the charge starts, contact Blink Customer Support 2. Press the STOP button on the front panel of the Blink Charger. The charging plug will need to be dis- 7. If the charge doesn’t start, contact EV Customer Service connected and reconnected to start charging again. -
Page 13: General Care
2. Unplug the charging connector Status indicator is in solid red 3. Turn the Blink HQ charger power OFF then back ON 4. If the situation persists, contact Customer support 1. Delay timer can only be set when the charger is in Standby state and the status indicator is solid green 2.
Need help?
Do you have a question about the HQ Charger and is the answer not in the manual?
Questions and answers