Advertisement
Quick Links
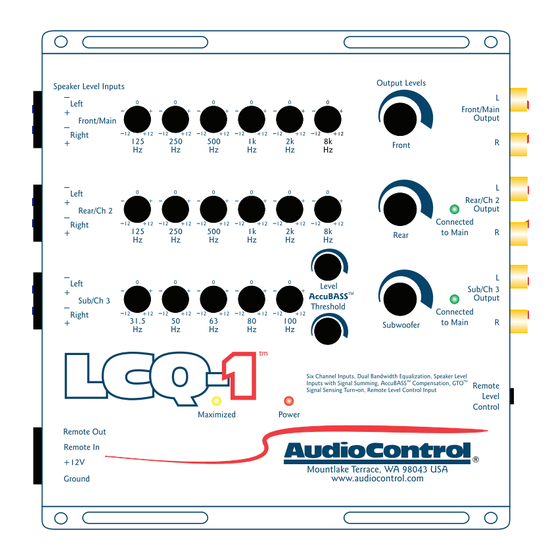
Six Channel Line Output Converter
with Multi-Channel Equalization and AccuBASS™
The LCQ-1 is your gateway to amazing sound from a factory head unit. It
is a compact, six-channel, high-performance, OEM
line output converter with independent multi-
channel equalizers to custom tune the system.
AudioControl's patent pending AccuBASS™
Key Features of The LCQ-1
Here are some of the cool things that your LCQ-1 does:
• Independent Front, Rear, and Subwoofer equalizers let you custom tune
your system
• AccuBASS™ bass compensation, so you can correct for the factory bass
roll off, Patent Pending
• GTO™ - signal-sensing inputs to turn the LCQ-1 on automatically
• Channel summing lets you eliminate any factory-installed active
crossovers
• Active speaker-level inputs accept high power factory amplifier outputs
• AutoMode Inputs turn 2 inputs into 3 outputs
• Compact size for quick, easy installation
• Input for optional ACR-2 remote mounted bass level control
• Bulletproof 5 year warranty (When installed by an authorized
AudioControl dealer)
Want to know more? See the "Awesome Information" section, page 8
...it's all there!
Making Good Sound Better
®
compensation corrects for the factory bass
roll-off present in many of today's cars.
In short; the LCQ-1 can make every car
sound amazing.
If you want even more, add the
optional dash mounted level control
(ACR-2) which allows control of the
subwoofer output. The ACR-2 will
also operate as an in/out switch for the
EQ section. Very handy addition!
®
®
Quick Install Guide
Since some of you will want to install your LCQ-1 on your own we offer a
few reminders in the following short section to speed up your installation of
the: You should also refer to diagrams on page 9 and 10 as guidelines.
Physically mount the LCQ-1 in a location that keeps it away from soda
spills, food crumbs, and curious fingers. Select a location that allows you ac-
cess to the top panel equalization controls.
The LCQ-1 needs to be installed in the signal path between your OEM
source unit (or factory amplifier) and after-market amplifier(s) and/or
processor(s). Do not connect the LCQ-1 between the factory head unit and
the factory amplifier. Locate the amplified speaker wires that are coming from
your factory source unit and/or amplifier and connect them to the speaker-level
inputs on your LCQ-1. In many cases you can find factory speaker leads in the
rear of the vehicle or at the factory amplifier that are easy to access.
Note: If your source unit has front, rear, and subwoofer speaker-level out-
puts, connect them to the three sets of inputs on your LCQ-1. If the source unit
only has front and rear outputs, the Auto Mode circuitry in your LCQ-1 auto-
matically routes the Channel 2 input channels to the (Channel 3) subwoofer
channels.
Use RCA connecting cables to connect the RCA outputs of the
LCQ-1 to your after market amplifier(s). If this is not obvious to you, quickly
pack up your LCQ-1 and run to your nearest authorized AudioControl dealer to
have them perform the installation. You will thank us later.
Connect +12 power, and ground. Note: The LCQ-1 has a 12-volt trigger
input but normally you will just let the GTO turn on circuit take care of that by
itself.
Connect your amplifier trigger input to the 12-volt trigger output of the LCQ-1.
Turn your amp gains fully down before turning on the system.
Turn on the system and level match your LCQ-1 to your source unit, signal
processor and amplifiers. For more help see our technical videos at
http://www.audiocontrol.com/t34/Mobile-Audio.html
Set your equalization controls so the system sounds amazing. See page 9
for more details.
If you have your authorized AudioControl dealer install your LCQ-1, we
will extend the normal one-year warranty to a full five years. AudioControl
products are, by nature, more technical than many others and we spend a good
deal of time training our dealers and installers so we know our products will
be installed correctly. We do this so you will get the best possible results from
your AudioControl purchases. For the best results this tuning should be done by
page 1
Advertisement

Related Manuals for AudioControl LCQ-1


Summary of Contents for AudioControl LCQ-1
- Page 1 Quick Install Guide Since some of you will want to install your LCQ-1 on your own we offer a few reminders in the following short section to speed up your installation of Six Channel Line Output Converter the: You should also refer to diagrams on page 9 and 10 as guidelines.
- Page 2 GTO™ jumper (see “Under the Covers” below) to not have a sub out, the LCQ-1’s AutoMode circuit will give you one) front rear need to be “Defeat”. This will prevent the car’s computer from turning the system on full range.
- Page 3 Pre-Amp Outputs: These are the RCA plugs on the output side and Channel Summed Indicators: Under the cover of your LCQ-1 are should be connected to the next component after the LCQ-1, such as a jumpers that will allow you to sum selected channels into the main (#1) crossover or amplifier.
- Page 4 We ship them in the Isolated position, which usually gives the best results. • On the LCQ-1, set the AccuBASS Level Control to 12:00 and set all the GTO™: Many cars can turn on the factory amplifier even if the source EQ controls to flat.
- Page 5 LED is plainly visible. front of the vehicle. The LCQ-1 lets you take all of those signals and sum Bracket Installation them together to get a high quality, full range, pre- amp signal.
- Page 6 Unlimited System Possibilities Serious Sound for Classic Rock, Bands, Music, or Jazz Serious Sound for High SPL Systems page 6...
-
Page 7: Equalization Adjustment
“flat” response (whatever the heck that is). At the end of the day, most people just 4. Although the plethora of knobs on your LCQ-1 can be intimidating, fear not as want their system to sound balanced and “just like it did in the store” or similar to they were designed to give enough control to maximize your systems performance their buddy’s car. - Page 8 All specifications are measured at 14.4 VDC (standard automotive Feeling lost? Here’s an internal “roadmap” to help you out. This simplified block diagram is a map of the paths your signals take inside the LCQ-1. With voltage). As technology advances, AudioControl reserves the right to continuously change our specifications, like our Pacific Northwest...
- Page 9 3. Your LCQ-1 must have originally been purchased from an authorized AudioControl dealer. You do not have to be the original owner, but you do need a copy of the original sales slip.
Need help?
Do you have a question about the LCQ-1 and is the answer not in the manual?
Questions and answers