Table of Contents
Advertisement
Quick Links
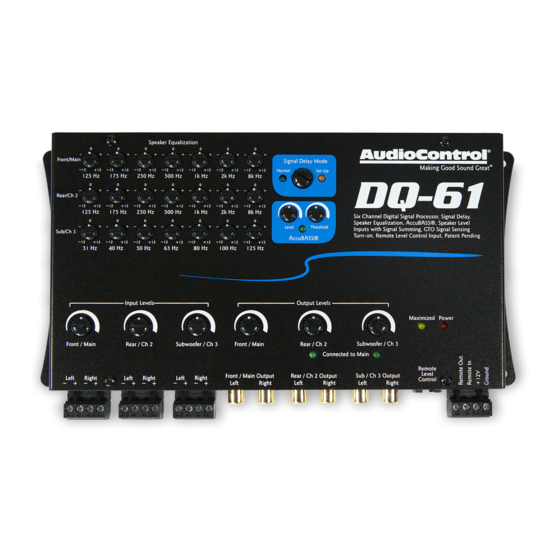
Six-Channel Line Output Converter with
Signal Delay, Equalization, and AccuBASS
for interfacing with factory installed audio systems
The DQ-61 is your gateway to amazing sound from a factory head unit.
It is a compact six channel, high-performance, line level converter with
independent multi-channel equalization and signal delay to custom
tune the system. AudioControl's patent pending AccuBASS
corrects for the factory bass roll-off present in so many of today's cars.
In short; the DQ-61 can make every car sound its very best.
Whether this is your first product from the rainforest dwellers of
AudioControl, or you are already a firm believer, you will definitely
enjoy how great the DQ-61 can make your performance system sound.
Making Good Sound Great
®
system
®
®
™
Advertisement
Table of Contents

Related Manuals for AudioControl DQ-61


Summary of Contents for AudioControl DQ-61
- Page 1 ® for interfacing with factory installed audio systems The DQ-61 is your gateway to amazing sound from a factory head unit. It is a compact six channel, high-performance, line level converter with independent multi-channel equalization and signal delay to custom tune the system.
- Page 2 Important Safety Instructions Read these instructions. Keep these instructions. Heed all warnings. Follow all instructions. Do not use this apparatus near water. Clean only with a dry cloth. Do not block any ventilation openings. Install in accordance with the manu- facturer’s instructions.
- Page 3 The lightning flash with arrowhead symbol within an equilateral trian- gle is intended to alert the user to the presence of uninsulated “danger- ous voltage” within the product’s enclosure, that may be of sufficient magnitude to constitute a risk of electric shock to persons. The exclamation point within an equilateral triangle is intended to alert the user of the presence of important operating and maintenance (ser- vicing) instructions in the literature accompanying the appliance.
- Page 4 • Discrete Input and Output level controls • GTO™ signal sensing inputs (selectable) to turn the DQ-61 on automatically and give you a 12 volt trigger to turn on your am- plifier • Bulletproof 5 year warranty (when installed by an authorized...
- Page 5 Note: If your source unit has front, rear, and subwoofer speaker-level outputs, connect them to the three sets of inputs on your DQ-61. If the source unit only has front and rear outputs, the Auto Mode circuitry in your DQ-61 automatically routes the Channel 2 input channels to the (Channel 3) subwoofer channels.
- Page 6 Connect +12 volt power, ground and turn-on wires as needed. Don’t forget the fuse! Note: The DQ-61 has a 12-volt trigger input but normally you will just let the GTO turn on circuit take care of that by itself. Connect your amplifier trigger input to the 12-volt trigger output of the DQ-61 Turn your amp gains fully down before turning on the system.
- Page 7 We do this so you will get the best possible results from your AudioControl components. To reinforce this point, if you have an Authorized AudioControl dealer install your DQ61, we will extend the normal one-year war- ranty to a full FIVE years parts and labor. Complete details of this warranty are listed at the end of this manual and on our website at www.audiocontrol.com.
- Page 8 ----------------------------------------------- 8 -----------------------------------------------...
- Page 9 DQ-61. If your source unit only has front and rear signals, the AutoMode circuitry of the DQ-61 will route the Channel 2 signals to the Channel 3 (subwoofer) outputs.
- Page 10 +12-volt trigger. Remote Out: This outputs 12 volts with 1 amp of current when the DQ-61 is powered up, so you can turn on external devices like signal processors and amplifiers with this wire.
- Page 11 15. Channel Summed Indicators: These green (like our grass) LED indicators let you know which channels are being summed into the main inputs. Under the cover of your DQ-61 are jumpers that will allow you to sum selected channels into the main and rear channels.
- Page 12 Under the Covers - Internal Jumpers You can optimize your DQ-61 using most of the controls mounted on the top of the chassis. However, we recognize there are situations where advanced users may have the need to configure the DQ-61 for specific applications.
- Page 13 Channel 2 Output. When the jumper is moved to the “SUM” position for a selected channel, the corresponding indicator LED on the front of the DQ-61 will turn green The shipped-from-the- factory setting is in the OFF or non-summed position.
- Page 14 -----------------------------------------------14 ----------------------------------------------...
- Page 15 -----------------------------------------------15 ----------------------------------------------...
- Page 16 -----------------------------------------------16 ----------------------------------------------...
- Page 17 After you have made all your power and ground connections, plug in all your inputs and outputs, turn the Signal Delay knob on the DQ-61 chassis all the way to the right to go into Set-Up mode. In this mode, the blue LED will blink on the ACR-3 dash remote.
- Page 18 Normal Mode (ACR-3 Dash Knob Controls the Sub Out) NORMAL LED ON ACR-3 Both LEDs ON • Signal Delay Engaged • Equalizer Engaged • AccuBASS® Engaged ACR-3 Blue LED Only • Signal Delay Disengaged • Equalizer Disengaged • AccuBASS® Disengaged Set-up Mode (Dash Knob controls the Signal Delay) SET-UP LED ON Blue LED Flashing, Red LED Solid • Signal Delay Adjustment Left to Right Blue LED Flashing, Red LED Off •...
- Page 19 Once you have everything where you want it you are done! Easy right? Now just go back to the Signal Delay knob on the DQ-61 and turn it counter clockwise back to Normal mode and you are ready to move to the next step of set-up.
- Page 20 There is no one curve that will satisfy every person, as we all have different tastes. The key is to use your DQ-61 to help balance your system from one frequency to the next and give your speakers the sparkle, sizzle, detail or punch that the acoustics of the car have compromised.
- Page 21 The key in this area is to have enough speakers and power to produce the amount of bass you desire but don’t use the controls on the DQ-61 to try and force your speakers to produce sounds they can’t. Too much bass boost creates a condition called “speakerus explodus”, which is not pretty.
- Page 22 Many autosound systems start a gradual decline in this area which is why speaker placement is very important. The DQ-61 only gives you a few controls in this area because too much boosting can really make a speaker sound unnatural.
- Page 23 An additional feature of the ACR-3 dash remote is that it allows the sig- nal processing of the DQ-61 (equalization, signal delay, and AccuBASS®) to be switched in and out of the audio circuit. That means that you can hear the system with and without the processing and hear the differ- ence that the tuning makes in the sound of your system.
- Page 24 DQ-61. With this diagram you can follow each input through the processor. If you do have an issue with the hook-up of your DQ-61 and need to call for technical assistance, please have this diagram available so we can help you trace the problem and get your system up and running and sounding as awesome as we know it can.
- Page 25 -----------------------------------------------25 ----------------------------------------------...
- Page 26 AccuBASS® circuit. After a quick and easy one-time setting, the AccuBASS® circuit takes over the bass just as the factory system rolls off. You get smooth, seamless, rock solid bass response regardless of volume. AudioControl’s patent pending AccuBASS® circuit, correcting for bass roll-off -----------------------------------------------26 ----------------------------------------------...
- Page 27 After you have hooked up the system and are playing music, play some tracks with good bass lines, and set the volume at low. On the DQ-61, set the AccuBASS® Level to 12:00 and set all the EQ controls to flat...
- Page 28 If you meet all of these conditions, we will warranty all materials and workmanship on the DQ-61 for one year from the date you bought it (five years if it is installed by an authorized United States AudioCon- trol dealer).
- Page 29 DQ-61 has been used improperly. Now that may sound like a big loophole, but here is all we mean by it. Unwarranted abuse is: (A) physical damage (don’t use the DQ-61 for a car jack); (B) im- proper connections (120 volts into the power jack can fry the poor thing);...
- Page 30 DQ-61 SPECIFICATIONS All specifications are measured at 14.4 VDC (standard automotive voltage.) As technology advances, AudioControl reserves the right to continuously change our specifications, in our never-ceasing quest for audio righteousness. Maximum speaker-level input .......400 watts per channel Maximum output level ............... 7.5 Vrms Output gain .................+/-12 dB...
- Page 31 AudioControl, Making Good Sound Great and DQ-61 are all trademarks of AudioControl Inc. This manual was conceived, designed, and written on a cold and windy day in the Pacific Northwest which is what the locals from Seattle call “spring.” -----------------------------------------------31 ----------------------------------------------...
- Page 32 ® Making Good Sound Great ™ 22410 70 Ave West Mountlake Terrace, WA 98043 USA Phone 425-775-8461 • www.audiocontrol.com P/N 913-121-0 Rev B...
Need help?
Do you have a question about the DQ-61 and is the answer not in the manual?
Questions and answers