DeWalt DWE4012 Instruction Manual
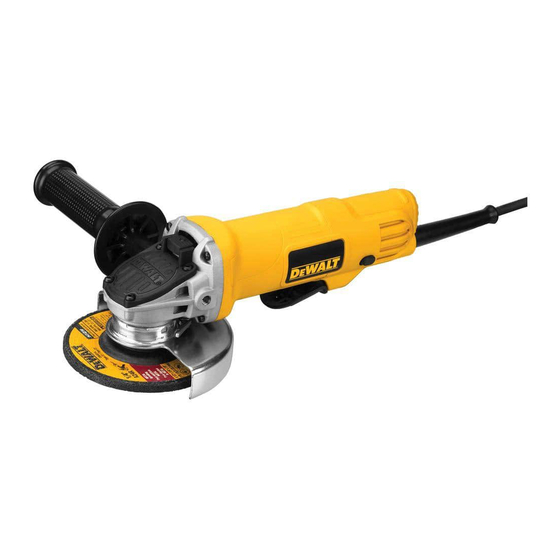
Small angle grinder
Hide thumbs
Also See for DWE4012:
- Instruction manual (68 pages) ,
- Instructions manual (65 pages) ,
- Instruction manual (45 pages)
Table of Contents
Advertisement
1-800-4-D
INSTRUCTION MANUAL
GUIDE D'UTILISATION
MANUAL DE INSTRUCCIONES
DWE4012
Small Angle Grinder
Petite meuleuse angulaire
Esmeriladora angular pequeña
If you have questions or comments, contact us.
Pour toute question ou tout commentaire, nous contacter.
Si tiene dudas o comentarios, contáctenos.
WALT • www.dewalt.com
E
INSTRUCTIVO DE OPERACIÓN, CENTROS DE SERVICIO Y PÓLIZA DE
GARANTÍA. ADVERTENCIA: LÉASE ESTE INSTRUCTIVO ANTES DE
USAR EL PRODUCTO.
Advertisement
Table of Contents

Related Manuals for DeWalt DWE4012


Summary of Contents for DeWalt DWE4012
- Page 1 If you have questions or comments, contact us. Pour toute question ou tout commentaire, nous contacter. Si tiene dudas o comentarios, contáctenos. 1-800-4-D WALT • www.dewalt.com INSTRUCTION MANUAL INSTRUCTIVO DE OPERACIÓN, CENTROS DE SERVICIO Y PÓLIZA DE GARANTÍA. ADVERTENCIA: LÉASE ESTE INSTRUCTIVO ANTES DE GUIDE D’UTILISATION...
-
Page 2: Save All Warnings And Instructions For Future Reference
1) WORK AREA SAFETY Defi nitions: Safety Guidelines a) Keep work area clean and well lit. Cluttered or dark areas invite accidents. The definitions below describe the level of severity for each b) Do not operate power tools in explosive atmospheres, signal word. - Page 3 3) PERSONAL SAFETY 4) POWER TOOL USE AND CARE a) Do not force the power tool. Use the correct power tool a) Stay alert, watch what you are doing and use common for your application. The correct power tool will do the job sense when operating a power tool.
-
Page 4: Safety Instructions For All Operations
SAFETY INSTRUCTIONS FOR f) Do not use a damaged accessory. Before each use inspect the accessory such as abrasive wheels for chips ALL OPERATIONS and cracks, backing pad for cracks, tear or excess wear, Safety Warnings Common for Grinding, wire brush for loose or cracked wires. If power tool or accessory is dropped, inspect for damage or install an Sanding, Wire Brushing, Polishing or undamaged accessory. -
Page 5: Kickback And Related Warnings
j) Position the cord clear of the spinning accessory. If you For example, if an abrasive wheel is snagged or pinched by the lose control, the cord may be cut or snagged and your hand or workpiece, the edge of the wheel that is entering into the pinch point can dig into the surface of the material causing the wheel arm may be pulled into the spinning accessory. -
Page 6: Safety Warnings Specifi C For Grinding And Abrasive Cutting-Off Operations
Safety Warnings Specifi c for Grinding and Additional Safety Warnings Specifi c for Abrasive Cutting-Off Operations Abrasive Cutting-Off Operations a) Use only wheel types that are recommended for your a) Do not “jam” the cut-off wheel or apply excessive power tool and the specific guard designed for the pressure. -
Page 7: Safety Warnings Specifi C For Sanding Operations
Safety Warnings Specifi c for Sanding Additional Safety Rules for Grinders Operations WARNING: The grinding wheel or accessory may loosen during coast-down of the tool when shut off. If grinding wheel or a) Do not use excessively oversized sanding disc paper. accessory loosens, it may dismount from the machine and may Follow manufacturers recommendations, when selecting cause serious personal injury. - Page 8 16 gauge has more capacity than 18 gauge. An undersized cord • crystalline silica from bricks and cement and other masonry will cause a drop in line voltage resulting in loss of power and products, and overheating. When using more than one extension to make up the •...
-
Page 9: Intended Use
…/min ... per minute n ......rated speed FIG. 1 BPM ..... beats per minute .....earthing IPM ....impacts per minute terminal RPM ..... revolutions per .....safety alert minute symbol sfpm ..... surface feet per minute SAVE THESE INSTRUCTIONS FOR FUTURE USE Motor Be sure your power supply agrees with the nameplate marking. -
Page 10: Accessories And Attachments
FIG. 2 ATTACHING SIDE HANDLE (FIG. 2) 4-1/2" (114.3 mm) Grinding Wheels The side handle (C) can be fitted to either side of the gear case in the threaded holes, as shown. Before using the tool, check that the handle is tightened se cure ly. - Page 11 4-1/2" (114.3 mm) Cutting Wheels Sanding Discs 4-1/2" (114.3 mm) Sanding Flap Discs rubber backing pad Type 1 guard Type 27 guard Type 27 guard Type 1 guard sanding disc backing flange backing flange backing flange hubbed sanding flap disc threaded clamp nut diamond cutting wheel abrasive cutting wheel...
-
Page 12: Operation
authorized service center. Grinding and cutting with wheels other than 6. To remove the guard, follow steps 1–3 of these instructions in Type 27 and 29 require different accessory guards not included with reverse. tool. A Type 27 guard is provided for use with the Type 27 wheel. NOTE: Edge grinding and cutting can be performed with Type 27 Mounting instructions for accessory guards are shown below and are wheels designed and specified for this purpose;... - Page 13 NOTE: To reduce unexpected tool movement, do not switch the SPINDLE LOCK (FIG. 7) tool on or off while under load conditions. Allow the grinder to run The spindle lock button (A) is provided to FIG. 7 up to full speed before touching the work surface. Lift the tool from prevent the spindle from rotating when the surface before turning the tool off.
- Page 14 MOUNTING NON-HUBBED WHEELS (FIG. 8, 9) NOTE: If the wheel spins after the clamp nut is tightened, check the Depressed center Type 27 grinding wheels must be used with orientation of the threaded clamp nut. If a thin wheel is installed with included flanges.
- Page 15 2. Apply minimum pressure to the work 4. Continuously move the tool in a forward and back motion to FIG. 11 surface, allowing the tool to operate at avoid creating gouges in the work surface. high speed. Grinding rate is greatest 5.
- Page 16 Coarse 16 – 30 grit CAUTION: Wheel or brush must not touch guard when mounted or while in use. Undetectable damage could occur to the accessory, Medium 36 – 80 grit causing wires to fragment from accessory wheel or cup. Fine Finishing 100 –...
-
Page 17: Maintenance
6. Remove the tool from the work surface before turning the tool off. USING CUTTING WHEELS (FIG. 17) Allow the tool to stop rotating before setting it down. WARNING: Do not use edge grinding/cutting wheels for surface CAUTION: Use extra care when working over an edge, as a grinding applications because these wheels are not designed for side sudden sharp movement of grinder may be experienced. - Page 18 Recommended accessories for use with your tool are available at abuse. For further detail of warranty coverage and warranty repair extra cost from your local dealer or authorized service center. If you information, visit www.dewalt.com or call 1-800-4-D WALT (1-800- need assistance in locating any accessory, please contact D WALT 433-9258).
- Page 19 FREE WARNING LABEL REPLACEMENT: If your warning labels become illegible or are missing, call 1-800-4-D WALT (1-800-433- 9258) for a free replacement.
Need help?
Do you have a question about the DWE4012 and is the answer not in the manual?
Questions and answers