
Related Manuals for Friedman BE-100


Summary of Contents for Friedman BE-100
- Page 1 BE-100 INSTRUCTION MANUAL...
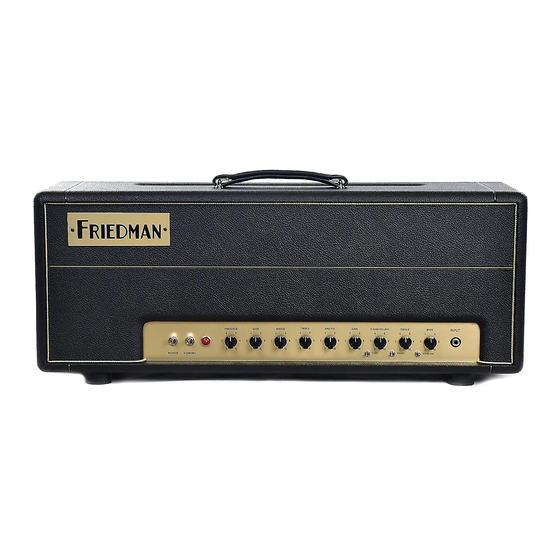
- Page 2 Congratulations on purchasing this incredible Incredibly versatile multi‐channel amp. new guitar amplifier designed by one of the 100‐Watt EL34 Power Tubes. most well known amp modders and designers Five 12AX7 Preamp Tubes in the LA Music scene for the past 20 years, Dirty Channel has Vol, Gain, Treble, Dave Friedman. Middle, Bass. Dave Friedman has been designing and Clean Channel has Vol, Treble, Bass building guitar rigs for the stars since the early and 3 position Bright Switch. nineties. After many years of modding Global Presence Control amplifiers and consulting for other well‐ Series Effects Loop with Return Level known amplifier companies, Dave has finally on rear. brought his talent to a new line of production Custom Transformers and Capacitors amps under his name, Friedman BE100 Voicing Switches include: Fat, Amplification. C45, Sat and front panel voice switch. Line Out with Level Control on rear ...
- Page 3 INSTRUCTIONS 4. Follow Instructions – All operating and use instructions should be followed. Please keep this instruction manual for future 5. Water and Moisture – The amplifier should reference and for the duration of owning this not be used near water – for example, a Friedman Amplifier. Please carefully read and bathtub, washbowl, kitchen sink, laundry tub, understand the instructions inside this user’s wet basement, or near a swimming pool, and manual before attempting to operate your the like. new amp. This instruction manual includes 6. Carts and Stands – The amplifier should be essential safety information regarding the use used only with a cart or stand that is and maintenance of the amplifier. Take recommended by the manufacturer. special care to heed all warning symbols and An amplifier and cart combination should be signs inside this manual and those printed on moved with care. Quick stops, excessive force, the amplifier itself. and uneven surfaces may cause the amplifier and cart combination to overturn. 7. Wall or Ceiling Mounting – The product should never be mounted to a wall or ceiling. WARNING! 8. Heat – Amplifier should be situated away TO PREVENT FIRE OR SHOCK HAZARD, DO from heat sources such as radiators, heat NOT EXPOSE THE AMPLIFIER TO WATER OR registers, stoves, or other amplifier (including MOISTURE. DO NOT OPERATE NEAR ANY amplifiers) that produce heat. ...
- Page 4 slightly damp with water. Avoid getting water tripod, bracket, or table recommended by the inside the amplifier. manufacturer, or sold with the product. 14. Non‐use Periods – The power cord of the 21. Lightning – For added protection for this amplifier should be unplugged from the outlet product before a lightning storm, or when it is when left unused for a long period of time. left unattended and unused for long periods 15. Object and Liquid Entry of time, unplug it from the wall outlet. This – Care should be taken so that objects do not will prevent damage to the product due to fall and liquids are not spilled into the lightning and power line surges. enclosure through openings. 22. Replacement Parts – When replacement 16. Damage Requiring Service parts are required, be sure the service – The amplifier should be serviced by qualified technician has used replacement parts service personnel when: specified by the manufacturer or have the A. The power‐supply cord or the plug has same characteristics as the original part. been damaged; or Unauthorized substitutions may result in fire, B. Objects have fallen, or liquid has been electric shock, or other hazards. spilled into the amplifier; or 23. Safety Check – Upon completion of any C. The amplifier has been exposed to rain; or service or repairs to this product, ask the D. The amplifier does not appear to operate service technician to perform safety checks to normally or exhibits a marked change in determine that the product is in proper performance; or operating condition. E. The amplifier has been dropped, or the ...
- Page 5 POWER SWITCH: Turn this ON for about one minute before taking the amp out of Standby for maximum tube life. ALWAYS MAKE SURE THERE IS A SPEAKER LOAD CONNECTED TO YOUR AMP BEFORE TURNING ON. STANDBY SWITCH: Wait about a minute before placing this switch in the ON position. This will put your amp into PLAY mode. POWER INDICATOR LAMP: This is a gentle reminder that your amp is powered up. PRESENCE CONTROL: Adjusts the upper mids and highs in the power amp section. Global on all channels. Start at about 4‐5 and adjust to taste. Note: This pot will sound scratchy when adjusted – this is normal. BASS CONTROL: This adds or takes away bass or bottom end. As the amp gets louder you may want to back this off a bit. Start at 7‐10 for bedroom volumes. MIDDLE CONTROL : Adds or takes away midrange. Start at 5 or 6, lower settings will scoop the mids, higher levels will allow your audience to actually hear the guitar in the mix. TREBLE CONTROL: This adds or takes away treble. Start at 5 and adjust to taste. MASTER CONTROL: This is the BE/HBE VOLUME. The more you turn it up the louder it gets. If the FX loop is engaged this becomes the amp’s SEND level and should set at around 5 for optimum loop performance. With the FX loop engaged the RETURN LEVEL on the rear of the BE100 would now control the amp’s overall volume. GAIN CONTROL: This adds gain/distortion. Adjust to taste. Don’t be afraid. CLEAN VOLUME: Adjusts the clean channel’s volume. BRIGHT SWITCH: 3 position switch that varies the overall brightness of the Clean Channel ONLY. TREBLE CONTROL: Adjusts the treble on the clean channel. Start at 5 and adjust to taste. BASS CONTROL: Adjusts the bass on the clean channel. Start at 5 and adjust to taste. VOICE SWITCH: This is a subtle yet effective tonal variance for the BE/HBE channel. Left position is slightly darker with more mids, right position is slightly brighter with a bigger bass. CHANNEL SELECTOR SWITCH: Switches between Clean. BE, HBE channels when Footwitch is not ...
- Page 6 FAT SWITCH: Like it says, makes the BE100 sound fatter. Great for single coil pickups. C45 SWITCH: This is a custom‐voicing switch for the BE/HBE channel. Turn it on, if you like leave it on. It’s kinda cool. SAT SWITCH: Primarily designed to be used in the BE or C45 mode to add gain, compression and saturation. It is normal for the volume level to drop with this switch engaged. Compensate with the amp’s Master volume. ...
- Page 7 Defective products must be shipped, PROOF OF PURCHASE TO USE YOUR WARRANTY. This warranty does not cover service or parts to together with proof of purchase, freight repair damage caused by accident, neglect, abuse, pre‐paid and insured to the Authorized normal wear, disaster, misuse, abuse, over‐ Friedman Service Center or directly to powering, negligence, inadequate packing or Friedman. If a product must be returned to Friedman shipping procedures and service, repair or any modifications to the product which have not been for warranty replacement/repair, a Return authorized or approved by Friedman in writing. Authorization Number must be obtained ANY MODIFICATION TO THE AMPLIFIER WILL from our Customer Service Department VOID YOUR WARRANTY. If this product is prior to shipping the product. Please contact Friedman Customer Service defective in materials or workmanship as warranted above, your sole remedy shall be repair Department for the Authorized Friedman or replacement by Friedman as provided below. Service Center nearest you. Products must be shipped in their original ...
- Page 8 818‐505‐0391 – Monday – Friday 9AM‐4PM option of repairing or replacing the product at no (Pacific Standard Time) additional charge, except as set forth below. All replaced parts become a property of Thank you again for choosing Friedman and we Friedman. Products replaced or repaired look forward to a long relationship! under this warranty will be returned via ground shipping within the United States or Canada ‐ freight prepaid. Friedman is not responsible for costs associated with expedited shipping, either to Friedman or the return of the product to the customer. All warranty repairs outside the United States and Canada must be directed to the dealer or distributor from which you purchased the product. ...
Need help?
Do you have a question about the BE-100 and is the answer not in the manual?
Questions and answers