Table of Contents
Advertisement
Quick Links
Special features:
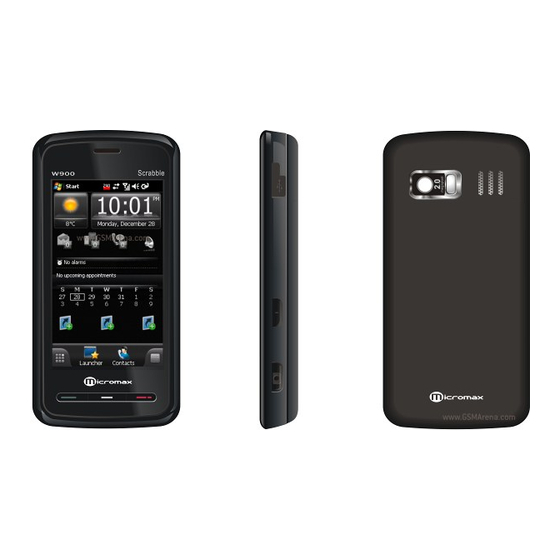
2.0 mega pixel CMOS camera
Windows Mobile 6.1
Pocket MSN
Windows Media Player
Bluetooth
ActiveSync
GPS with integrated MAPS
FM Radio
Declaration
Certain functions referred in this document may be network services and
require support by your network operator or service provider. Please
check with your network operator or service provider for more details.
For your safety, please read "For your safety" and "Safety information"
in this document before you use this device.
Symbols that may occur in this document are defined as below:
< > stands for soft keys and buttons; " " stands for display information on
phone screen;[ ]stands for menus.
Disclaimer: Micromax will not bear any responsibility for any
incompliance with the guidelines mentioned in this manual; or improper
use of the mobile phone. Our company keeps the right to make
modifications to any of the content here in this user guide without public
announcement in advance. The content of this manual may vary from the
actual content displayed in the mobile phone. In such a case, the latter
shall govern.
T-Flash card compatible
Touch screen with handwriting
recognition
3.2-inch 65K color display
E-mail
Wi-Fi
-I-
Advertisement
Table of Contents

Related Manuals for Micromax W900


Summary of Contents for Micromax W900
- Page 1 < > stands for soft keys and buttons; “ “ stands for display information on phone screen;[ ]stands for menus. Disclaimer: Micromax will not bear any responsibility for any incompliance with the guidelines mentioned in this manual; or improper use of the mobile phone. Our company keeps the right to make modifications to any of the content here in this user guide without public announcement in advance.
-
Page 2: Table Of Contents
Contents YOUR DEVICE GETTING STARTED CALL FUNCTIONS CALL HISTORY ENTERING TEXT SETTINGS MESSAGING TAKE YOUR OFFICE WITH YOUR SMART PHONE SYNC YOUR DEVICE BROWSE THE WEB ENTERTAINMENT FILE EXPLORER USE A T-FLASH CARD MANAGE PROGRAMS AND MEMORY ON YOUR SMART PHONE CARE AND MAINTENANCE TROUBLESHOOTING... -
Page 3: Safety Information
SAFETY INFORMATION For your safety Read these simple guidelines before using the device. Not following them may be dangerous or illegal. Refer to “Safety information”. ROAD SAFETY COMES FIRST SWITCH OFF IN AIRCRAFT Obey all local laws. Always Follow restrictions. keep your hands free to Wireless devices can cause operate the vehicle while... - Page 4 important information. of the device such as a memory card where children may access them. EMERGENCY CALLS Ensure the phone function of the device is switched on and in service. Enter the emergency number, then press the Talk key. Give your location. Do not end the call without permission.
-
Page 5: Your Device
Your Device Keys and parts Planform view Earphone hole Side view port Volume Power Camera... - Page 6 Front view Receiver Talk key End key MicroPhone Rear view...
- Page 7 Camera Speaker...
- Page 8 Function Volume key 1. Press the up key or the down key to adjust the volume; 2. When the phone rings for an incoming call, press the up key or the down key to mute the ringer. Talk key Press to answer an incoming call or dial a call. Power 1.
- Page 9 Name Function Start Tap here to pop up the Start menu. Time and date Tap here to change the time and date, or set an alarm. Program section Tap a section to open the program that is associated with that section. Device Tap here to lock the device.
- Page 10 customize the [ Today ] screen, including the background picture. Status icons The following table lists common status indicators that may appear at the top and bottom of the phone screen, and on the [Today] screen. If you are not sure about what an icon exactly means, tap the icon to pop up a message box that gives detailed description about the icon and enables you to change settings.
- Page 11 New MSN instant message. Multiple notifications. No connection. Synchronizing. ActiveSync connected. GPRS available GPRS connection is active. Invalid or missing SIM card. Battery charging. Battery level. You can tap this icon to view how much power is left and to set the idle time while [On battery power]or [On external power].
-
Page 12: Getting Started
(4) Push the SIM card into the slot. Using a T-Flash card Your W900 phone is compatible with a T-Flash card. A T-Flash card expands the phone’s memory capacity and thus allows you to backup or save more files and data. - Page 13 (2) Remove the back cover and battery. (3) Position the battery so the gold colored contacts match up with those on the device. Insert the battery, contact end first into the slot. Snap the other end of the battery into place. Slide the battery cover towards the top of the phone to lock the cover into place.
- Page 14 is low. Switch on/off your device Switch on/off When the device is off, press and hold the power button to switch it on. Note that it may take a few seconds for the device to operate after it’s switched When the device is on, press and hold power button, and switch it off. If the device is locked, unlock it first.
- Page 15 and select [Wireless Manager]to switch off the phone strength indicator function. 2. Your phone has a built-in antenna. Do not touch the antenna unnecessarily when the phone is switched on; otherwise, it may affect call quality and may cause the phone to operate at a higher power level than otherwise needed.
- Page 16 Warning: Make sure to switch off the phone function when wireless phone use is prohibited Aligning the screen When switching on the device for the first time after purchase, follow the instructions on the phone screen to make some basic settings. Aligning the touch screen To align the touch screen, just tap the center of the + symbol wherever it moves until it disappears automatically.
- Page 17 the + symbol. Screen orientation Your phone allows you to change the screen orientation as needed. Tap[Start→Settings→System→Screen]. On the[General]tab, tap the screen orientation you want. You can switch between[Portrait]and [Landscape]. To view more content or increase the readability in some programs that allow text size adjustment, you can tap the[Text size]tab to increase or decrease the font size.
- Page 18 Programs Tap [Start→Programs]to view all programs available with your phone. SPB Mobile Shell introduces the next generation of a user interface while keeping all the advantages of Windows. You will be able- while only using one hand- to get information, launch programs, make calls and navigate your device in a simple and flexible manner.
- Page 19 SPB Home has two components: Professional Home (disabled by default) and Lifestyle Home. Switching between them can be done using any of the following ways: From the Menu button . From the Tabs button that shows you all of SPB Mobile Shell tabs in the selected views style (carousel or tiles).
- Page 20 highlighted with the number of new emails you have in your inbox. You can open your Inbox to read new emails with just a tap, or with a few key presses. Note: The voice mail may not work due to your service provider. Some providers notify only by SMS about unread voicemails.
- Page 21 Launcher Tab The Launcher tab adds a fast and convenient way to navigate through your device. All of the pages are kinetic scrolling supported. Launcher tab has two main pages: Launcher and SPB Menu. The Launcher shows you the Pinned shortcuts, recently used programs, and finger friendly task manager.
- Page 22 The Contacts tab helps you to manage your contacts and calls using many useful features such as call history, photo speed dial, smart contact search, drag-and-drop to edit your favorite layout, kinetic scrolling, easy assigning and cropping of contact picture, set a unique ringtone for each of your favorite contacts, and more.
- Page 23 [Device Lock]. Protect your device with a password You can enable a password to prevent unauthorized access to your device. (1) Tap[Start→Settings→Personal→Lock]. (2) Select the[Prompt if device unused for…]check box. (3) In the box to the right select the time period you want. (4) In the [Password type] box, select the type of password you want to use.
-
Page 24: Call Functions
Call Functions Your phone keeps call records and allows you to take notes or record the conversation when you are on a call. Access the phone function Press button to enter the [Phone] screen as below: Use the PIN code In general, a PIN code is supplied with the SIM card when you purchase. - Page 25 You can make a call by using the keypad, the Contacts, speed dial or call history. Use the keypad (8) On the [Today] screen, tap <Phone> to enter the [Phone] screen. (9) Enter your desired phone number by tapping the keypad, and then or simply press button to dial.
- Page 26 (16) Tap the up/down arrows in[Location]box to select an available speed dial number. Then tap <ok> button to save. Note that number 1 is reserved for Voice Mail. On the Phone keypad, tap and hold the speed dial number assigned to the contact you want to call for 1-3 seconds.
- Page 27 (17) On the Phone keypad, tap and hold button until a Plus symbol (+) appears. (18) Enter the country code, area code and phone number. (19) Tap button to dial. Enter voice mail phone number The speed dial number 1 is reserved for[Voice Mail]. On the Phone keypad, tap[Speed dial→Voicemail].
- Page 28 forwarded to another phone number or sent to your voice mail, depending on your settings. When you receive a phone call with earphone connected to your phone, you can press and hold the <Talk> key on the earphone to ignore the phone call. End a call While on a call, you can press button or tap...
- Page 29 (24) While on a call, tap the <Note> button at the bottom of the screen. (25) Enter your note and tap <ok> button to save. Access a note: In the [Call history] list, tap and hold the name or number for your desired phone call entry containing the note, and select [View note] in the pull-down menu to read the note.
-
Page 30: Call History
Call History Your phone keeps records of your missed, outgoing and incoming calls. For [Call history] to work properly, your service provider must support caller ID and it must be enabled, your calls cannot be blocked, and your phone must be on and within the service ara. Call history On the [Today] screen, tap <Phone>... - Page 31 Tap <Reset> to reset the [Recent calls] counter.
-
Page 32: Entering Text
Entering Text Input screen Change the text input method On the input screen, tap the input selector arrow ▲ at the bottom center of the screen to bring up options of text input methods. You can use the on-screen keyboard or a handwriting recognition feature such as Block Recognizer, Letter Recognizer, and Transciber to enter text. - Page 33 From a program, tap the input selector arrow and then tap [Block Recognizer]. Write characters, numbers, and symbols in the designated writing area. Enter letters by writing in the abc (left) area of the box. Enter numbers by writing in the 123 (right) area of the box. ...
- Page 34 Use Letter Recognizer With Letter Recognizer, you can write individual letters, numbers, and punctuation and have them converted into typed text. From a program, tap the input selector arrow and then tap [Letter Recognizer]. Write characters, numbers, and symbols in the designated writing area.
- Page 35 Use Transcriber This input method allows you to write in cursive, print or mixed (consisting of both cursive and print). Your phone recognizes and converts your writing into typed text.
-
Page 36: Settings
Settings You can customize your phone’s settings to suit your preferences. Personal Tap [Start→Settings→Personal] to access the following settings options. Owner information (29) Tap[Start→Settings→Personal→Owner information]. On the[Identification]tab, enter your personal information. On the [ Notes] tab, enter additional information that you want the phone to display each time you switch it on. - Page 37 to use. (33) In [Type], select the file type of the picture. (34) Tap the file name of the picture you want to use. (35) To share a theme with your friends, tap the theme, and then tap <Beam>. Items to be displayed: (36) Tap[Start→Settings→Personal→Today].
- Page 38 On the [ Program buttons ] tab, you can reassign programs or shortcuts to program buttons. Program Buttons: (41) Tap [ Start→Settings→Personal→Buttons→Program buttons] . A list of buttons and their current assignments is displayed. (42) Tap the button you want to reassign. In the[Assign a program]box, tap the program or shortcut you want to assign.
- Page 39 (45) Tap[Start→Settings→Personal→Phone]. (46) On the[Services]tab, tap [Call barring] and tap [Get settings…]. (47) Select the type of incoming and/or outgoing calls you want to block. Caller ID (48) Tap[Start→Settings→Personal→Phone]. (49) On the[Services]tab, tap[Caller ID]and tap [Get settings…]. (50) Tap [Everyone] to show your identity to all people when you are calling them.
- Page 40 appropriate box. Fixed dialing Fixed dialing is a network service that you can use to restrict your phone to dial only the phone number(s) or area code(s) that you specify in a fixed dialing list. When you try to make calls to any other numbers (emergency numbers excluded), your phone tells “Phone call prohibited!”...
- Page 41 (1) Tap[Start→Settings→Personal→Phone→Network]. (2) Tap [Set networks] and follow the instructions on the screen. Manually select a network There may be times when you want to manually select a different wireless network to use. Tap[Start→Settings→Personal→Phone→Network]. Under [Network selection], tap [Manual] and select the network you want to use.
- Page 42 Tap[Start→Settings→Personal→Lock. On the [Password] tab, (75) Select the [Prompt if device unused for] check box and select your desired time period. Your phone asks for a password after being left inactive for the specific amount of time. (76) Under [Password type] selector, select the type of password you would like to use.
- Page 43 Memory Tap [ Start→Settings→System→Memory ] . On the [Main] tab, the amount of memory allocated to file and data storage versus program storage is displayed, as well as the amount of memory in use versus the available memory. On the [Storage card] tab, you can see how much memory is ...
- Page 44 Note: Clean Boot operation clears all data saved in the phone and all customized settings you made. The phone automatically restarts after Clean Boot. To avoid data loss, backup copies of important data before cleanup. Clock and alarms Tap [ Start→Settings→System→Clock and alarms ] . On the [Time] tab, you can view or change the time and date in your home country or visiting country.
- Page 45 On the [More] tab, select the [Display the clock on the title bar in all programs] check box to show the time in all programs. To change the time and date format, tap [ Start→Settings→System→Regional settings ] . Power (84) Tap[Start→Settings→System→Power]. (85) On the [Power] tab, you can view the battery charge level.
- Page 46 Note: When the device is in sleep mode, you can press power key to wake it up. New text messages, incoming calls or alarm reminder also wake your phone Backlight Tap [ Start→Settings→System→Backlight ] to make settings to the backlight. Certificates Tap[Start→Settings→System→Certificates].
- Page 47 Encryption Tap[Start→Settings→System→Encryption]to encryption files on a storage card that you have inserted. Encrypted files can be read only by this device. Note: Encrypted files cannot be recovered after hard reset or clearing storage.To help prevent data loss, abck up data from storage cards to another location.
-
Page 49: Pim
You can synchronize your phone with the PC via ActiveSync to transfer data in the Microsoft Outlook or Microsoft Exchange server between the phone and PC. Contacts You can save contacts in your SIM card and in your phone’s memory. The SIM card and phone’s memory are physically separate, but they are used as a single entity called Contacts. - Page 50 (88) Enter the Contact’s name and other details. (89) If you want, enter [Notes] tab to create a note for the Contact. (90) Tap <ok> to save. Create a SIM contact (91) On the [Today] screen, tap <Contacts> , tap <New> and then select [SIM Contact]to create a new SIM contact.
- Page 51 contacts again, select [All Contacts]. When working in Company view, you can filter by categories you’ve assigned to contacts. Then, only the companies with contacts that have that category assigned to them will appear in the list. Change view In the Contacts list, tap[Menu→Options]to change the Contacts view. Filter In the Contacts list, tap[Menu→Filter]to view all Contacts or recently viewed contacts or No categories contacts.
- Page 52 Delete a contact On the [Today] screen, tap <Contacts> and tap your desired Contact entry. Then, tap [Menu→Delete Contact] and select <Yes> to delete the contact. Tasks [Tasks] program keeps track of your tasks to get done. New task (94) Tap[Start→Programs→Tasks→Menu→New task]to create a new task.
- Page 53 Notes You can use this program to take a memo or record with your phone. Create a note (95) Tap[Start→Programs→Notes→New]. (96) You can create a note by directly writing or drawing on the screen, tapping the on-screen keypad or recording. (97) When creating a note, tap and hold anywhere on the note paper to pop up a menu and tap [Insert date] to insert the date.
- Page 54 (99) In the notes list, tap[Menu→Options]. (100) Select your preferred template from the[Default template] selection box. The selected template will be used for all new notes to be created. Send a note by MMS In the notes list, tap and hold the note you want to send to bring up options.
- Page 55 If you want to be notified of the appointment, tap [Reminder→Remind me]. Tap the [Notes] tab to create a note. Tap < ok > to save. Update an appointment On the [Today] screen, tap[Start→Calendar]. (103) Tap an appointment, and then tap <Edit> to update the (104) information about the appointment.
- Page 56 The [Search ] function in your device helps you find the information you need quickly and easily. (110) Tap[Start→Programs→Search]. (111) Enter the key words on the [Search for] blank. (112) Select a search scope under the [Type] pull-down selection menu. (113) Tap <Search>...
-
Page 57: Messaging
Messaging The messaging function in your device allows you to send and receive E-mail, text messages or multimedia messages. If you don’t have an e-mail address, register one from the ISP or e-mail service provider. Note: When you are synchronizing your device with PC via ActiveSync, you cannot connect to GPRS. - Page 58 Auto configuration attempts to download necessary e-mail server settings so that you do not need to enter them manually. Once auto configuration has finished, tap <Next>. Enter your name and account display name, and tap <Next>. Select [Automatic Send/Receive]...
- Page 59 Tap <Finish> to save. You can now use the account to connect to your E-mail server. Clear an Outlook email account Select the account you desired to clean then tap [Menu→Delete”], and tap <Yes> to clear the account. Compose and send an e-mail (117) Tap an E-mail account you want to send an e-mail.
- Page 60 (120) Enter the subject in [Subject] and your message. (121) Tap [Menu→Insert] to add pictures or files as attachments. (122) If you want to add a voice note as attachment, tap [Menu→Insert→Voice note], and tap to record. Voice notes recorded are attached to the e-mail automatically. (123) To check the spelling, tap [Menu→Spell check].
- Page 61 Notes: E-mail messages are sent immediately if you are working online. If you are working offline, e-mail messages are moved to the [Outbox] folder and will be sent the next time you connect. Manage messages and folders You can synchronize Outlook e-mail on the PC with your device ...
- Page 62 Tap [Start→Settings→Connections→Connections], and then tap [My Work Network→Add a new modem connections]. Select Celluar Line(GPRS) under the [Select a modem] pull-down selection menu. Tap [Next], enter access point name, you can obtain it from your network operator. Tap [Next], and then tap [Finish].
- Page 63 Tap [Receiving options] tab to make receiving settings as below: Retrieve messages immediately: Typically, you receive a notification whenever a new message is available. You can select automatic under [Home Reception] pull-down selection menu and automatic under [Roaming Reception] pull-down selection menu to download new messages automatically.
- Page 64 your MMS. Messages Size:Select size of MMS to be sent. Message Types:Select messages type to be sent under pull-down selection menu. Hide Sender: Select this check box to hide sender while sending MMS. Create and edit a message Your message can consist of multiple slides (images, video/audio clips, or text) which can be edited and rearranged at any time.
- Page 65 6. Tap [Menu]: • Preview:Tap here to preview your message. • Recipients:Tap [Recipients→Add Recipient] to choose recipients from your contacts list; Tap [Recipients→Check Names] to check your recipients names. Slide : Tap [Add Slide] to add an additional slide to your •...
- Page 66 Draft :Save this message to your draft. • • MMS Templates:Save this message as a template to use later. 7. Tap [Send] to send your message. Text messages You must enter text messages service center number before you can use your text messages account on your device.
- Page 67 If you want to know when a text message is received, before sending the message, tap [Menu→Message options], and then select the [Request message delivery notification] check box. Pocket MSN Pocket MSN on your mobile device provides practically instant access to your up-to-date MSN Hotmail Inbox, your MSN Messenger Contacts list and options for customizing your Pocket MSN experience.
- Page 68 To sign in, tap [sign in] on the bottom of Messenger screen. (140) Follow the directions on the screen. To sign out, tap[Menu→Sign out]. (141)
-
Page 69: Take Your Office With Your Smart Phone
Take your office with your Smart Phone Word Mobile You can create and edit documents and templates in Word Mobile, or copy Word documents and templates created on the PC to your device and edit them on the device. Create a Word Mobile document (142) Tap[Start→Office Mobile→Word Mobile]. - Page 70 Excel Mobile You can create and edit documents and templates in Excel Mobile, or copy Excel documents and templates created on the PC to your device and edit them on the device. To create a new Excel Mobile document, tap [ Start→Office Mobile→Excel Mobile]...
- Page 71 undo the split, tap[View→Remove split] PowerPoint Mobile You can use the PowerPoint Mobile to view slide shows created in .ppt or .pps format with PowerPoint 97 and later versions. Many presentation elements built into the slide shows such as slide transitions and animations will playback on the device.
- Page 72 you want to view. Note: If you have zoomed in to see a slide in more detail, you cannot navigate to another slide until you zoom out. Tapping [Next] or [Previous] may play an animation on a slide rather than navigate to another slide.
-
Page 73: Sync Your Device
10. Sync Your Device Sync via ActiveSync To sync your device with a computer via ActiveSync, you need to first install the Microsoft ActiveSync software on your computer. ActiveSync can be used to: Sync your device with PC Change synchronization settings ... - Page 74 E-mail messages in the subfolders under other Outlook E-mail folders are synchronized only when they are selected in the ActiveSync. Note: Text messages and multimedia messages are not received via synchronization. Instead, they are sent to your device via your service provider. Sync your Contacts Contacts stored on your device can be synchronized with similar Outlook Contacts on your PC.
- Page 75 Use Notes synchronization : In [ActiveSync] on your device, tap [Menu→Options], and then select the [Notes] check box. All notes in [My Documents] and its subfolders on your device will appear in Outlook Notes on your PC. Handwritten text or drawings in notes will appear on your PC as pictures.
-
Page 76: Browse The Web
11. Browse the Web Notes: 1. Before you can browse the web on your Smart Phone, make sure the GPRS service is enabled on your SIM card. When GPRS connection is active, a status icon appears at the top of the screen. 2. - Page 77 For more information, tap at the top right of the screen. Disconnect a GPRS connection To inactivate a GPRS connection, tap the Signal strength icon then tap <Wireless Manager>, and then tap [Menu→DisConnect Cellular Data] to disconnect an active GPRS connection. WIFI You can browse the web on your Smart Phone through WIFI.
- Page 78 Tap[Start→Settings→Connections→Wi-Fi], and then tap and hold an available connection to bring up options. Tap [Connect] to connect according to the instructions step by step. (3) When the available connection is connected, you can browse the web on your Smart Phone through WIFI.
- Page 79 Internet Explorer (1) Tap[Start→Internet Explorer]to open IE. (2) Enter a URL into the address line. Or, tap the arrow to the right of the address line and select from the pull-down list an URL that you have previously accessed. (3) Tap to connect to the website.
- Page 80 choose to connect via USB or Bluetooth. If you want to use a USB cable connection, you must first install Microsoft ActiveSync version 4.5 or later on the computer. Note: 1. To be used as a MODEM, your device must have a SIM card that supports web browsing.
- Page 81 To set up your device as a Bluetooth modem For the computer to use the Internet connection of your device, activate Internet Sharing on your device, then set up a Bluetooth Personal Area Network (PAN) between the computer and your device. (1) On your device, turn on Bluetooth and set it to visible mode by following the steps in “To turn Bluetooth on and make your device visible”...
- Page 82 b. Click Manage network connections and then under Personal Area Network, double-click Bluetooth Network Connection. c. In the Bluetooth Personal Area Network Devices dialog box, select your device, and then click Connect. For Windows XP: a. Tap Start > Control Panel > Network Connections. b.
- Page 83 [Turn on Bluetooth]check box to turn on the Bluetooth on your device. Make your device visible to other devices (152) Tap[Start→Settings→Connections→Bluetooth. Select the check box for[Turn on Bluetooth]and[Make this device visible to other devices], and then tap <ok>. Note: Simply selecting the [ Make this device visible to other devices] check box also turns on the Bluetooth.
- Page 84 Accept a Bluetooth connection First, make sure your device is turned on and visible. (159) When your device receives a Bluetooth connection request (160) from another Bluetooth device, tap <Yes> to accept. Enter the same password that has been entered on the (161) other device.
- Page 85 Tap the device to which you want to beam the selected picture, and then it starts beaming. Receive a Bluetooth beam Tap[Start→Settings→Connections→Beam], and then select the [Receive all incoming beams]check box. Ensure that your device is turned on, visible, and within close range of the device that is beaming the information.
-
Page 86: Entertainment
12. Entertainment Entertain yourself with the Windows Media Player, funny games, a 2.0 Megapixel Camera, and FM Radio all in your Smart Phone. Windows Media Player Use the Windows Media Player embedded in your device to play audio files in MP3 formats such as .asf, .wma, .wmv and .mp3, or video/audio files in Windows Media formats. - Page 87 Pictures and videos Pictures To handle .jpg pictures saved in your phone or on the storage card, such as viewing, sending to Contacts or setting as a wallpaper. Search and list pictures (171) Tap[Start→Programs→Pictures and videos]. (172) Tap the arrow on the left of the screen and select [My pictures].
- Page 88 Tap[Start→Programs→Pictures and videos]. (176) Tap the arrow on the right of the screen to pop a pull-down (177) menu. Select a list order by name, date or size. (178) Delete pictures Tap and hold the picture you want to delete to bring up options, and then tap [Delete] in the pull-down menu.
- Page 89 Set as Today background Use this menu to set a .jpg picture as the wallpaper on the [Today] screen. Tap the picture you want to set as wallpaper. (185) Tap[Menu→Set as Today background…]. (186) Change the transparency under the[Transparency level] (187) selection box.
- Page 90 Mode:Tap the middle icon at the bottom of the screen (the icon displayed is based on the current Capture mode.) On the on-screen menu, tap the capture mode you want to use Picture:Captures standard still images. Video:Captures video clips, with or without accompanying audio. ...
- Page 91 Series: Burst mode enables you to take 20 shots in quick succession. Movement: Burst mode enables you to take 5 shots in quick succession. Contact : Captures a still image and gives you the option to immediately assign it as a Photo ID for a contact Menu:...
- Page 92 Timer:Tap to set the self-timer to 2 seconds, 10 seconds, or Off when in the Picture or Contacts mode. When you press the to capture a still image, it starts to count down, and then captures a still image after the time expires. Advance: Tap to open the advanced camera settings.
- Page 93 choose to name files using either the current Date or Date & Time as the prefix. Recount. To reset the file naming counter back to 1, tap Reset. Flicker frequency adjustment. When taking indoor shots, flicker on the camera screen may be caused by inconsistencies between the vertical scan rate of the camera display and the flicker frequency of fluorescent lighting.
-
Page 94: File Explorer
Breaker and Solitaire. 13. File Explorer File Explorer is a powerful utility that helps you handling your files. To avoid system error, do not unnecessarily modify or remove system files that come with your device. Tap[Start→Programs→File explorer]to view, delete or copy files in your device or in the storage card. - Page 95 Tap [Start→settings→system→GPS Settings], on the Satellite State tab, tap<Please click here to startup A-GPS> to start positioning location.
-
Page 96: Use A T-Flash Card
15. Use a T-Flash Card Expand your Smart Phone with a T-Flash card for storing data, backup and additional applications. Use a T-Flash card Note: To use a T-Flash card, you must first use the supplied disk and install ActiveSync and USB driver on your computer by following the instructions on the installation wizard screen. -
Page 97: Manage Programs And Memory On Your Smart Phone
16. Manage programs and memory on your Smart Phone Add/Remove programs Programs that come with your device cannot be removed. As long as the device memory allows, you can install additional programs that apply to your Windows Mobile. Install a program through ActiveSync To install programs to your device, you need to install ActiveSync to ... - Page 98 ActiveSync’s main screen to copy the program file to the [Program Files] folder in your Smart Phone. When the program is installed, it appears in the [Programs] folder on your Smart Phone. Install a program directly from the Internet Check the model of your Smart Phone and processor to know which ...
- Page 99 Tap[Start→Programs→File explorer]. Tap and hold the file you want to move, and tap [Cut]. Open any folder in the T-Flash card, and tap [Menu→Edit→Paste]. Move e-mail attachments to T-Flash card Tap[Start→Messaging→Menu→Options]. On the [Storage] tab, select the [When availabele,use this store card to sotre attachments]...
- Page 100 Internet Explorer Mobile, do the following: Tap[Start→Internet Explorer], then [Menu→Tools→Options→Memory]and tap [Delete files]. All pages stored on your device, including offline favorites content, will be deleted. Tap [Clear history]. The history list will be cleared. Backup files It’s highly recommended that you make back-up copies or keep a written record of all important information on the PC or a T-Flash card to protect from data loss.
-
Page 101: Care And Maintenance
17. Care and Maintenance Your phone is a product of superior design and craftsmanship and should be treated with care. The suggestions below will help you protect your warranty coverage and enjoy your phone for many years. Keep your phone and its enhancements out of reach of small ... - Page 102 Unauthorized antennas, modifications or attachments could damage the phone and may violate regulations governing radio devices.
-
Page 103: Troubleshooting
18. Troubleshooting If your phone does not work properly, read the following guidelines to see if you can find a useful solution. If none of them helps, contact your nearest service center for help. Your phone cannot be switched on Possible reason What should you try? The battery power is... - Page 104 PIN/PUK codes locked Possible reason What should you try? Wrong PIN/ PUK codes If PIN code is locked, enter PUK code to are entered. unlock. But if you enter an incorrect PUK code ten times in succession, SIM card will be permanently blocked and cannot be used anymore.
- Page 105 switched off. You are out of your Move and try again. service area. SIM card is not Reinstall the SIM card. properly installed. Device is locked. Tap <Unlock> at the bottom left of the screen and then tap[Unlock]again. Call barring Disable the Call barring function.
- Page 106 Possible reason What should you try? You selected [None] as the ring Change the settings. type incoming call [Start→Settings→Personal→Sounds &Notifications→Notifications] The ringer volume is too low to on the status bar hear. and increase the volume. Call forwarding is enabled. Disable Call forwarding...
- Page 107 damaged again. cannot be used. The device is in hot or Move device normal cold areas when being temperature and try again. charged. Network failure Possible reason What should you try? The SIM card is not Reinstall the SIM card. properly installed.
- Page 108 Your device doesn’t recognize a storage card Possible reason What should you try? Storage card Insert the storage card according to wrongly inserted. instructions in this user’s manual. Storage card inserted Change a storage card to try. damaged unusable. Your device cannot connect to PC via ActiveSync Possible reason What should you try? Firewall is installed on...
- Page 109 Internet Contact your service provider for details. service not supported your service provider or haven’t subscribed service. Screen freezes and doesn’t respond Possible reason What should you try? Your device halts. Long press power key to reboot your device. Short of memory space Possible reason What should you try? much...
- Page 110 occupied messages or e-mail messages to free up multimedia messages memory. or e-mail messages. Can not power on the phone Possible reason What should you try? Can not power on the Press send key,camera key, at the same phone time long press power key. The result of this operation equals to clear master.
- Page 111 19. Safety Information Operating environment Remember to follow any special regulations in force in any area where you use your phone. Switch off your phone near a refueling point, bunker, chemical plant or blasting. Follow any restrictions. Not following them may cause an explosion or even death.
- Page 112 Warning: If you have any reason to suspect that interface is taking place, switch off the phone immediately. Consult the physician for more information. Hearing aid Your phone may interfere with some hearing aids. If interference occurs, consult the manufacturer of the hearing aids. Emergency calls Wireless phones, including this phone, operate using radio signals, wireless networks, landline networks and user-programmed functions.
- Page 113 succession, the SIM card is blocked. You must enter the PUK code to unblock the SIM card and set a new PIN code. If you do not have the PUK code, contact your service provider or SIM card vendor immediately. Do not enter any characters at random.
- Page 114 Do not touch the battery or charger with wet hands when charging is in progress to avoid any potential danger. When charging is complete, the battery indicator becomes and the LED light turns green. Tips: The full performance of a new battery is achieved only after two or three complete charge and discharge cycles.
- Page 115 occur when a metallic object such as coin, clip or pen causes direct connection of the positive (+) and negative (-) terminals of the battery. (These look like metal strips on the battery.) This might happen, for example, when you carry a spare battery in your pocket or purse.
Need help?
Do you have a question about the W900 and is the answer not in the manual?
Questions and answers