
Related Manuals for iGuard FPS110 Series

Summary of Contents for iGuard FPS110 Series
- Page 1 FPS110 Series Operation Manual Version 3.4.xxxx (Aug 10 , 2004) iGuard FPS110 Series Operation Manual Version 3.4.xxxx www.lucky-tech.com Copyright © 2002 Lucky Technology Limited...
- Page 2 FPS110 Series Operation Manual Version 3.4.xxxx (Aug 10 , 2004) Federal Communications Commission (FCC) Statement This Equipment has been tested and found to comply with the limits for a Class A digital device, pursuant to Part 15 of the FCC rules. These limits are designed to provide reasonable protection against harmful interference in a residential installation.
-
Page 3: Table Of Contents
FPS110 Series Operation Manual Version 3.4.xxxx (Aug 10 , 2004) Table of Content INSTALLATION ....................5 1.1. Quick Installation ..................5 1.1.1. Pre-Installation Notes ................5 1.1.2. Installation ....................5 1.2. Power Requirements ..................7 1.3. Deciding where to install ................7 1.4. **Important** Mounting the Metal Back Panel........7 1.5. - Page 4 FPS110 Series Operation Manual Version 3.4.xxxx (Aug 10 , 2004) 4.16. Tools - Backup & Restore ..............42 4.17. Tools - Web Camera................44 REPORTING......................46 5.1. Tools-Export (XLS)..................46 5.2. Tools - Exports (TXT) ................47 5.3. Reports - Access Log ................48 5.4.
-
Page 5: Installation
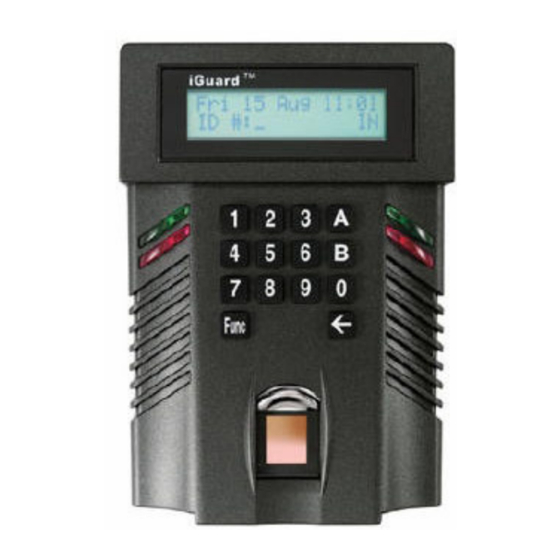
1. INSTALLATION 1.1. Quick Installation Before installing your iGuard, it is important to check a few criteria for safe and easy installation. For this, please read the pre-installation notes as listed below for your reference as to steps you should take before implementing iGuard. - Page 6 RJ-45 cable & TCP/IP protocols. Make sure your computer/notebook has been installed and configured with the TCP/IP Protocols. iGuard can also be connected directly to the network card of PC via crossover RJ- 45 cable. Setting Network and TCP/IP address On your iGuard, press FUNC, enter the default password "123", press...
-
Page 7: Power Requirements
1.2. Power Requirements iGuard requires a switching DC 12V / 500mA power supply. It is not recommended that the same power supply to be shared by both iGuard and the door strike because of the potential back E.M.F. Problem. **Warning: Please do NOT use other power supplies since this may lead to system failure, and poor or unreliable operation. - Page 8 Attendance System, these terminals can be left disconnected. Door Sensor (optional): Terminals #6 & #7. It provides iGuard the current status of the door (open / close). If the door is left open for over 10 seconds, iGuard will generate beep sounds to alert others.
-
Page 9: Connections - Corporate Network
Switch on the right side. To make use of the external relay, you need to connect a two pin connector to the board of iGuard and then connect it back to the external relay. This controls the door strike from within the premises, heightening security and preventing break-ins. - Page 10 FPS110 Series Operation Manual Version 3.4.xxxx (Aug 10 , 2004) After the powering up, iGuard will perform a self-test, then it will enter the standby mode as shown below: - Description LCD Display Power Up -- when iGuard is power-up, it will perform Initializing…...
-
Page 11: Configuration
Note: iGuard can keep the date & time running without power for approximately two days. Also, there is a software tool for users to synchronize the clock of the iGuard device with the desktop PC (iSetClock.exe), which can be downloaded freely at the website. - Page 12 Domain Name Server (e.g., 192.168.0.200). Make sure that the IP address of all units are unique. (Warning: IP addresses that are not unique will cause network error and the iGuard would not function. Press Func key to continue. You will be asked if the Master/Slave (1/2)? Master www.lucky-tech.com...
-
Page 13: The Company Code
, 2004) device is a Master or Slave device (1/2)? If you have only one unit of iGuard, choose (1) Master. If you have more than one units of iGuard, you have to decide which is the Master and which are the Slave(s). If you choose (2) Slave, the system will ask you to provide the Master IP Address, key in, default: 192.168.0.100. - Page 14 FPS110 Series Operation Manual Version 3.4.xxxx (Aug 10 , 2004) the Setup Menu. Enter the System Administrator Password (default 123) and press Func key, then press 6 to select "Set Password" menu. The menu "Admin/Personal (1/2)?" will display. Press 1 to select Administrator password.
- Page 15 FPS110 Series Operation Manual Version 3.4.xxxx (Aug 10 , 2004) As shown in the figure above, there is no authorized time assigned in the default setting, and none of the terminals is selected neither. You must specify the authorized period by first clicking on any one of the Day buttons (i.e., Sunday to Saturday and Holiday buttons), then select the desire time period (in 30-min interval).
-
Page 16: Lcd Display
Press the Func key again to proceed. If the password ID #:_ is right, iGuard will release the door strike, and will return to the Standby Mode. More details about using the Internet browser will be discussed in later sections. -
Page 17: Basic Operation
In the case of poor fingerprint quality or dry finger, iGuard will ask you if you want to lower the matching security. A low security level will bring more convenience to the user but with a minor sacrifice of security. - Page 18 FPS110 Series Operation Manual Version 3.4.xxxx (Aug 10 , 2004) The following steps show you how to register the user's fingerprint template: Description LCD Display While in standby mode, press the Func key to Enter ID # and enter the Setup Menu. Enter the Administrator...
-
Page 19: Enabling Automatch
The maximum number of users allowed to access the iGuard using automatch is recommended to be limited to 30 users. This is due to the fact that the iGuard would require some time to process the fingerprint and then search for it across ALL the database stored on your iGuard. -
Page 20: Enrollment With Smart Card (For Models With Smart Card Reader)20
FPS110 Series Operation Manual Version 3.4.xxxx (Aug 10 , 2004) 3.1.3. Enrollment with Smart Card (for Models with Smart Card reader) The user has to be created prior to use this function either the fingerprint is enrolled or the password is added. After the enrollment procedure, the user ID and the fingerprint template is stored in the internal memory. -
Page 21: Internal Memory Vs. Smart Card Memory
FPS110 Series Operation Manual Version 3.4.xxxx (Aug 10 , 2004) Please note that the above procedure will overwrite all the existing information stored in the Smart Card. 3.1.4. Internal Memory vs. Smart Card Memory The internal user database of the device is divided into two parts: the Internal Memory &... -
Page 22: Verification
FPS110 Series Operation Manual Version 3.4.xxxx (Aug 10 , 2004) You will then be asked to present the Smart Card. Waiting for Smart Card... Writing..Present a Smart Card near the keypad. The unit will then write the user information to the card. -
Page 23: Verification With Automatch
FPS110 Series Operation Manual Version 3.4.xxxx (Aug 10 , 2004) 3.2.2. Verification with Automatch The automatch feature allows users to get authorized without inputting their user ID. This feature allows top management to enter the premises without having to enter their ID, enable them quicker access and giving them high convenience. -
Page 24: Verification With Password
FPS110 Series Operation Manual Version 3.4.xxxx (Aug 10 , 2004) 3.2.4. Verification with Password Description LCD Display Mon Aug 30 13:49 While in standby mode, key in the user ID number A01_ IN (e.g., A01). Instead of lifting the shutter and placing the finger Your Password: _ on the sensor, press the Func key. -
Page 25: Deleting Id
... etc.). 3.3.4. Emergency Procedures This feature has been added as a safety precaution, just in case your iGuard fails to respond to you and does not unlock the door as instructed. While in the standby mode, press the Func key to enter the Setup Mode. Enter your Administrator Password (default 123) and press the Func key once again. -
Page 26: Administration
The iGuard's home page is divided into left and right panels. You can select different functions in the left panel, and the right panel will display the corresponding results. Note: The home page of your iGuard may be different from the one shown above depending on the model you have. www.lucky-tech.com... -
Page 27: Employee List
FPS110 Series Operation Manual Version 3.4.xxxx (Aug 10 , 2004) Each item in the left panel corresponds to different pages in the right panel, and will be discussed in the following sections. 4.2. Employee List 4.2.1. Employee List – Internal Memory Under Employee List, click on "Internal Memory"... - Page 28 FPS110 Series Operation Manual Version 3.4.xxxx (Aug 10 , 2004) to authenticate the person. As mentioned earlier in the manual, there are people with skin problem of their fingers that are unable to work with the fingerprint sensor. These people either have skin problems such as peel-off skin, or have extremely dry fingers.
-
Page 29: Employee List - Smart Card Memory
FPS110 Series Operation Manual Version 3.4.xxxx (Aug 10 , 2004) You can edit the employee information in this page, such as: 1. Employee ID 2. Last Name 3. First Name 4. Other Name/ Title 5. New Password (Personal) 6. Status - Active/Auto Match 7. - Page 30 , 2004) All enrolled employees have been listed out in this page. You can either "Activate", "Deactivate" or "Delete" an employee from a specific iGuard. Check the appropriate employee, click either one of the 3 options. Besides, the green indicator indicates that the specific employee has an active smart card.
-
Page 31: Employee List - Add Employee
FPS110 Series Operation Manual Version 3.4.xxxx (Aug 10 , 2004) 4.3. Employee List - Add Employee Normally a new employee is added in the enrollment process, as already discussed in the "Basic Operation - Enrollment" section. However, you can also add an employee in the Add Employee page. -
Page 32: Department - List
FPS110 Series Operation Manual Version 3.4.xxxx (Aug 10 , 2004) 4.4. Department - List One of the purposes of setting up departments is to divide the employees into different groups. Each department has its own authorized access time. For... - Page 33 FPS110 Series Operation Manual Version 3.4.xxxx (Aug 10 , 2004) The above page indicates that the authorized time period for the department Marketing is from 8:30 am to 7:59 pm, Monday to Saturday. As a result, all the members of this department can only be authenticated within this period.
-
Page 34: Department - Add Department
FPS110 Series Operation Manual Version 3.4.xxxx (Aug 10 , 2004) 4.5. Department - Add Department To add a new department, click on the Add Department link on the left. It will display the following page. Enter the Department ID and Description in the above text boxes. After that, you should click on a day to set the Time Restrictions for employees to enter the premises. -
Page 35: Access Control - Quick Access
FPS110 Series Operation Manual Version 3.4.xxxx (Aug 10 , 2004) 4.6. Access Control - Quick Access Quick Access can be used for bypassing the fingerprint authentication process. The default setting does not allow you to use the Access Password (see Administration - Password Setup )or Smart Card ( for Smart Card model ) to by- pass the fingerprint authentication process. -
Page 36: Administration - Password Setup
FPS110 Series Operation Manual Version 3.4.xxxx (Aug 10 , 2004) 4.8. Administration - Password Setup Setup the Administrator Passwords & the Door Access Password as follow: System Administration - This is the user name and password required to •... -
Page 37: Administration - Terminal Setup
Select Terminal Setup: 4.10. Administration - Clock Setup Auto Date/Time Value: When enabled, the time of your iGuard is automatically configured as the time on your computer system. Location (Time Zone): To further specify the time zone of your region, please select the right option from this menu. -
Page 38: Administration - In / Out Trigger
FPS110 Series Operation Manual Version 3.4.xxxx (Aug 10 , 2004) 4.11. Administration - In / Out Trigger In / Out time Trigger defines the time for either “IN” or “OUT” for access log. The In / Out Time Setting is useful only if the device is configured for Time Attendance purpose. -
Page 39: Administration - Holiday Setup
FPS110 Series Operation Manual Version 3.4.xxxx (Aug 10 , 2004) 4.12. Administration - Holiday Setup The Holiday list is used for the Time Restriction purpose (along with the day-of- week settings). In the above example, the dates 09/10/2001, 10/30/2001 & 12/25/2001 are set as holidays. -
Page 40: Administration - Terminal List
FPS110 Series Operation Manual Version 3.4.xxxx (Aug 10 , 2004) 4.13. Administration - Terminal List This page shows the current slave devices in a master and slave mode network. In the above example, the device "Main" is the master unit, and it has one slave unit named "Office". -
Page 41: Administration - Add Access Log
FPS110 Series Operation Manual Version 3.4.xxxx (Aug 10 , 2004) 4.14. Administration - Add Access Log By default, all the access records cannot be changed and deleted. However, you can add an access record for an employee should he forgot to Clock-In or Clock- Out. -
Page 42: Tools - Export Employee
FPS110 Series Operation Manual Version 3.4.xxxx (Aug 10 , 2004) The records in pink color with the checkbox next to them indicate that these records were added manually. You can later on delete these records by selecting the checkbox and then press the Delete button at the bottom of the page. - Page 43 FPS110 Series Operation Manual Version 3.4.xxxx (Aug 10 , 2004) Press the Save button, and a dialog box similar to the one below should appear: - Press the OK button to save the backup data to your desktop computer.
-
Page 44: Tools - Web Camera
Press the Go button and the data will be restored from the file to the device. 4.17. Tools - Web Camera If the optional Web Camera is available to the network, iGuard can redirect the web camera's image to the browser as shown below: - www.lucky-tech.com... - Page 45 FPS110 Series Operation Manual Version 3.4.xxxx (Aug 10 , 2004) Currently the only supported web camera is Axis 2100 Network Camera from Axis Communications and the JVC camera from JVC. Up to four Web Cameras can be supported at the same time and shown in the same page.
-
Page 46: Reporting
FPS110 Series Operation Manual Version 3.4.xxxx (Aug 10 , 2004) 5. REPORTING 5.1. Tools-Export (XLS) The reports (including the Access Report & Attendance Report) can be exported directly in the popular XLS format, which enables smooth integration with office suite applications such as Microsoft EXCEL. -
Page 47: Tools - Exports (Txt)
FPS110 Series Operation Manual Version 3.4.xxxx (Aug 10 , 2004) 5.2. Tools - Exports (TXT) The TEXT file is useful for exporting to existing payroll programs used in the company. The format of the text file is as follows: "Item","Employee ID","Name","Other Name","Date","Time","Terminal","In/Out"... -
Page 48: Reports - Access Log
FPS110 Series Operation Manual Version 3.4.xxxx (Aug 10 , 2004) 5.3. Reports - Access Log Click on the link Access Log in the left panel, and you should see something similar to the following screen: - This page shows the employees' Access Records. If you want to show the records of only a particular person (e.g., C001), enter his/her ID # in the edit box and press... - Page 49 FPS110 Series Operation Manual Version 3.4.xxxx (Aug 10 , 2004) The following example shows only the previous month records of the employee ID # BB26: www.lucky-tech.com Copyright © 2002 Lucky Technology Limited...
-
Page 50: Reports - Attendance
FPS110 Series Operation Manual Version 3.4.xxxx (Aug 10 , 2004) 5.4. Reports - Attendance The attendance reports provide consolidated access records as follows: - ***Daily In/Out The Attendance Report is particularly useful for payroll purpose. Similar to the Access Log Report, you can specify the employee's ID and / or the Time Period of the Attendance Report. - Page 51 FPS110 Series Operation Manual Version 3.4.xxxx (Aug 10 , 2004) The Table Structure of the Default MS Access (ibonussrv.mdb): 5.5.1. MS Access Table: AccessLog RCDID Int AUTO_INCREMENT, EmployeeID char(16), LogDate char(10), LogTime char(10), TerminalID char(20), InOut Int, Primary Key(RCDID, EmployeeID, LogDate, LogTime, TerminalID)
- Page 52 FPS110 Series Operation Manual Version 3.4.xxxx (Aug 10 , 2004) Department char(50), Primary Key(EmployeeID) There are some differences in the syntax of creating the table in other database like SQL Sever and Oracle. The following is for you reference.
- Page 53 FPS110 Series Operation Manual Version 3.4.xxxx (Aug 10 , 2004) LogDate Char(10) Not Null, LogTime Char(10) Not Null, TerminalID Char(20) Not Null, InOut Number(38) Table: Employee EmployeeID Char(16) Not Null, LastName Char(40), FirstName Char(40), OtherName Char(40), Password Char(40), EmpStatus Number(38),...
- Page 54 FPS110 Series Operation Manual Version 3.4.xxxx (Aug 10 , 2004) 2. To create a field for auto increment (RCDID): a) To create a sequence and add a constriant to a field, or ; b) Create a trigger to increment the field.
-
Page 55: Master-Slave/Super Master
Slave devices. iGuard can be configured to Master or Slave mode. Master and Slave iGuard can be logically connected using TCP/IP protocol. With a RJ45 cable plugged from your iGuard unit to your corporate LAN, you can connect your iGuard to the corporate network. -
Page 56: Setting Terminal Id
, 2004) 6.2 Setting Terminal ID The terminal ID of each iGuard should be renamed (default: iGuard) to different names so as to avoid confusion in master and slave modes. Select terminal setup in Internet browser and rename the terminal ID accordingly. -
Page 57: Super Master (Only For Lm Series)
Super Master, a different hardware, is used in the case of more than a thousand users are required in a master-slave mode network. The Super Master will be used as a master device replacing a standard iGuard master device in the network. With the Super Master, the slave iGuards will operate in cache mode which means that they only store the most recently used 1,000 users in memory. -
Page 58: Miscellaneous
7.1 Remote Door Relay Remote Door Relay is used for absolute security for access control. In this case, the relay at the back of the iGuard is not used and the Remote Door Relay is installed inside the building. Remote Door Relay Connection Terminal Description:... - Page 59 1. Firmware Version: 3.2.9987A or up (can be updated by firmware update patch), 2. iGuard Remote Door Relay hardware support. It can be verified by checking iGuard's status web page; "Remote Door Relay" will be shown in row "Other Feature".
-
Page 60: Various In/Out Modes
FPS110 Series Operation Manual Version 3.4.xxxx (Aug 10 , 2004) 7.2 Various In/Out Modes These functions will not be included in the standard FPS110 series. Please contact our sales. Different Modes Description Follow IN/OUT Trigger If the default value is chosen, the IN/OUT setting will be defined in the... -
Page 61: Wiegand 26 Bits Output
Version 3.4.xxxx (Aug 10 , 2004) 7.3 Wiegand 26 bits Output There is a Wiegand output connector at the back of iGuard and data with Wiegand 26 bits format can be enabled in the terminal setup. www.lucky-tech.com Copyright © 2002 Lucky Technology Limited... -
Page 62: Fingerprint And Automatch Matching Security
FPS110 Series Operation Manual Version 3.4.xxxx (Aug 10 , 2004) 7.4 Fingerprint and Automatch Matching Security This option enables the administrator to set the level of security for fingerprint matching. Set it to low for normal application. If you need to use the device where high security is required, set this security to "high". - Page 63 FPS110 Series Operation Manual Version 3.4.xxxx (Aug 10 , 2004) www.lucky-tech.com Copyright © 2002 Lucky Technology Limited...
-
Page 64: Web Pages Languages
FPS110 Series Operation Manual Version 3.4.xxxx (Aug 10 , 2004) 7.6 Web Pages Languages The language used in web administration pages can be changed. Currently few languages are supported: English, Simplified Chinese, Traditional Chinese, and Japanese. Contact our sales if you want to incorporate your languages. -
Page 65: Anti-Passback
FPS110 Series Operation Manual Version 3.4.xxxx (Aug 10 , 2004) 7.7 Anti-Passback This function is not available in the standard FPS110 Series. Please contact our sales. When enabled, this feature prevents the same employee to enter the premises Anti-Passback twice if he/she has not checked out. -
Page 66: Sntp Time Server
FPS110 Series Operation Manual Version 3.4.xxxx (Aug 10 , 2004) 7.8 SNTP Time Server Internet SNTP Time Server time synchronization Go to Terminal Setup: SNTP Time Server URL: This should be set to the standard time on the Internet. It is represented by the Greenwich Time. -
Page 67: Security For Web Access
FPS110 Series Operation Manual Version 3.4.xxxx (Aug 10 , 2004) 7.9 Security for Web Access Setup Security for Web Administration Access No IP Address Restrictions There is no restriction to access the web administration page from any PC's or any users. -
Page 68: Reset Device
If you want to erase all the users information and access records stored in the iGuard internal memory, and to reset all the settings to the factory defaults, you can perform the System Reset function to clear all the stored data. There are two databases inside the iGuard: User Database &... -
Page 69: Test Mode
, 2004) 7.11 Test Mode Under normal operation, iGuard records all the user transactions in its Access Log. However, you can set the machine to Test Mode, and it will temporary disable the machine from recording the transactions. This feature is useful when you have finished a new enrollment for a new user, and you want the new user to practice with the device. - Page 70 FPS110 Series Operation Manual Version 3.4.xxxx (Aug 10 , 2004) 8 Appendix Network Connection 1. Connection with PSTN 2. Connect with Internet www.lucky-tech.com Copyright © 2002 Lucky Technology Limited...
- Page 71 FPS110 Series Operation Manual Version 3.4.xxxx (Aug 10 , 2004) Connection Diagrams 1. Basic Connection www.lucky-tech.com Copyright © 2002 Lucky Technology Limited...
- Page 72 FPS110 Series Operation Manual Version 3.4.xxxx (Aug 10 , 2004) 2. Basic Connection (Large Load) www.lucky-tech.com Copyright © 2002 Lucky Technology Limited...
- Page 73 FPS110 Series Operation Manual Version 3.4.xxxx (Aug 10 , 2004) 3. Connection Diagram – Remote Relay www.lucky-tech.com Copyright © 2002 Lucky Technology Limited...
- Page 74 FPS110 Series Operation Manual Version 3.4.xxxx (Aug 10 , 2004) www.lucky-tech.com Copyright © 2002 Lucky Technology Limited...
- Page 75 FPS110 Series Operation Manual Version 3.4.xxxx (Aug 10 , 2004) www.lucky-tech.com Copyright © 2002 Lucky Technology Limited...
- Page 76 FPS110 Series Operation Manual Version 3.4.xxxx (Aug 10 , 2004) www.lucky-tech.com Copyright © 2002 Lucky Technology Limited...
Need help?
Do you have a question about the FPS110 Series and is the answer not in the manual?
Questions and answers