Table of Contents
Advertisement
Quick Links
Model # JGSBSEAR
FOR OUTDOOR USE ONLY
!WARNING!
If you smell gas:
1. Shut off gas to the appliance.
2. Extinguish any open flame.
3. Open lid.
4. If odor continues, keep away from
appliance and immediately call your gas
supplier & fire department.
OWNER'S MANUAL:
JACKSON GRILLS INC.
#106-2480 Mt. Lehman Rd.
Abbotsford, BC V4X 2N3
TEL:
1(888) 287-3333
FAX:
1(877) 855-5373
SUPPORT: support@jacksongrills.com
WEB SITE: www.jacksongrills.com
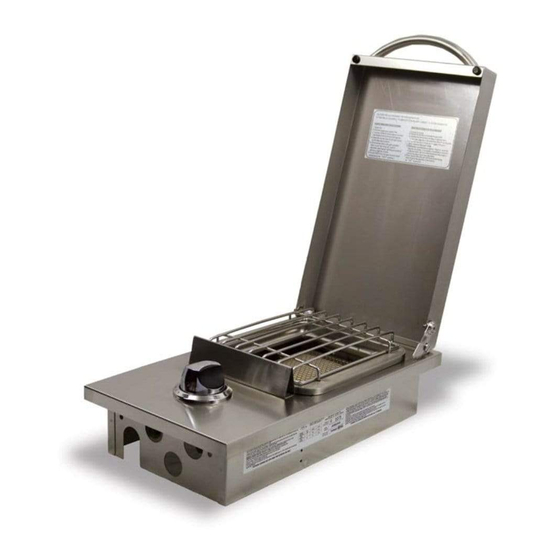
Searing Burner Station
!WARNING!
1. Do not store or use gasoline or other
flammable liquids in the vicinity of this
appliance.
2. Do not store disconnected propane
tanks in the vicinity of this appliance.
1
Version: MAR13
Advertisement
Table of Contents

Subscribe to Our Youtube Channel
Related Manuals for Jackson Grills JGSBSEAR


Summary of Contents for Jackson Grills JGSBSEAR
- Page 1 TEL: 1(888) 287-3333 FAX: 1(877) 855-5373 SUPPORT: support@jacksongrills.com WEB SITE: www.jacksongrills.com OWNER’S MANUAL: Model # JGSBSEAR Searing Burner Station FOR OUTDOOR USE ONLY !WARNING! !WARNING! If you smell gas: 1. Shut off gas to the appliance. 1. Do not store or use gasoline or other 2.
-
Page 2: Table Of Contents
TABLE OF CONTENTS Certification & Testing: Safety Warnings: Package Contents Checklist: Searing Side Burner Part Number List: Installation Instructions: (Cart Version) Installation Instructions: (Built In Version) Leak Testing: Lighting Instructions: Natural Gas Conversion: Warranty: CERTIFICATION & TESTING This side burner has been tested by Labtest Certification (LC) and has been tested to ANSI Z21.58a-1198 & CGA 16a-M98, and Certified for Canada and the USA. -
Page 3: Safety Warnings
!SAFETY WARNINGS! SAFETY FIRST: Please read and understand all warnings and precautions prior to operating your Side Burner. This accessory is for outside use only, and shall not be used in any building, garage, enclosed area or vehicle. This Side Burner is set up from the factory for use with Propane Gas (LP). (Propane Cylinder /Tank not included) Do not use gasoline, alcohol or other volatiles for lighting purposes. -
Page 4: Searing Side Burner Part Number List
SIDE BURNER PART NUMBER LIST: Main Fuel Line: JF-83 Side Burner Body: call dealer Grid Support: JG-22 Lid With Handle: JH-000 Cook Grid: JG-18 Shoulder Bolt: JH-001 Electrode: JF-21 Flex fuel Line; JF-8 Burner: JB-14 Bezel: JK-15 Manifold: JF-80 Gas Valve: JF-02 Knob: JK-14 Elbow: JF-004 Orifice: JF-001 NAT... - Page 5 STEP 2 Drop the Searing Side Burner assembly onto the rails that formerly supported the Cutting Board. This may be a tight fit; if so, please bend the rails down slightly using a pair of pliers as needed (Fig. 1). This adjustment will allow the side burner to drop into place.
-
Page 6: Installation Instructions: (Built In Version)
INSTALLATION INTO BUILT-IN CABINET: STEP 1 Cut/fabricate a hole in the cabinet to size as shown in Figure 6; ‘Cut Out Dimensions’ (High Lighted in Yellow). !WARNING! SHUT OFF FUEL before installing Figure 6: Built In Cut-Out Dimensions** this side burner assembly. These dimensions are the actual cut out dimensions for the built in units in non-combustible applications. -
Page 7: Leak Testing
STEP 2 Install the Main Flex Fuel Line onto the 3/8” flared connection on the TECH TIP It is recommend that a Certified Gas Searing Side Burner manifold (Fig. 2 above). (Sealant not required). Fitter be used to install fuel lines and other fuel related components. -
Page 8: Natural Gas Conversion
NATURAL GAS CONVERSION 1. Remove the Cook Grid and Cook Grid Support, then turn the Searing Side Burner upside down. 2. Using a 10mm and 12mm wrench, remove the Propane Orifice (Fig. 7). 3. Lightly coat threads of the Natural Gas Orifice with Gas Teflon Tape or Gas Fitting Pipe Dope. 4. -
Page 9: Limited Warranty
Limited Warranty: MODEL: JGSBSEAR Searing Side Burner Jackson Grills Inc. warrants the materials and workmanship in this accessory to be free of defects for two years from the date of purchase. Limited Warranty Subject to the following Conditions & Limitations: (NOTE: Shipping and Labor Charges are NOT covered) ...
Need help?
Do you have a question about the JGSBSEAR and is the answer not in the manual?
Questions and answers