
Related Manuals for Bosch PCM 1800 SD


Summary of Contents for Bosch PCM 1800 SD
- Page 1 OBJ_BUCH-1304-001.book Page 1 Wednesday, August 18, 2010 10:12 AM Robert Bosch GmbH Power Tools Division 70745 Leinfelden-Echterdingen PCM 1800 SD Germany www.bosch-pt.com 1 609 929 X24 (2010.08) PS / 22 XXX en Original instructions...
- Page 2 OBJ_BUCH-1304-001.book Page 2 Wednesday, August 18, 2010 10:12 AM PCM 1800 SD 1 609 929 X24 | (18.8.10) Bosch Power Tools...
- Page 3 OBJ_BUCH-1304-001.book Page 3 Wednesday, August 18, 2010 10:12 AM Bosch Power Tools 1 609 929 X24 | (18.8.10)
- Page 4 OBJ_BUCH-1304-001.book Page 4 Wednesday, August 18, 2010 10:12 AM 1 609 929 X24 | (18.8.10) Bosch Power Tools...
- Page 5 OBJ_BUCH-1304-001.book Page 5 Wednesday, August 18, 2010 10:12 AM 12 11 Bosch Power Tools 1 609 929 X24 | (18.8.10)
- Page 6 OBJ_BUCH-1304-001.book Page 6 Wednesday, August 18, 2010 10:12 AM 1 609 929 X24 | (18.8.10) Bosch Power Tools...
- Page 7 OBJ_BUCH-1304-001.book Page 7 Wednesday, August 18, 2010 10:12 AM Bosch Power Tools 1 609 929 X24 | (18.8.10)
- Page 8 OBJ_BUCH-1304-001.book Page 8 Wednesday, August 18, 2010 10:12 AM 1 609 929 X24 | (18.8.10) Bosch Power Tools...
- Page 9 Water entering a power tool or a key left attached to a rotating part of will increase the risk of electric shock. the power tool may result in personal inju- Bosch Power Tools 1 609 929 X24 | (18.8.10)
- Page 10 Always guide the tool repaired before use. Many accidents are arm back to the neutral position first and caused by poorly maintained power tools. then switch the machine off. 1 609 929 X24 | (18.8.10) Bosch Power Tools...
- Page 11 Keep handles dry, clean, and free from oil aged cable repaired only through an author- and grease. Greasy, oily handles are slippery ised customer service agent for Bosch pow- causing loss of control. er tools. Replace damaged extension cables. This will ensure that the safety of the Operate the power tool only when the work power tool is maintained.
- Page 12 Danger area! Keep hands, fingers or arms away from this area. Observe the dimensions of the saw blade. The hole diameter must 25.4mm match the tool spindle without play. Do not use reducers or adapt- 254mm Ø Ø ers. 1 609 929 X24 | (18.8.10) Bosch Power Tools...
-
Page 13: Functional Description
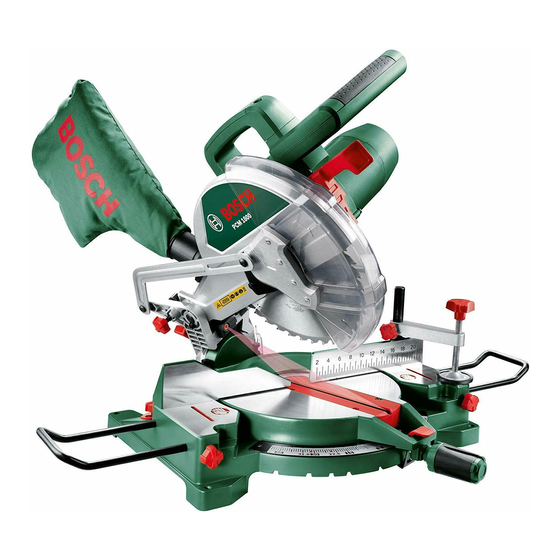
12 Scale for mitre angle (horizontal) 13 Saw-Table extension 14 Length stop 15 Fence 16 Ring spanner (13 mm) 17 Material clamp 18 Metal bar of tilt protector 19 Scale for bevel angle (vertical) Bosch Power Tools 1 609 929 X24 | (18.8.10) - Page 14 14 | English – Sliding mitre saw with premounted saw Technical Data blade – Dust bag 1 Sliding Mitre Saw PCM 1800 SD – Ring spanner 16 Article number 3 603 M08 040 – Material clamp 17 Rated power input...
- Page 15 – Guide the retracting blade guard 6 down again, until it is held by the upper teeth of the saw blade 39. Bosch Power Tools 1 609 929 X24 | (18.8.10)
- Page 16 – Push the locking lever 4 and at the same time lower the tool arm via handle 3 until the transport safety-lock engages in the end po- sition. The tool arm is now securely locked for trans- port. 1 609 929 X24 | (18.8.10) Bosch Power Tools...
- Page 17 For quick and precise setting of often used mi- tre angles, the saw table 7 engages at the de- tents of the following standard angles: 0°/ ±15°/ ±30°/ ±45° Bosch Power Tools 1 609 929 X24 | (18.8.10)
- Page 18 – Switch on the machine. – Push the locking lever 4 and guide the tool arm slowly downward with the tool handle 3. 1 609 929 X24 | (18.8.10) Bosch Power Tools...
- Page 19 In addition, the cut can be perfomed with or without slide movement depending on the width of the profile strip/moulding. Always make trial cuts with the mitre angle set- ting first on scrap wood. Bosch Power Tools 1 609 929 X24 | (18.8.10)
-
Page 20: Maintenance And Service
OBJ_BUCH-1304-001.book Page 20 Wednesday, August 18, 2010 10:12 AM 20 | English Maintenance and Service Australia, New Zealand and Pacific Islands Robert Bosch Australia Pty. Ltd. Power Tools Maintenance and Cleaning Locked Bag 66 Before any work on the machine itself, pull Clayton South VIC 3169 the mains plug. - Page 21 OBJ_BUCH-1304-001.book Page 21 Wednesday, August 18, 2010 10:12 AM | 21 Bosch Power Tools 1 609 929 X24 | (18.8.10)
Need help?
Do you have a question about the PCM 1800 SD and is the answer not in the manual?
Questions and answers
Which way do you turn the holding plate holding the blade to remove it
To remove the blade on the Bosch PCM 1800 SD, first bring the tool into the working position. Then:
1. Push the locking lever and swing the retracting blade guard to the rear to the stop.
2. Hold the retracting blade guard in this position.
3. Loosen screw 37 with a Phillips screwdriver.
4. Pull the retracting blade guard together with the cover upward until hexagon bolt 40 is easily accessible.
5. Guide the retracting blade guard down again until it is held in position.
The turning of the holding plate is not explicitly described, so the exact method to turn it cannot be determined from the provided context.
This answer is automatically generated