
Subscribe to Our Youtube Channel
Related Manuals for NTS G-1000


Summary of Contents for NTS G-1000
- Page 1 ELECTRONIC CASH REGISTER USER'S MANUAL G-1000 MANUAL REVISION EN 1.0...
-
Page 2: Table Of Contents
INDEX Chapter 1 Overview........1.1 ECR Parts Description........... 1.2 Description to Ports..........1.3 Load paper............ 1.4 Keyboard description..........Chapter 2 Setting......... 2.1 Go to setting page..........2.2 System Settings..........2.3 Authority Settings..........2.4 Printing Setting..........2.5 Keyboard Setting..........2.6 Pay Way Setting.......... -
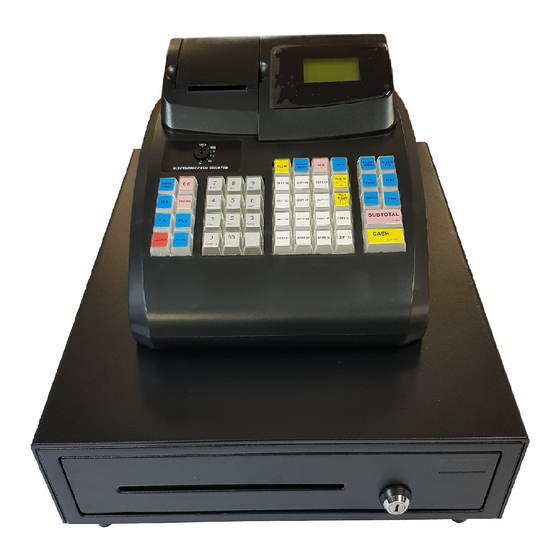
Page 3: Chapter 1 Overview
Chapter 1 Overview 1.2 Description To Ports 1.1 ECR Parts Description Power port: power plug provided. PS/2 port: for barcode scanner. COM: for PC or external printer(Default baud rate115200bps). Cash Drawer Port: for cash drawer. ⑤ ① ② ⑥ ⑦ ③... -
Page 4: Load Paper
1.4 Keyboard description 1.3 Load paper RECEIPT RECEIPT SEARCH VOID SHIFT CLERK ON/OFF ISSUED PAGE UP FEED DEPT04 DEPT08 DEPT12 #/NS ↑ A.Open the printer cover in the arrow direction PAGE DN REF/ DEPT03 DEPT07 DEPT11 CARD CHECK ↓ DEPT02 DEPT06 DEPT10 DEPT14... -
Page 5: Chapter 2 Setting
Chapter 2 Setting 2.1 Go to setting page 2.2.2 Machine Number ======== ======== Date & Time 1.Settings In “System Settings” listing, move cursor to “Machine No.” Machine No. 2.Registration Switch on selection option and press “Enter” to define the machine ID number. 3.PLUS &... -
Page 6: Authority Settings
= Manager Settings = = Language Select= Users could select to login the system with password or not. To No PSW. Log in: Chinese cancel the password login, tackle the option “No PSW. Log in: √ English Select the language and press “Enter” to save. ”. -
Page 7: Printing Setting
2.4.1 Set Receipt Head <Enter> Yes, <ESC>Exit Cashier03 In “Printing Settings” page, select Set Receipt Head option “ ” ==Printing Settings== and press Enter . “ ” ABC.: ( 9/20) Set Receipt Head Set Receipt Tail Set Receipt Set Report === Cashiers === To modify cashier’s password, the operations are the same Cashier 3: Cashier03... -
Page 8: Keyboard Setting
2.5.1 PLU Hot Key In “Set Receipt”, users could make below configurations to receipt: ==Printing Settings== Define the printing density Print Density: To switch on/off the receipt printing If a commodity (represented by a PLU) was defined to a key, users could sell this commodity Print Receipt: √... - Page 9 = Keyboard Settings = = Set Function Keys = In “Keyboard Settings” page, select “Set Function Keys” option PLU Hot-key Search PLU:0 and press Enter” to define keys to functions.Function keys are “ Set Function Keys Function key page 6 as below.
-
Page 10: Pay Way Setting
2.5.6 Restore Default 2.5.4 Auto Key = Keyboard Settings = “Auto Key” means the key could activate a serial of actions automatically. With this function 'Shift' One Time Only With this function performed, all the keys are restored to default. key defined, users could perform a serial of function only by pressing the Auto Key”. -
Page 11: Count Rules
2.8 TAX/VAT Setting 2.7 Count Rules In “Count Rules”, users could configure the decimal digits, rounding method and round === Settings === position. In Settings” page, move cursor to TAX/VAT Settings” option “ “ Pay Way Settings Count Rules and press Enter”. “... -
Page 12: Delete Data
Chapter 3 Data Establish 2.9 Delete Data Before selling any commodity, users need to pre-establish commodity data in the In Settings” page, move cursor to Delete Data” and press Enter” “ “ “ === Settings === ECR machine. to delete data. Pay Way Settings There are two concepts of commodity: department and PLU. -
Page 13: Create New Plu
3.2 Create New PLU In “Search PLUS”page, the ECR provides three == Search PLUS == searching ways:search by code, search by department Search By Code In “PLU & Departments” page, move cursor to “Create and search by character. In each way, users only need = PLUS&Departments = Search By Dept. -
Page 14: Chapter 4 Sell Commodity
Chapter 4 Sell Commodity 4.2 Sell PLU Basically Before selling a department, users should do some beforehand works, such as establishing department data, define unit price and define department function key. Below operations take selling fruit for example to teach users how to sell department. -
Page 15: Functional Selling
4.3 Functional Selling 4.3.2 Reduce Price To reduce the price to a commodity, users need to re-define function key to "Red 4.3.1 Add Price uce Price". Processes to sell commodities at a reduced price are as below. Sometimes users need to sell commodity not with the default price but with an added price, for example to charge with the service fee. - Page 16 4.3.3 Sell at a Discount Change There are two kinds of method to make a discount to a transaction: discount to a single The system displays the change total and print out the receipt. commodity or discount to the total amount. Examples to show the processes of discount 1.36 are as below.
- Page 17 Merchandise sales Select the commodity to be canceled through pressing billing details “Page Up”or “Page Down” and press “EC” to 3. Biscuits cancel it. After that, press “Enter” to escape. 4.3.5 Input Cash & Output Cash 16.00 "Received Account" means to put in money without any transaction; "Paid Out" means to take out money without any transaction.
-
Page 18: Chapter 5 X Report
Chapter 5 X Report Chapter 6 Z Report The ECR provides X report. X report means issuing report without deleting the The ECR provides Z report. Z report means issuing report with deleting the corresponding data. corresponding data. ==== ECR === === ECR === In main menu page, move cursor to “4. -
Page 19: Chapter 7 Receipt Sample
Chapter 7 Receipt Sample Financial Report Daily Financial Report Monthly Department Report Daily Basic Selling To Department Sell Department with Changed Price Sell PLU Basically X Report X Report X Report Financial Report,Month Depar tmenl Report,day Financial Report,Day Inquiry From: 23.04.2010 14:35 Inquiry From: 23.04.2010 14:35... - Page 20 Department Report Monthly Clerk Report Daily PLU Report Monthly PLU Report Daily X Report X Report X Report X Report Depar tmenl Report,Month Clerk Report,Day Plu Report.Month Plu Report.Day Inquiry From: 23.04.2010 14:35 Inquiry From: 23.04.2010 14:35 30.04.2010 13:55 30.04.2010 13:56 Inquiry From: 23.04.2010 14:35 Inquiry From:...
-
Page 21: Chapter 8 Pc Software Instruction
Chapter 8 PC Software Instruction 3. Click on [Next] There is a CD disc besides the ECR machine. It includes PC software. Users could edit data, make system configuration, upload and download data, print reports and backup data with this software. 8.1 Install the Program 1. - Page 22 8.2 Login 5. Installing… Double click on [ECR System] quick launch. Then the login conversation will be started. Select the ECR model and put in the password accordingly. There is no default password and press “Enter” directly. 8.3 Communication Setting The ECR communicates with PC software through COM port.
- Page 23 Click on a department key, the program will pop out the definition conversation. 8.4System Configuration Select the PLU type in “Function Define” area. Usually one department key includes 3layers usage. That mean one key performs three keys. To shift among Click on “Parameter Setting”...
- Page 24 Click on “Add” to add or edit a new cashier. 8.6 Cashier Setting Click on [Cashier] option in left-side navigator as below. This function is specially to make configuration to cashiers. Users could change cashier’s ID, cashier’ s name, password and authorities. 99 cashiers are allowed for maximum. 8.7 Department Click on “Department”...
- Page 25 8.8 LOGO Download Users could make their own shop LOGO and download it to the ECR machine through the software. The software only supports picture format of BMP at resolution of 384x200. When downloading the LOGO, the ECR should be at the main display page.
- Page 26 (2)Select “Save As” in “File” menu. Select the file format to “*.bmp, *.dib” to save the picture. 2. Select the BMP picture. 3. Click on “Update to ECR” and start the downloading. 8.8.2 LOGO Download 1. Open the ECR software, select LOGO Download.
- Page 27 8.9 Establish PLU Data 8.9.2 Establish PLU Data Select “PLU Setting” in “Data Management” navigator and then click “Add” The ECR software provides functions of establishing PLU data, downloading PLU to add new PLU. data to ECR. These functions faster the speed of user establishing data. 8.9.1 Import from Excel Select “Import from EXCEL”...
- Page 28 8.11 Report Select “Browse” to specify the storing directory. Then put in the file name and Notice: to make sure the data in PC is the same of which in ECR machine, users need save the data backup. to read data of department, PLU, selling data from ECR machine. Otherwise the reports might got mistakes.
Need help?
Do you have a question about the G-1000 and is the answer not in the manual?
Questions and answers
I need to reset the passwords on the system.
@Nina Oliver The password I enter says Invalid
what is the default login details the machine
There is no default password for the NTS G-1000 machine. You can press “Enter” directly at the login screen.
This answer is automatically generated
How do you set the shop name, address and contact details
To set the shop name, address, and contact details for the NTS G-1000, go to the “Report Settings” section. There, you can define the user’s name and address information to be printed on reports. Input the desired name and address in the provided fields.
This answer is automatically generated