Table of Contents
Advertisement
Ceiling Concealed Ducted Split Systems
53QDMT 12-18-24-30-36-42-48-60
Carrier is committed to continuously improving its products according to national and international standards
to ensure the highest quality and reliability standards, and to meet market regulations and requirements.
All specifications subject to change without prior notice according to Carrier policy of continuous development.
03502787
Medium Static Pressure
Slim Line
Heat Pump
O WNE R' S MANUAL
Quality
Enviromental
Management System
Management System
ISO 9001 : 2008
ISO 14001 : 2004
Certi cate No.: QS-5519HH
Certi cate No : 12 104 30334 TMS
220-240V ~ 50Hz 1Ph
380-420V ~ 50Hz 3Ph
Safety
Management System
BS OHSAS 18001 : 2007
Certi cate No : 12 116 30334 TMS
Rev. (0) - 2013
Advertisement
Table of Contents

Related Manuals for Carrier 53QDMT 12


Summary of Contents for Carrier 53QDMT 12
-
Page 1: Heat Pump
Carrier is committed to continuously improving its products according to national and international standards to ensure the highest quality and reliability standards, and to meet market regulations and requirements. All specifications subject to change without prior notice according to Carrier policy of continuous development. Quality... - Page 2 220-240V ~ 50Hz 1Ph 380-420V ~ 50Hz 3Ph Medium Static Pressure Slim Line Ceiling Concealed Ducted Split Systems 12K - 18K - 24K - 30K - 36K - 42K - 48K - 60K Efficient Tropical Hydrophilic Auto 3 Minutes Self diagnostic Min.
-
Page 3: Table Of Contents
Thank you for selecting Carrier Air Conditioner medium static pressure, ceiling concealed ducted split is the optimum air conditioning solution for places which require ceiling installation above false ceiling and minimum sound levels. Its slim profile and flexible installation make this system the best choice for residential and light commercial applications where the units are practically hidden from view. -
Page 4: General Information
1. GENERAL INFORMATION PRECAUTIONS Installing and servicing of air conditioning equipment can be hazardous due to system pressure and electrical components. Only trained and qualified service personnel should install or service this equipment. Untrained personnel can perform basic maintenance function such as cleaning coil and filters. -
Page 5: System Safety Protections
2. SYSTEM SAFETY PROTECTIONS The air conditioner is equipped with complete safety protections to ensure safe operation of air conditioner at different operating conditions : Auto Restart Feature with backup memory. When the power failure is happened during the air conditioner operation, the microprocessor of printed circuit board will memorize the operation settings. -
Page 6: Tips Of Energy Saving And Optimum Comfort Level
3. TIPS OF ENERGY SAVING AND OPTIMUM COMFORT LEVEL Adjust economical setting temperature for cooling mode in summer for energy saving and optimum comfort level. • Keep room temperature to comfort levels. • Don’t remain in direct contact with cold air for a long period. This is harmful to health. •... - Page 7 Periodic service and maintenance of the air conditioner or upon customer request through Carrier or Carrier authorized dealer to assure maximum cooling and heating efficiency. ( 4 )
-
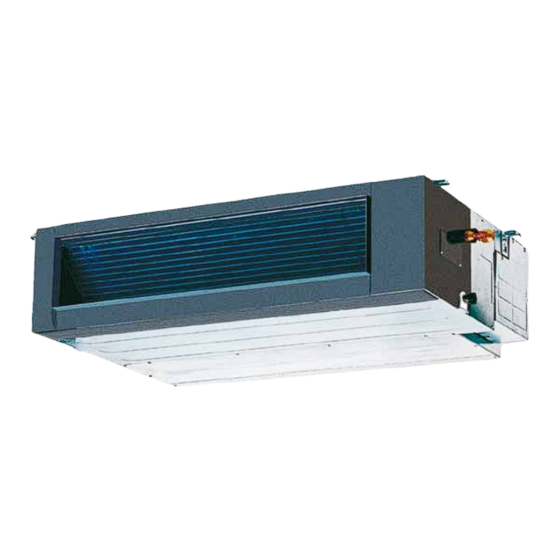
Page 8: Split System Description
4. SPLIT SYSTEM DESCRIPTION Indoor Unit Outdoor Unit 1: Air outlet 2: Air inlet 3: Air filter 4: Electric control cabinet 5: Drain hose 6: Inter-connecting refrigerant piping and electrical cables between indoor and outdoor units. 7: Wired control 8 : Wireless remote control ( 5 ) -
Page 9: Description Of Display Panel
5. DESCRIPTION OF DISPLAY PANEL The display panel id indoor unit contains the following function indicators : MANUAL Button * This button is used to operate the unit temporarily in case you misplace the remote control or its batteries are exhausted. * Once you push temporary button, the air conditioner will run in such order : Auto, Forced cool, off and back to Auto AUTO... -
Page 10: Use Of Wired Controller
6. USE OF WIRED CONTROLLER CLOCK ADJUSTING FUNCTION Initial Setting or the Clock When the power supply is connected to wired controller, Setting the clock (1) Press CLOCK button for 4 seconds, then the hour part on the clock display flashes every 0.5 second, then press Clock button again to adjust hours. - Page 11 USE OF WIRED CONTROLLER (Cont.) COOL MODE START Press MODE button to select mode on the wired controller display. Press TEMP buttons to select the set temperature on the wired controller display. Set desired temperature between 17°C and 30°C. Press FAN SPEED button to select the desired fan speed on the wired controller display.
- Page 12 USE OF WIRED CONTROLLER (Cont.) HEAT MODE START 1. Press MODE button to select mode on the wired controller display. 2. Press TEMP buttons to select the set temperature on the wired controller display. Set desired temperature between 17°C and 30°C. 3.
-
Page 13: Auto Mode
USE OF WIRED CONTROLLER (Cont.) AUTO MODE START 1. Press MODE button to select mode on the wired controller display. 2. Press TEMP buttons to select the set temperature on the wired controller display. Set desired temperature between 17°C to 30°C . 3. - Page 14 USE OF WIRED CONTROLLER (Cont.) DRY MODE START 1. Press MODE button to select mode on the wired controller display. 2. Press TEMP buttons to select the set temperature the wired controller display. Set desired temperature between 17°C to 30°C . 3.
-
Page 15: Fan Only Mode
USE OF WIRED CONTROLLER (Cont.) FAN ONLY MODE START 1. Press MODE button to select mode on the wired controller display. 2. Press FAN SPEED button to select the desired fan speed on the wired controller display. 3. Press ON/OFF button to start the air conditioner. - Page 16 ECO Function ECO function is useful when you go to sleep. Carrier air conditioner automatically controls the selected temperature and consequently controls the room temperature to avoid overcooling or overheating and to have comfortable and healthy sleep. ECO function with COOL Mode...
- Page 17 USE OF WIRED CONTROLLER (Cont.) TIMER ON FUNCTION ( Off → Start Operation ) TIMER ON function is useful when you want to start automatically the air conditioner at a desired setting time when you wake up in the morning or when you return home. Press TIMER ON button to set TIMER ON function, the wired controller displays the icons of HOUR and ON display on the timer setting area.
- Page 18 USE OF WIRED CONTROLLER (Cont.) TIMER OFF FUNCTION ( On → Stop Operation ) TIMER OFF function is useful when you want to stop automatically the air conditioner at a desired setting time after you go to bed. Press TIMER OFF button to set TIMER OFF function, the wired controller displays the icons of HOUR and OFF display on the timer setting area.
- Page 19 USE OF WIRED CONTROLLER (Cont.) COMBINED TIMER ON → TIMER OFF FUNCTION ( Off → Start Operation → Stop Operation ) You can use this setting to automatically start operation of the air conditioner before you wake up and automatically stop it after you leave the home. Press TIMER ON button to set TIMER ON function, the wired controller displays the icons of HOUR and ON display on the timer setting area.
- Page 20 USE OF WIRED CONTROLLER (Cont.) COMBINED TIMER OFF → TIMER ON FUNCTION ( On → Stop Operation → Start Operation ) You can use this setting to automatically stop the air conditioner after you go to sleep and start it automatically again in the morning when you wake up or you return home.
- Page 21 USE OF WIRED CONTROLLER (Cont.) COOL ONLY / COOL - HEAT Selection Function When you press the COOL / HEAT button, Use a small stick with a diameter of 1mm to push the button to switch modes. For COOLING ONLY type, it will be no heating mode when pressing MODE.
-
Page 22: Considerations For Remote Control
7. CONSIDERATIONS FOR REMOTE CONTROL 7-1 HOW TO INSERT BATTERIES : (a) Remove the cover of battery (c) Press the button (at the front of remote compartment at the back of the control) with an object not sharp to operate remote control by pressing the the remote control. -
Page 23: Use Of Remote Control
8. USE OF REMOTE CONTROL CLOCK ADJUSTING FUNCTION Initial Setting or the Clock When batteries are inserted in the remote control, the clock panel will display ‘’12:00’’ and being to flash. Setting the clock Before you start operating the air conditioner, set the clock of the remote control using the procedures given in this section. - Page 24 USE OF REMOTE CONTROL (Cont.) COOL MODE START 1. Press MODE button to select COOL mode on the remote control display. 2. Press TEMP buttons to select the set temperature on the remote control display. Set desired temp. between 17°C and 30°C. 3.
- Page 25 USE OF REMOTE CONTROL (Cont.) HEAT MODE START 1. Press MODE button to select HEAT mode on the remote control display. 2. Press TEMP buttons to select the set temperature on the remote control display. Set desired temp. between 17°C and 30°C. 3.
- Page 26 USE OF REMOTE CONTROL (Cont.) AUTO MODE START 4. Press MODE button to select AUTO mode on the remote control display. 5. Press TEMP buttons to select the set temperature on the remote control display. Set desired temp. between 17°C to 30°C . 6.
- Page 27 USE OF REMOTE CONTROL (Cont.) DRY MODE START 4. Press MODE button to select DRY mode on the remote control display. 5. Press TEMP buttons , to select the set temperature the remote control display. Set desired temp. between 17°C to 30°C . 6.
- Page 28 USE OF REMOTE CONTROL (Cont.) FAN ONLY MODE START 4. Press MODE button to select FAN mode on the remote control display. 5. Press FAN SPEED button to select the desired fan speed on the remote control display. 6. Press ON/OFF button to start the air conditioner.
- Page 29 SLEEP (ECO) Function SLEEP (ECO) function is useful when you go to sleep. Carrier air conditioner automatically controls the selected temperature and consequently controls the room temperature to avoid overcooling or overheating and to have comfortable and healthy sleep. SLEEP (ECO) function with COOL Mode...
- Page 30 USE OF REMOTE CONTROL (Cont.) TIMER ON FUNCTION ( Off → Start Operation ) TIMER ON function is useful when you want to start automatically the air conditioner at a desired setting time when you wake up in the morning or when you return home. Example: To automatically start the air conditioner at 6:00 in the morning Proceed with following steps :...
- Page 31 USE OF REMOTE CONTROL (Cont.) TIMER OFF FUNCTION ( On → Stop Operation ) TIMER OFF function is useful when you want to stop automatically the air conditioner at a desired setting time after you go to bed. Example : To automatically stop the air conditioner at 23:00 in the evening proceed with the following steps : (1) Press...
- Page 32 USE OF REMOTE CONTROL (Cont.) COMBINED TIMER ON → TIMER OFF FUNCTION ( Off → Start Operation → Stop Operation ) You can use this setting to automatically start operation of the air conditioner before you wake up and automatically stop it after you leave the home. Example: If you want to start operation of the air conditioner at 6:00 AM the next morning, and stop at 8:00 AM proceed as follows:...
- Page 33 USE OF REMOTE CONTROL (Cont.) COMBINED TIMER OFF → TIMER ON FUNCTION ( On → Stop Operation → Start Operation ) You can use this setting to automatically stop the air conditioner after you go to sleep and start it automatically again in the morning when you wake up or you return home.
- Page 34 USE OF REMOTE CONTROL (Cont.) RESET Function When you press the recessed RESET button, all current settings are cancelled and return to original factory settings. • The clock time “12:00” will flash • The mode displays “AUTO” • The fan speed displays “AUTO” •...
- Page 35 USE OF REMOTE CONTROL (Cont.) LOCK Function 5. Use LOCK function when you want to prevent settings from being changed accidentally. 6. When you press TEMP. ▲and ▼ buttons as the same time, all current settings are locked in and the remote control does not accept any operation except that of the LOCK.
-
Page 36: Air Filters Cleaning
9. AIR FILTERS CLEANING The air filters behind the front panel of the indoor unit should be checked and cleaned every month. Clogged air filters will reduce cooling and heating efficiency. WARNING: It is necessary to stop the air conditioner and disconnect the power supply before cleaning air filters. -
Page 37: Indoor Unit Cleaning
10. INDOOR UNIT CLEANING WARNING: It is necessary to stop the air conditioner and disconnect the power supply before cleaning. Cleaning the indoor unit and remote controller CAUTIONS: • When cleaning the unit, first make sure that the power and circuit breaker are turned off. -
Page 38: Periodical Checks
For a good operation of the air conditioner it is recommended to carry out periodic service and maintenance of the air conditioner or upon customer request through Carrier or Carrier authorized dealer. Recommended service and maintenance works and intervals may vary depending on the installation environment, e.g. -
Page 39: Considerations Before A Long Shutdown Period Of Air Conditioner
12. MAINTENANCE BEFORE A LONG STOP ( AT THE END THE SEASON ) Keep the indoor unit in operation for half a day in the ventilation (fan only) mode in order to dry all internal parts. Switch electric mains supply off. Clean indoor and outdoor units. -
Page 40: Operation Tips
13. OPERATION TIPS The following events may occur during normal operation of the air conditioner: 1. A slight white mist (water vapor)coming out from the indoor unit during cooling A white mist may generate due to a large temperature difference between air inlet and air outlet on COOL mode in an indoor environment that has a high relative humidity. -
Page 41: Trouble Shooting Tips
14. TROUBLE SHOOTING TROUBLE REASON ACTION After batteries have been placed Batteries are exhausted or have Replace batteries or check into the remote control, the the wrong polarity. polarity. display is not lit. When pressing the recessed Recessed button has not been Press with a round point, avoid clock adjustment button, hour pressed correctly. - Page 42 TROUBLE SHOOTING (Cont.) TROUBLE REASON ACTION Air conditioner will not start. Main supply switch is OFF Switch to ON Fuses or main switch are blown Replace fuses Protection against frequent Wait for 3 minutes. compressor cycling is ON Selected temperature is higher than Correct selected temperature.
- Page 43 Medium Static Pressure Ducted Split Air Conditioners Wireless Remote control Display Of Remote Control COOL AUTO HEAT SET TEMP. CLOCK TIMER OFF SPEED AUTO LOW MED HIGH Signal transmission indicator MODE indicator AUTO Automatic COOL Cooling and dehumidification Dehumidification only HEAT Heating MODE selection button...
- Page 44 Medium Static Pressure Ducted Split Air Conditioners WIRED ROOM CONTROLLER ON / OFF button DISPLAY MODE selection button Decrease temperature button Increase temperature button FAN SPEED selection button SWING function button ( This function does not work with ducted indoor unit but works with other indoor type ) ECO function button CLOCK function button TIMER ON function button...
Need help?
Do you have a question about the 53QDMT 12 and is the answer not in the manual?
Questions and answers