Bosch CCS180 Operating/Safety Instructions Manual
Hide thumbs
Also See for CCS180:
- Operating/safety instructions manual (57 pages) ,
- Operating/safety instructions manual (53 pages) ,
- Operating/safety instructions manual (53 pages)
Table of Contents
Advertisement
Available languages
Available languages
Quick Links
BM 2610034442 03-14_CCS180 3/27/14 12:25 PM Page 1
IMPORT NT:
Read Before Using
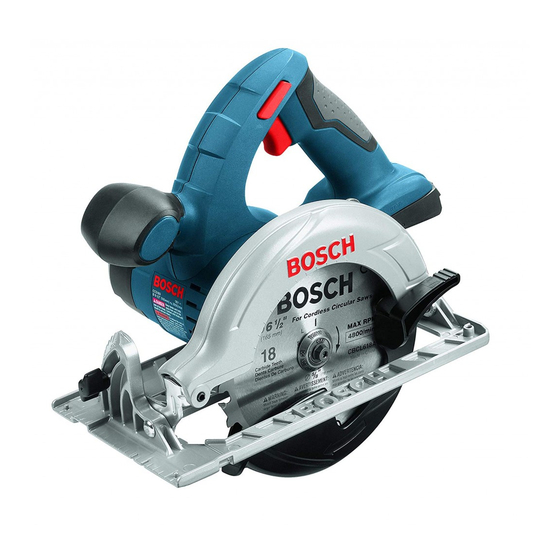
CCS180
Call Toll Free for
Consumer Information
& Service Locations
1-877-BOSCH99 (1-877-267-2499) www.boschtools.com
For English Version
See page 2
IMPORT NT :
Lire avant usage
Operating/Safety Instructions
Consignes de fonctionnement/sécurité
Instrucciones de funcionamiento y seguridad
Pour obtenir des informations
et les adresses de nos centres
de service après-vente,
appelez ce numéro gratuit
Version française
Voir page 15
IMPORT NTE:
Leer antes de usar
Llame gratis para
obtener información
para el consumidor y
ubicaciones de servicio
Versión en español
Ver la página 28
Advertisement
Table of Contents

Related Manuals for Bosch CCS180


Summary of Contents for Bosch CCS180
- Page 1 Read Before Using Lire avant usage Leer antes de usar Operating/Safety Instructions Consignes de fonctionnement/sécurité Instrucciones de funcionamiento y seguridad CCS180 Call Toll Free for Pour obtenir des informations Llame gratis para Consumer Information et les adresses de nos centres obtener información...
-
Page 2: General Power Tool Safety Warnings
BM 2610034442 03-14_CCS180 3/27/14 12:25 PM Page 2 General Power Tool Safety Warnings Read all safety warnings and all instructions. Failure to follow the warnings W RNING and instructions may result in electric shock, fire and/or serious injury. SAVE ALL WARNINGS AND INSTRUCTIONS FOR FUTURE REFERENCE The term “power tool”... - Page 3 BM 2610034442 03-14_CCS180 3/27/14 12:25 PM Page 3 Disconnect the plug from the power source Battery tool use and care and/or the battery pack from the power tool Recharge only with the charger specified before making any adjustments, changing by the manufacturer. A charger that is accessories, or storing power tools.
- Page 4 BM 2610034442 03-14_CCS180 3/27/14 12:25 PM Page 4 This product is intended to cut wood and When blade is binding, or when interrupting wood-like products only. Dust build up a cut for any reason, release the trigger and around the lower guard and hub from other hold the saw motionless in the material materials (plastic, masonry or metal) may until the blade comes to a complete stop.
- Page 5 BM 2610034442 03-14_CCS180 3/27/14 12:25 PM Page 5 Never place your hand behind the saw Lower guard should be retracted manually blade. Kickback could cause the saw to jump only for special cuts such as “Plunge Cuts” backwards over your hand. and “Compound Cuts”.
- Page 6 BM 2610034442 03-14_CCS180 3/27/14 12:25 PM Page 6 Symbols IMPORTANT: Some of the following symbols may be used on your tool. Please study them and learn their meaning. Proper interpretation of these symbols will allow you to operate the tool better and safer. Symbol Name Designation/Explanation...
- Page 7 BM 2610034442 03-14_CCS180 3/27/14 12:25 PM Page 7 Symbols (continued) IMPORTANT: Some of the following symbols may be used on your tool. Please study them and learn their meaning. Proper interpretation of these symbols will allow you to operate the tool better and safer.
- Page 8 Cordless Circular Saws. For replacement blades we recommend Bosch Cordless Circular saw blades. Their thin kerf and tooth design deliver the best speed, quality of cut, and reduce battery drain. Use of standard blades will substantially affect the performance and reduce run-time.
- Page 9 BM 2610034442 03-14_CCS180 3/27/14 12:25 PM Page 9 Assembly ATTACHING THE BLADE guard has marks around it that will help you Disconnect battery pack properly adjust the blade stud. Press lock W RNING from tool before making button to lock shaft and TIGHTEN BLADE any assembly, adjustments or changing STUD COUNTER-CLOCKWISE...
-
Page 10: Operating Instructions
BM 2610034442 03-14_CCS180 3/27/14 12:25 PM Page 10 Operating Instructions DEPTH ADjUSTMENT Disconnect battery pack from tool. Loosen the Tighten lever at the depth setting desired. depth adjustment lever located on the right Check desired depth (Fig. 3). side of the tool. Hold the foot down with one Not more than one tooth length of the blade hand and raise or lower saw by the handle. - Page 11 BM 2610034442 03-14_CCS180 3/27/14 12:25 PM Page 11 BEVEL ADjUSTMENT FIG. 8 Disconnect battery pack from tool. The foot BEVEL can be adjusted up to 50° by loosening the DJUSTMENT bevel adjustment knob at the front of the saw. KNOB Align to desired angle on calibrated quadrant.
- Page 12 BM 2610034442 03-14_CCS180 3/27/14 12:25 PM Page 12 CUTTING MASONRy/METAL materials or environments. Abrasive cutting This tool is not recommended for usage with may produce sparks that could ignite metal or masonry cut-off wheels. flammable materials and cause explosion hazards. Do not cut metal or W RNING masonry with this circular...
- Page 13 BM 2610034442 03-14_CCS180 3/27/14 12:25 PM Page 13 RIP CUTS RIP BOARD GUIDE The combination blade provided with your saw When rip cutting large sheets, the rip fence is for both cross cuts and rip cuts. Ripping is may not allow the desired width of cut. Clamp cutting lengthwise with the grain of the wood.
- Page 14 Do damage the charger. not attempt to clean by inserting pointed objects through opening. TOOL LUBRICATION Your Bosch tool has been properly lubricated Certain cleaning agents C UTION and is ready for use. solvents damage plastic parts.
- Page 15 BM 2610034442 03-14_CCS180 3/27/14 12:25 PM Page 15 vertissements généraux concernant la sécurité des outils électroportatifs Veuillez lire tous les avertissements et toutes les consignes de sécurité. Si l'on VERTISSEMENT n'observe pas ces avertissements et ces consignes de sécurité, il existe un risque de choc électrique, d'incendie et/ou de blessures corporelles graves.
- Page 16 BM 2610034442 03-14_CCS180 3/27/14 12:25 PM Page 16 électroportatifs instructions, en tenant compte des conditions de travail et des travaux à réaliser. L'emploi d’outils Ne forcez pas sur l’outil électroportatif. Utilisez l’outil électroportatifs pour des tâches différentes de celles électroportatif qui convient à la tâche à effectuer. pour lesquelles ils ont été...
- Page 17 BM 2610034442 03-14_CCS180 3/27/14 12:25 PM Page 17 Utilisez toujours des lames avec trous d'arbre de la Maintenez une prise ferme avec les deux mains sur la dimension et de la forme appropriées (en diamant scie et positionnez vos bras de manière à résister aux par rapport à...
- Page 18 BM 2610034442 03-14_CCS180 3/27/14 12:25 PM Page 18 fonctionner paresseusement en raison de pièces abîmées, de dépôts gommeux ou d'une accumulation de débris. Le garde inférieur doit être rétracté manuellement uniquement pour des coupes spéciales telles que les « coupes en guichet » et les « coupes combinées ». Levez le garde inférieur à...
- Page 19 BM 2610034442 03-14_CCS180 3/27/14 12:25 PM Page 19 Symboles IMPORT NT : Certains des symboles suivants peuvent être utilisés sur votre outil. Veuillez les étudier et apprendre leur signification. Une interprétation appropriée de ces symboles vous permettra d'utiliser l'outil de façon plus efficace et plus sûre.
- Page 20 BM 2610034442 03-14_CCS180 3/27/14 12:25 PM Page 20 Symboles (suite) IMPORT NT : Certains des symboles suivants peuvent être utilisés sur votre outil. Veuillez les étudier et apprendre leur signification. Une interprétation appropriée de ces symboles vous permettra d'utiliser l'outil de façon plus efficace et plus sûre.
- Page 21 étroite conçues pour les scies circulaires sans fil. En rechange, nous vous conseillons d’utiliser les lames pour scies circulaires sans fil Bosch. Leur voie étroite et la conception de leurs dents permettent d’obtenir de meilleures vitesse et qualité de sciage tout en réduisant l’usure de la pile.
- Page 22 BM 2610034442 03-14_CCS180 3/27/14 12:25 PM Page 22 ssemblage MONT GE DE L L ME 5. Réinstallez la RONDELLE EXTÉRIEURE et serrez le Débranchez le bloc-piles GOUJON DE L ME à la main. La face de la garde VERTISSEMENT de l'outil avant d'effectuer supérieure de lame comporte des graduations sur son tout assemblage ou réglage, ou de changer des pourtour qui vous aideront à...
- Page 23 BM 2610034442 03-14_CCS180 3/27/14 12:25 PM Page 23 Consignes de fonctionnement REGL GE DE L PROFONDEUR DE COUPE Débranchez le bloc-piles de l'outil. Desserrez le levier Pour réduire le risque d’écaillage des bords de la pièce de réglage de profondeur situé à la droite de l’outil. à...
- Page 24 BM 2610034442 03-14_CCS180 3/27/14 12:25 PM Page 24 REGL GE DE L COUPE EN BISE U FIG. 8 Débranchez le bloc-piles de l'outil. L’angle formé par BOUTON DE la lame par rapport à la semelle peut être réglé jusqu’à REGL GE DU 50°...
- Page 25 BM 2610034442 03-14_CCS180 3/27/14 12:25 PM Page 25 SCI GE DES M TÉRI UX DE proximité d'environnements ou de matériaux M ÇONNERIE ET DES MÉT UX inflammables. Le sciage avec des instruments abrasifs Il n'est pas recommandé d'utiliser cet outil avec des risquerait de produire des étincelles qui pourraient meules de tronçonnage pour couper des métaux ou des mettre feu à...
- Page 26 BM 2610034442 03-14_CCS180 3/27/14 12:25 PM Page 26 COUPES DE REFENTE UTILIS TION D’UNE PL NCHE La lame universelle fournie avec la scie convient tant COMME GUIDE DE REFENTE pour les coupes en travers que pour les coupes de Si vous devez exécuter une coupe de refente sur de refente.
- Page 27 être remplacés im mé diatement Nous recommandons de confier toute intervention pour éviter la surchauffe et les défaillances du moteur. d’entretien sur l’outil à un centre de service-usine Bosch Nettoyage ou à un centre de service après-vente Bosch agréé.
- Page 28 BM 2610034442 03-14_CCS180 3/27/14 12:25 PM Page 28 dvertencias generales de seguridad para herramientas mecánicas Lea todas las advertencias de seguridad y todas las instrucciones. Si no se siguen las DVERTENCI advertencias e instrucciones, el resultado podría ser sacudidas eléctricas, incendio y/o lesiones graves. GU RDE TOD S L S DVERTENCI S E INSTRUCCIONES P R REFERENCI FUTUR La expresión “herramienta mecánica”...
- Page 29 BM 2610034442 03-14_CCS180 3/27/14 12:25 PM Page 29 el trabajo mejor y con más seguridad a la capacidad herramienta mecánica para operaciones distintas a nominal para la que fue diseñada. aquéllas para las que fue diseñada podría causar una situación peligrosa. No use la herramienta mecánica si el interruptor no la enciende y apaga.
- Page 30 BM 2610034442 03-14_CCS180 3/27/14 12:25 PM Page 30 Utilice siempre hojas con agujeros de eje Mantenga un agarre firme de la sierra con las dos portaherramienta de tamaño y forma correctos manos y sitúe los brazos para resistir las fuerzas de (diamante frente a redondo).
- Page 31 BM 2610034442 03-14_CCS180 3/27/14 12:25 PM Page 31 presencia de depósitos gomosos o una acumulación de residuos. El protector inferior se debe retraer manualmente sólo para hacer cortes especiales, tales como "cortes por penetración" y "cortes compuestos". Suba el protector inferior usando la palanca de elevación del protector inferior.
- Page 32 BM 2610034442 03-14_CCS180 3/27/14 12:25 PM Page 32 Símbolos IMPORT NTE: Es posible que algunos de los símbolos siguientes se usen en su herramienta. Por favor, estúdielos y aprenda su significado. La interpretación adecuada de estos símbolos le permitirá utilizar la herramienta mejor y con más seguridad.
- Page 33 BM 2610034442 03-14_CCS180 3/27/14 12:25 PM Page 33 Símbolos (continuación) IMPORT NTE: Es posible que algunos de los símbolos siguientes se usen en su herramienta. Por favor, estúdielos y aprenda su significado. La interpretación adecuada de estos símbolos le permitirá utilizar la herramienta mejor y con más seguridad.
- Page 34 Para hojas de repuesto, recomendamos las hojas para sierras circulares sin cordón Bosch. Su separación de corte estrecha y diseño de dientes brindan la mejor velocidad y calidad de corte, y reducen el desgaste de las baterías. El uso de hojas estándar afectará...
- Page 35 BM 2610034442 03-14_CCS180 3/27/14 12:25 PM Page 35 Ensamblaje COLOC CION DE L HOJ PERNO DE L HOJ con los dedos. La cara del protector Desconecte el paquete de superior de la hoja tiene marcas a su alrededor que le DVERTENCI batería de la herramienta antes ayudarán a usted a ajustar adecuadamente el perno de la...
-
Page 36: Table Of Contents
BM 2610034442 03-14_CCS180 3/27/14 12:25 PM Page 36 Instrucciones de funcionamiento JUSTE DE PROFUNDID D Desconecte el paquete de baterías de la herramienta. Para un astillado mínimo la longitud que debe sobresalir floje el palanca de ajuste de profundidad ubicado en el por debajo del material que se va a cortar no debe ser de lado derecho de la herramienta. -
Page 37: Desconecte El Paquete De Baterías De La Herramienta
BM 2610034442 03-14_CCS180 3/27/14 12:25 PM Page 37 JUSTE DE INCLIN CION FIG. 8 Desconecte el paquete de baterías de la herramienta. POMO DE La base se puede ajustar hasta 50˚ aflojando el pomo de JUSTE DE ajuste de inclinación en la parte delantera de la sierra. INCLIN CION linee hasta alcanzar el ángulo deseado en el cuadrante calibrado. -
Page 38: P L Nc De
BM 2610034442 03-14_CCS180 3/27/14 12:25 PM Page 38 CORTE DE M MPOSTERÍ Y MET L o entornos inflamables. El corte abrasivo puede Esta herramienta no se recomienda para utilizarse con producir chispas que podrían incendiar los materiales ruedas de corte para metal o mampostería. inflamables y causar peligros de explosión. -
Page 39: Fig. 13
BM 2610034442 03-14_CCS180 3/27/14 12:25 PM Page 39 CORTES L HILO T BLERO-GUI P R CORT R L HILO La hoja combinada suministrada con la sierra sirve tanto Cuando se cortan al hilo planchas grandes, puede que el para cortes transversales como para cortes al hilo. El tope-guía para cortar al hilo no permita el ancho de corte corte al hilo consiste en cortar a lo largo siguiendo la veta deseado. - Page 40 Centro de servicio de fábrica Bosch o en una Estación Limpieza de servicio Bosch autorizada. TECNICOS DE...
- Page 41 BM 2610034442 03-14_CCS180 3/27/14 12:25 PM Page 41 Notes: -41-...
- Page 42 BM 2610034442 03-14_CCS180 3/27/14 12:25 PM Page 42 Remarques : -42-...
- Page 43 BM 2610034442 03-14_CCS180 3/27/14 12:25 PM Page 43 Notas: -43-...
- Page 44 Robert Bosch Tool Corporation ("el Vendedor") garantiza, únicamente al comprador original, que todas las herramientas mecánicas portátiles y para tablero de banco BOSCH estarán libres de defectos de material o de fabricación durante un período de un año a partir de la fecha de compra.
Need help?
Do you have a question about the CCS180 and is the answer not in the manual?
Questions and answers