Table of Contents
Advertisement
Quick Links
Advertisement
Table of Contents

Related Manuals for Dahua G4-HDE Series


Summary of Contents for Dahua G4-HDE Series
- Page 1 G4-HDE Series DVR Quick Start Guide...
-
Page 2: Table Of Contents
Table of Contents Welcome........................2 Important Safeguards and Warnings ..............2 1.1.1 Electrical safety..................2 1.1.2 Shipping instructions ................2 1.1.3 Installation ....................2 1.1.4 DVR Repairs .................... 2 1.1.5 Environment ..................... 2 1.1.6 Accessories....................2 Hardware Installation....................3 Inspect the DVR Packaging and Check Contents ........... 3 HDD Installation .................... -
Page 3: Welcome
1 Welcome Thank you for purchasing the G4-HDE series DVR! This quick start guide will help you to become familiar with our DVR in a very short time. Topics include hardware installation, cable connections, web operations and general operation information such as system setup, record, search, backup, alarm setup and PTZ operation. -
Page 4: Hardware Installation
If your DVR was ordered with a hard disk drive (HDD) preinstalled, please skip this step. The G4-HDE series DVR may contain only one SATA HDD. If installing or upgrading, please use a HDD of 7200rpm or higher. Please refer to the User’s Manual for recommended HDD brands and models. -
Page 5: Front Panel
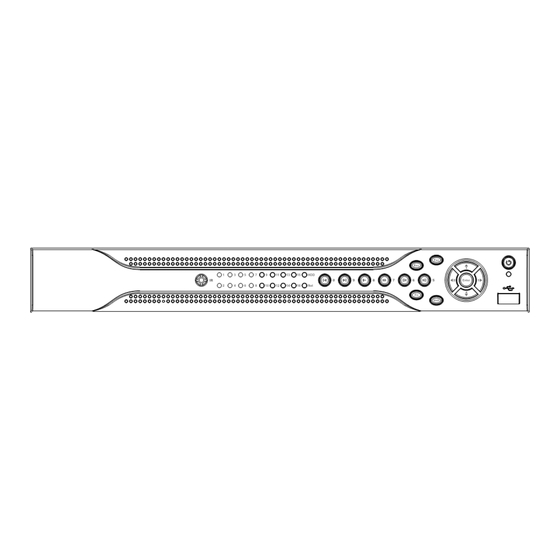
2.3 Front Panel The front panel is shown as in Figure 1-1. Figure 2-1 Please refer to the following table for front panel information. Name Icon Function Press and hold for three to five seconds to boot up or shut Power button down DVR. -
Page 6: Rear Panel
In motion detection setup, work with Fn and direction keys to realize setup In text mode, click to switch between numeric, upper case, lower case and special characters In playback mode, cycle through playback speeds Fast forward In text mode, input number 7 In playback mode, skip to previous file Play previous In text mode, input number 0... - Page 7 The 8-ch rear panel is shown as below. See Figure 2-3. Figure 2-3 The 16-ch real panel is shown as below. See Figure 2-4. Figure 2-4 Please refer to the following table for detail information. Analog video input Audio input Composite (BNC) video output Audio output Ethernet port...
-
Page 8: Connection Samples
Connection Samples Please refer to Figure 2-5 for connection samples. Figure 2-5 2.5 Alarm Input and Output Connection There are two alarm input types for you to select: normal open (NO) and normal close (NC). 2.5.1 Alarm Input and Output Details RS-485 A(+) B(-) Connection port Figure 2-6... -
Page 9: Alarm Input Port
Refer to the following table and Figure 2-7 for alarm input and output information. Parameter Grounding Alarm Ground line Alarm Input 1, 2, …, 8. It becomes valid in low voltage. 1 - NO C 2 - NO C Three NO (Normally Open) outputs. 3 - NO C Relay Output 1,2,3,4: NO and C (Normally Open and Com) -
Page 10: Overview Of Navigation And Controls
3 Overview of Navigation and Controls Before operation, please make sure you have properly installed the HDDs and all cable connections. 3.1 Login, Logout & Main Menu 3.1.1 Login After the DVR has booted up, the default video display is in multiple-window mode. Press Enter or left click the mouse to bring up the login interface. -
Page 11: Logout
Figure 3-2 3.1.3 Logout There are two ways for you to log out. The first one is from the Shutdown menu option. In the main menu, click the shutdown icon. The Shutdown interface will be shown as below. See Figure 3-3. Figure 3-3 There are several options to choose from. -
Page 12: Recording Operation
3.2 Recording Operation 3.2.1 Live Viewing After powering the DVR on, the system will be in live viewing mode by default. The system date, time and channel names will be displayed by default. If you want to change system date and time, you can refer to general settings (Main Menu ->... -
Page 13: Manual Record Menu
Valid values are from 1 to 30 seconds depending on the bit stream. The default value is 4. Redundancy: This option is unsupported on the G4-HDE series DVR. Snapshot: This option is unsupported on the G4-HDE series DVR. -
Page 14: Encode
Bit Rate Type: The G4-HDE series DVR supports two bit-rate types: CBR and VBR. CBR stands for Constant Bit Rate which means the DVR will always use this bit rate without regard to the video image. -
Page 15: Snapshot
Snapshot: The Snapshot menu contains four items: Mode, Image Size, Image Quality and Snapshot Frequency. Please refer to section 3.3.4 for more information. Figure 3-7 3.3.4 Snapshot Snapshots are only used in conjunction with the FTP or Email functions and are not stored on the DVR. -
Page 16: Snapshot Image Storage
See Figure 3-11. There are three file types to search for: Formatted: Bullets and Numbering * R: regular (continuous) recording file * A: external alarm triggered recording file. * M: motion detection triggered recording file The G4-HDE series DVR supports up to 4 concurrent playback windows. -
Page 17: Basic Operation
Figure 3-11 Please refer to the following table for more information. Number Function Play Reverse Stop Slow play Fast play Previous frame Next frame Volume Previous file Next channel Next file Previous channel Search Backup 3.3.7 Basic Operation There are multiple search parameters: video type, channel number and time. The DVR can display a maximum of 128 results for one search. - Page 18 3.3.7.2 Playback Starting from Exact Time To begin playback from an exact time, Input the time (h/m/s) in the search parameters column and then click the play button. 3.3.7.3 Synchronized playback function when playback During the playback process click on one of the numeral keys above the search results list, the system will switch to the corresponding channel video of the same time.
-
Page 19: Network Setup
Manual playback Click pause button in normal playback mode, playback. frame by frame. you can use │ and │ to view frame by frame. Note: All of the operations here such as playback speed, channel, time and progress are related to the DVR hardware version. Some series DVRs do not support some all listed functions or playback speeds. -
Page 20: Pan/Tilt/Zoom
3.5 Pan/Tilt/Zoom Please note the following regarding pan/tilt/zoom (PTZ) setup and operation: Slight differences may be found in the user interface, due to various protocols. RS-485 cables must be connected to the “A” (positive) and “B” (negative) ports of the alarm block in order to have PTZ control. - Page 21 Figure 3-14 Click Pan/Tilt/Zoom, the interface is shown as below. See Figure 3-15. Here you can set the following items: Speed: value ranges from 1 to 8. Zoom Focus Iris Click the icons to adjust zoom, focus and iris. Figure 3-15 In Figure 3-15, click the directional arrows (See 3-16 Figure...
- Page 22 You can click the Set button in Figure 3-15 (or click REC button in the front panel) to set preset, tour, and pattern for the PTZ. You can click the Page Switch button in Figure 3-15 (or click Fn button in the front panel) to change PTZ function interfaces.
-
Page 23: Web Client Operation
4 Web Client Operation Slight difference may be found in the interface due to different model DVRs or different • firmware versions. 4.1 Network Connection Before attempting to connect to the DVR with the web client, check the following items: The DVR and PC are connected to the network and can see traffic. -
Page 24: Main Window
Figure 4-1 4.3 Main Window After logging in, you should see the main window. See Figure 4-2. If the four video windows are not displayed in the center of the screen and you are using Internet Explorer 8, you need to view the page using Compatibility View (Tools ->...
Need help?
Do you have a question about the G4-HDE Series and is the answer not in the manual?
Questions and answers